Keeway
Focus factory error???

I
do not know if this is a type fault, but it was annoying a bit of
a bug in the carburettor.
The trouble was that he did not want
to start the engine cold (50cm3 focus).
I took it to the repair
shop and replaced the automatic choke, but the error was later
reset
It occurred. approx. I had to squeeze the carburettor 5x
to find out the cause of the problem.
The automatic choke did
not reach gasoline (a small fuel was injected into the
engine).
Under the automatic choke there is a long brass tube
through which the vacuum absorbs gasoline,
And on top of it
there are 4 small (visibly visible) boreholes that breathe air
through (see below).
In this case it is too much, so you can
not take the gas from the hole next to the float !!!
It's
ridiculously simple to fix the problem: one or two of the 4 holes
(preferably from the bottom) must be soldered
(Soldering tin
used in plain electronics), so the suction power increases and the
fuel is enough to fuel
(When the automatic chopper is closed,
there is no running fuel, so it is not a tragedy if we have sold
more holes than we needed).
Anyone who is struggling with
similar problems will also look into this possibility.
-Excellent
now is a very reliable engine :).
-To disassemble, only a 10-piece dog knob and a star screwdriver are
required.
With the socket wrench, the seat and luggage bracket bolts (4pcs) can
be worn out, the star sprocket must be attached to the carburettor.
First we have access to the gas bowden (2 screws fix the cover), then
the automatic choke 2 bolts follow,
3 tires go to the carburettor:
The upper spring, outside the fuel pipe, is a little downstream of
the vacuum tube (it opens the diaphragm valve under the gasoline
tank),
And the thin pipe facing the direction of travel is carrying the oil
(it fits on the copper tube shown above).
These tubes are held by hand compressible spring clamps.
Then loosen the air filter spring clip to descend from the rubber rim
and then on the rubber suction side facing the engine
Loosen the star screw on the metal clamp. So we can remove the
carburettor.
Only remove the float housing from the bottom of the carburetor by
loosening the 4 sprockets (preferably vertically, to avoid leakage
Gasoline in it).
If we twist
the starbars:
The 4s long is
for the floating house,
2 medium for
the gas-bowden section,
2 short in the
automatic choke.
The
automatic choke operation is short:
- It has a
disc-shaped resistance (this acts as a heating) that warms a liquid
in a copper tank (tube)
Which is
usually waxy or alcoholic, it removes a rubber membrane that pulls a
metal stump against a spring, this is with the brass needle valve
with a rubber flange seal.
When the
liquid warms up, it expands and moves the valve to close the choke
vacuum pipe (the brass pipe below the picture).
The voltage is
received from a coil from the side of the generator, which outputs
the power proportional to the rotation of the motor,
So at higher
speeds the heating resistor will heat up faster and the automatic
choke will be locked faster.
-
Consequently, it does not use the motor temperature to activate the
choke, but also the temperature of the resistor and the thermal
switch.
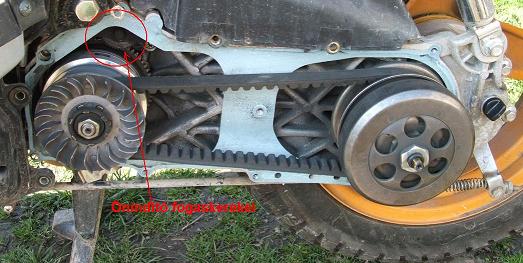
An image of
the carburetor:

Other
minor errors:
The
gears of the starter and the kicker arm dry over each other. Over
time, the rubber drive from the drive belt is embedded between the
teeth and
It's
harder to go with the startup, the kicker's arm blend, and I got
ripped and did not go out ...
To
prevent these problems, it is advisable to use the graphite machine
grease (such as grease that melts at high temperatures) to the gears
and the moving parts of the kicker.
So do
not overdo the lubrication so that a grease can not get loose and
possibly get caught on the belt (I think it will be fat gum rather
than rubber greasy ...).
-There
are some pictures to help:
The
starter gears are: (it is worth insisting that the starter will not
kill the battery with 20-30 AMs, only 5-15!)
Parts
of the starter arm:

Apart
from these small mistakes, only one thing was disturbed: the plastic
casing was jerked at idle.
After
a long search, I realized that the right side hydraulic brake arm oil
side came to the plastic casing at the cutout.
This
can be eliminated with a self-adhesive sponge, rubber or any elastic
material (this is not a very disturbing noise but I resonated at
idle).
-2007.05.18.
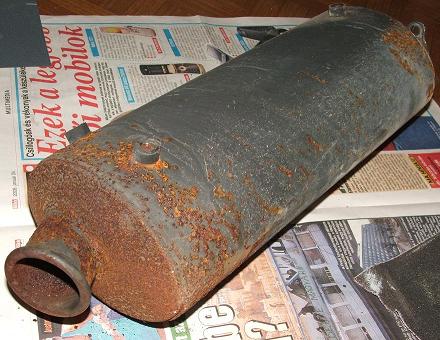
Repair
Rust Exhaust:
Again
here is the spring and the yearly maintenance time. Now only the
exhaust was to be sanded and repainted because it started to eat
rust.
Anyway,
it is worth checking the whole vehicle every 2-3 years, because it is
still easy to repair the rusty spots that begin!
The
battery was discharged and charged in winter, so it went unharmed.
So he looked like an
under star garage and regular rainfall:
After grinding and
painting:
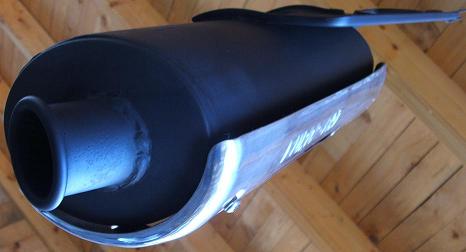
After replacing and
replacing the gear, he really dumped the look of the scooter :)

Paint spray is a heat
resistant stove painted up to 700C, which burns on the surface when
used for the first time (no moisture can occur).
The producers made a
repugnant mistake when the chrome-plated outer cover was not picked
up by a stainless steel screwdriver ...
Repair
Rust Exhaust:
One more frustrating
mistake should be mentioned:
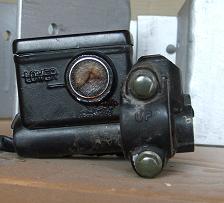
The
oil spout of the brake lever is preferable to the brake fluid.
Unfortunately, this needs to be
replaced, perhaps the more skilled ones can make a more durable
window from glass.
2008.04.02
Since then, I have sold the scooter,
but I leave this article on my side because it can come in handy for
others :).
<<
Back <<