|
|
Table of Contents |
|
Hack 1 Fake Per-Pixel Transitions
Simulate pixel-based fades and wipes, as supported in Macromedia Director. Flash doesn't have built-in support for pixel-based transitions. This hack can be used with other video-friendly hacks [Hack #8] to make your static bitmaps more interesting [Hack #3]. Flash uses a vector-based rendering engine, which doesn't allow direct access to the individual screen pixels. This hack depends on the fact that pixels are small, and when you make something small, it looks like anything else that is small. The per-pixel transition effect is shown in Figure 1-1. Figure 1-1. Simulated per-pixel transition, steps 1 through 4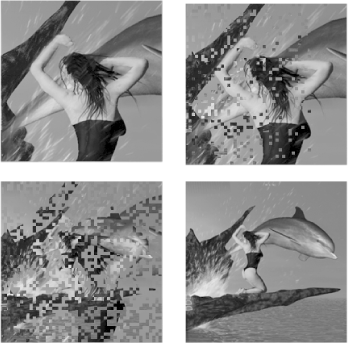 The transition hides (masks) pixels in the first image over time so that the image disappears a few pixels at a time. Masking off the first image reveals a second image that is positioned below it, thus creating the transition effect from the first image to the second image. The masks used to create the preceding effect are shown in Figure 1-2. Note that for black pixels, the mask effect shows the first (topmost) image; for white pixels (no mask), it shows the second (bottom) image. Figure 1-2. Masks for simulated per-pixel transition, steps 1 through 4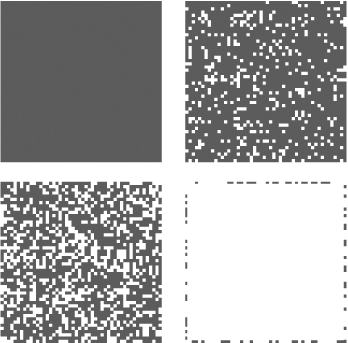 As we shall see, we can make much more complex transitions with little change. This hack requires three steps:
The problem here is that we will have thousands of fake pixels, and we can't use anything as processor-extravagant as thousands of onEnterFrame( ) scripts running every frame for the duration of the effect. Instead, we will use setInterval( ), which reduces our processing overhead significantly by running code only once per fake pixel for the duration of the effect. Make the PixelsMaking a pixel mask is as simple as creating a rectangle:
Figure 1-4. The Symbol Properties dialog box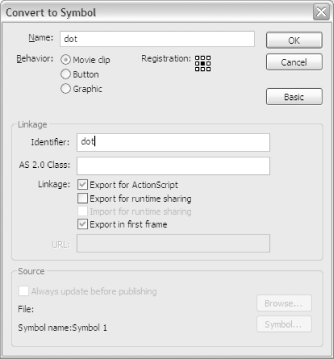 You can delete the movie clip instance from the Stage, since we will
use the MovieClip.attachMovie(
) method to dynamically attach the Library
symbol to the main timeline at runtime. If you want to avoid creating
and then deleting the movie clip from the Stage, you can use
Insert The effect uses a large mask consisting of these 4x4 squares. The mask is applied to the first image, and the effect works by masking additional rectangles over time, causing the second image (which is below the first) to show through the gaps. Make Lots of PixelsOn the main timeline, add a new layer and name it actions [Hack #80] . In the actions layer of the main timeline, select frame 1 and attach the following script using the Actions panel (F9): function drawGrid (theWidth:Number, theHeight:Number):Void {
var initDot:Object = new Object( );
var k:Number = 0;
for (var i:Number = 0; i < theWidth; i += 4) {
for (var j:Number = 0; j < theHeight; j += 4) {
var dotName:String = "dot" + i + "_" + j;
initDot._x = i;
initDot._y = j;
this.attachMovie("dot", dotName, k, initDot);
k++;
}
}
}
drawGrid(200, 200);The preceding code creates a 200x200-pixel square consisting of our 4
4 movie clips (you can invoke the drawGrid( )
function with different dimensions to create a grid of a different
size). Each pixel is placed at position (i,
j) and depth k on the Stage and
has instance name
doti_j.
The first instance name (situated at the top left of the square) is
dot0_0 and the last one is
dot199_199 (bottom right). You can see the movie
clips created if you run the code in Debug Movie mode
(Control
Control the PixelsThe trick now is to make the dots disappear on demand. The way to do this is via setInterval(object, "method", timer), which invokes the function object.method( ) every timer milliseconds. Add the following code after initDot._y = j; in the preceding script: initDot.timer = 1000 + Math.ceil(Math.random( )*800); The preceding line creates a property, timer, which stores an integer between 1000 and 1800 for each dot clip. The 1000 specifies the pause before the effect starts, and the 800 is the duration of the effect. Both values are in milliseconds, the standard measure of time in ActionScript. This hack is based on a mask effect, but Flash allows only one mask per movie clip. The easy way around this limitation is to create all our dot movie clips inside another one that acts as the mask. We also pass in the name of the clip to be masked as a parameter to the drawGrid( ) function (changes are shown in bold): function drawGrid(theWidth:Number, theHeight:Number,
imageClip:MovieClip):Void {
var initDot = new Object( );
var k:Number = 0;
// Create a mask clip to hold all the dots
this.createEmptyMovieClip("mask", 1);
// Assign it as the masking clip
imageClip.setMask(mask);
for (var i:Number = 0; i < theWidth; i += 4) {
for (var j:Number = 0; j < theHeight; j += 4) {
var dotName:String = "dot" + i + "_" + j;
initDot._x = i;
initDot._y = j;
initDot.timer = 1000 + Math.ceil(Math.random( )*800);
// Place the masking dots within the container mask clip
mask.attachMovie("dot", dotName, k, initDot);
k++;
}
}
}
drawGrid(200, 200, image1_mc);So now we have all our dot clips inside another movie clip named mask, which we use as the mask for a movie clip whose name is passed in as a parameter to the drawGrid( ) function. In this case, we use a clip named image1_mc, which we create later in Section 1.2.5. First though, let's finish off the dot movie clips. Create the TimersWe already have a timer property for each dot movie clip. Now let's write the code to make our dots disappear. Edit the dot movie clip symbol and add a new layer named actions (the first layer of a timeline is traditionally named scripts or actions and used exclusively to hold your timeline-based scripts). In the first frame of the actions layer, add the following code: removeMe = function ( ) {
clearInterval(countDown);
this.removeMovieClip( );
};
var countDown = setInterval(this, "removeMe", timer);The last line of the preceding code uses setInterval( ) to create a timer named countdown for each dot. It calls the removeMe( ) function when the timer expires. The removeMe( ) function clears the interval and then removes the current dot clip, which creates our "disappearing pixels" transition effect.
Using the EffectTo use the effect, you need to have the two things you want to transition between on two separate layers, with the first image or video clip on the top layer, as shown in Figure 1-5. You should give the first clip the instance name image1_mc using the Properties panel. The second image can be called anything since it is never referred to in the code. Figure 1-5. Setting up a transition between two layers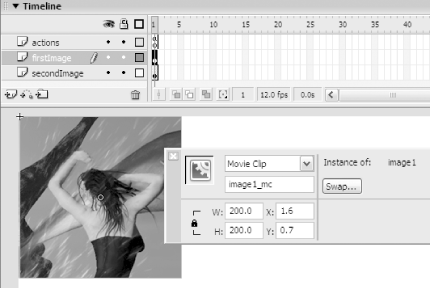 You can see the effect in action by downloading pixelMask.fla from this book's web site. Extend the EffectBy changing the time interval before each dot disappears, you can create different transition effects. For example, changing the timer values based on the position of the dots serves as the basis for many common pixel-based transitions: // Left-to-right wipe initDot.timer = 1000 + (Math.random( )*(initDot._x)*10); // Diagonal wipe initDot.timer = 1000 + (Math.random( )*(initDot._x + initDot._y)*5); Final ThoughtsMasking is a very underutilized feature of Flash. It's one of those features that seems to have no real use until you delve deeper. No surprise then that many of the coolest effects [Hack #21] seem to use it extensively! |
|
|
Table of Contents |
|
 New
New
