|
|
Table of Contents |
|
Hack 23 Add a Vector Edge to a Bitmap
When you need a graphic that contains textures and a sharp edge, you are stuck. A vector shape will give you the sharp edge but is not able to show complex textures. A bitmap can show complex textures but will have no sharp edge. Create the best of both vectors and bitmaps in Flash-a bitmap with a vector edge. For some images (particularly logos or other graphics that contain text or a "spiky" edge rather than the smoothly curving butterfly wing), the feathering technique [Hack #22] loses the sharp edges of the original. In such cases, we can do the opposite-create a sharp vector edge. In this hack, we hide the jaggies by covering them with a vector stroke or by masking them out with a vector mask. We perform the bitmap manipulation in Photoshop, but you can achieve similar results in other programs, including Fireworks. Select the image created in the preceding hack [Hack #22] and export it as a PNG using
File Figure 3-40. The black silhouette (left) of the original butterfly image (right)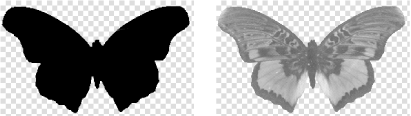 Import both of the images into Flash using
File You can either use the stroke outline, as seen in Figure 3-41, as a cookie cutter or use the shape as a standard vector mask. The latter method is immediately obvious, but the former is more efficient computationally because it doesn't require Flash to constantly apply the mask (which is helpful if you need to animate the bitmap later). Figure 3-41. A cookie-cutter outline When you convert the PNG into a vector, you do not end up with the black shape encased in a white shape (which would happen if you imported a bitmap consisting of a shape on a white background). Because there is no background in our PNG (and because Flash can correctly convert zero alpha pixels into "no vector"), your vector conversion is faster, with less cleanup afterward. So let's move forward with the cookie-cutter method, given that it is by far the more hacky and nonobvious. Place the outline in a layer above the bitmap and align it over the bitmap, as shown in Figure 3-42. If necessary, use the Subselection tool to make the stroke follow the edges of the bitmap better. Aim to get the stroke to outline the bitmap with a slight overlap. When you do this, it may be a good idea to view the layer containing the vector as Outlines (you can do this by clicking on the colored square to the left of the layer title). Figure 3-42. An outline used as a cookie cutter Break apart the bitmap using Modify Move the vector outline from its current layer to the same one as the bitmap. The easiest way to move the vector outline between the layers is via the clipboard:
Select all pixels outside the outline and press Delete. Finally, carefully delete the stroke, as shown in Figure 3-43, to reveal a perfectly sharp vector edge around your bitmap! Figure 3-43. Delete the outline to reveal the sharp vector edge Your bitmap has become a hybrid shape with the advantages of both vectors (sharp edge) and bitmaps (complex textures). Cooler still, the vector edge remains editable. You guessed it-you can even animate the vector edge, as shown in Figure 3-44, should the urge arise. Figure 3-44. Animating the vector edge of a bitmap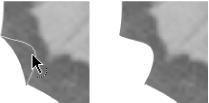 Final ThoughtsAs you can see from this hack, there is an awful lot you can do to merge bitmaps into the clean, vector-sharp world of Flash. Not only can you hide your jaggies using a PNG image and its associated alpha mask, you can also create a Flash-only "pseudo vector shape" consisting of a bitmap with a vector outline. It's actually a vector with a bitmap as a fill. The shape is sized exactly the same as the bitmap, so the bitmap is tiled exactly once. |
|
|
Table of Contents |
|
 Save As. You also need to export a second image in
which you have turned all the nonzero pixels to black, as shown in
Save As. You also need to export a second image in
which you have turned all the nonzero pixels to black, as shown in