|
|
Table of Contents |
|
Hack 59 Sound Time Codes (Cue Points)
Associate timecode information with your sound files so Flash can react to your sounds as they play. Although we can use Flash to play sounds, we cannot use Flash to access low-level information about the sounds. In particular, although we can set an overall volume for a sound object with Sound.setVolume( ), we cannot find out the instantaneous volume amplitudes of the sound file that is actually played. Instead, we can hack around the problem by adding this information to Flash separately. In this example, we use Audacity (http://audacity.sourceforge.net) a free, open source sound editor for Windows, Max OS 9/X, and Unix/Linux. Although it doesn't have the precise controls of a commercial offering such as Adobe Audition, its presets are almost always what a typical web designer would require anyway, making it quick and easy to use. We will find beat-timing information about the sound and use this information every time the sound is played to allow Flash to act as if it can "read" and follow the sound. You need a sound file containing percussion. If you don't have one lying around, you can always use mine, groovyLoop.wav, downloadable from this book's web site. The file groovyLoop.wav has a useful property-it can be looped seamlessly. Creating such a sound from scratch unfortunately requires both musical ability and a fair amount of musical equipment, although you can cut sections of existing song files (using the features of Audacity and Audition) until you achieve a similar result. Doing this is not something I would recommend though, because there are copyright implications in sampling other works in such an obvious (and common) way. Open the groovyLoop.wav sound in Audacity with
File Select Analyze Figure 7-25. Setting the Beat Finder threshold level in Audacity After the waveform has been processed, you should see a series of periodic (or nearly periodic) beat markers (labeled with "B") appear below the main waveform, as shown in Figure 7-26. Figure 7-26. A correct set of beat markers in Audacity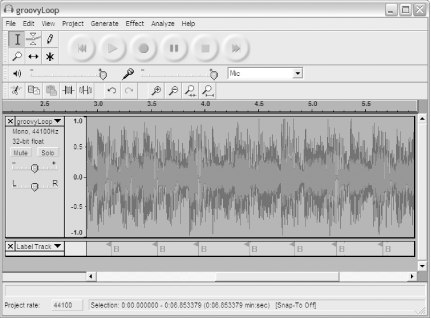 If your beats do not look very periodic, as shown in Figure 7-27, you have set the Beat Finder threshold either too low or too high. In this case, you should delete the marker track (click the x above the track title at the start of the track) and retry the Beat Finder with a different value. The existing threshold is too low if the Beat Finder is finding too many beats. If you have the threshold set too high, you will see too few beat markers. Figure 7-27. An incorrect set of beat markersFinding the correct beat threshold is a bit like tuning a guitar by starting with a low value that you know is wrong and then working upward in value. That way, at least you know that the correct setting is in a particular direction (higher) from the current setting. With Audacity still open, start Flash and import the sound using
File Attach the following code to frame 1 of the FLA: beatHandler = function ( ) {
beatMarker++;
clearInterval(beatID);
beatID = setInterval(beatHandler, beatCode[beatMarker]);
pulse( );
};
repeatSound = function ( ) {
this.start(0, 1);
clearInterval(beatID);
beatMarker = 0;
beatID = setInterval(beatHandler, beatCode[beatMarker]);
};
function pulse( ) {
// Do something here...
}
beatCode = new Array( );
beatMarker = 0;
beatCode = [];
for (var i = beatCode.length - 1; i > 0; i--) {
beatCode[i] = beatCode[i] - beatCode[i-1];
trace(beatCode[i]);
}
groovy = new Sound(this);
groovy.attachSound("groovyLoop");
groovy.start(0, 1);
groovy.onSoundComplete = repeatSound;
clearInterval(beatID);
beatID = setInterval(beatHandler, beatCode[0]);We need to add values in the array beatCode corresponding to the markers. In Audacity, select the Selection tool (the first tool in the toolbox) and click on the waveform at the position of each marker in turn, starting with the first. Read the time for this marker (it will appear in minute:second:millisecond format at the bottom of the application window). Convert this to milliseconds. In Flash, add this value (in milliseconds) in the array beatCode. Repeat this for all markers. You should end up with something like this for your beatCode array: beatCode = [120, 556, 996, 1366, 1835, 2302, 2699, 3124,
3559, 3938, 4414, 4827, 5232, 5661, 6091, 6512];This array now contains the beat position information for our wave in milliseconds. It is in a form suitable to be used with setInterval( ), and that is exactly what the preceding code does-it executes beatHandler( ) at the points defined by the beatCode array. To actually use the setInterval( ) events, you need to make function pulse( ) do something. This could be used to control a dancing figure or change an important parameter of a pattern effect. It could even be used to start another sound, so, for example, you could play another sample in time with the loop. Music players such as WinAmp and iTunes allow you to create visualizations to accompany the currently playing track. These are pattern effects that rotate and pulse in time to the music. They work by detecting beats-exactly the same thing we used Audacity to do. Although the procedure stated here doesn't allow you to easily create beat tracks for entire songs, it does allow you to create beat tracks for loops, which are traditionally used in Flash web design as background tracks. You can also use the beats to drive a bar graph that will pulse in time to your music (many sites have one of these to signify the music on/off toggle but don't actually show a bar graph that moves in time to the music-with this code, it will!). You can also fill the beatCode array with any timing values you like to synchronize to any point in the sound track, such as a crescendo or cymbal crash. That is, the beatCode array, along with the code presented, simulates what are called cue points in Director. That is, they create a way to trigger events at a particular time in a sound. |
|
|
Table of Contents |
|
 Open. Select all of the wave (Edit