|
|
Table of Contents |
|
Hack 63 Button Movie Clips
Create enhanced Flash buttons using instances of the MovieClip class instead of the Button class. Flash buttons are traditionally made from instances of the Button class (not to be confused with the Flash MX Button component in the mx.components package). A Flash button has three states-up, over, and down-plus a hit area. Flash displays the up state when the mouse is not over the button, the over state when the mouse cursor rolls over the button, and the down state when the user clicks the mouse on the button. The hit area is a graphic that defines the clickable area of the button (the portion that accepts mouseclicks), which is often the same size as the graphics for the up, over, and down states. All four button states are represented by frames on the button symbol's timeline, as shown in Figure 8-5. Figure 8-5. Button states represented by named frames in the timeline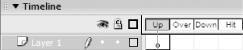 A standard button is easy to create and easy to understand. For the beginner (or designer in a rush!), they are very useful. The Button class contains many of the properties and event handlers of the MovieClip class but none of its methods and no true timeline. Consequently, you cannot make a button instance act like a full-fledged movie clip. However, given that movie clips in Flash MX and Flash MX 2004 support all the methods of the Button class and more, you can create so-called button movie clips-movie clips that act as full-featured buttons. With button movie clips, an ActionScript-savvy designer need never use standard buttons. Button movie clips have several features that simply cannot be created via standard buttons. Button movie clips can:
A button movie clip is not a new type of symbol. It is still a movie clip! To create a button movie clip that acts exactly the same as a standard button, first create a movie clip symbol named hit. Within the hit symbol, rename the first layer to actions and create a second layer named hit, as shown in Figure 8-6. Figure 8-6. Creating the hit area for our button movie clip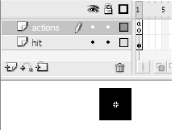 The hit layer should contain a rectangle in the first frame (or a circle if you prefer); this shape will be your button's clickable area. On frame 1 of the actions layer, attach the following script: this._visible = false; _parent.hitArea = this; Create a second movie clip symbol to act as the button movie clip,
calling it clipButton. Rename the first layer to
actions. Label the first frame of the
actions layer as _up using
the Properties panel. Add additional keyframes
(Insert Figure 8-7. Simulating button states with labeled frames in a movie clip
Attach a stop( ) action to each keyframe (one for each button state) using the Actions panel. Place your three button graphics in the three keyframes as you would with a normal button, using as many additional layers as you need. Place all of the new layers below the actions layer, as shown in Figure 8-8. Figure 8-8. Button states in a button movie clip Add a new layer named hit, as shown in Figure 8-9. On the first frame of this layer, place an instance of your hit movie clip symbol, resizing it as necessary to fit over your graphics in the other frames. Once you have done this, hide layer hit. Figure 8-9. Adding the hit clip in the hit layer of the main button movie clip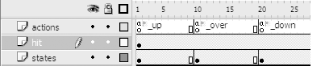 If you now place an instance of your button movie clip onto the main Stage and attach a button script to it, it will act exactly like a standard button. That is, your movie clip will start to act like a button if you attach a button event handler to it. To do this, first give your button movie clip an instance name, such as cButton using the Properties panel. Then, add a new layer named actions to the main timeline (not the movie clip's timeline), and attach the following script to the first frame in the actions layer: cButton.onRelease = function( ) {
trace("you clicked me");
};How does it work? If you attach a button script to the movie clip (which we do indirectly via the preceding ActionScript on the main timeline rather than attaching the script to the clip's timeline), Flash sends the playhead to the frames labeled _up, _over, and _down whenever the corresponding events occur. The script inside the hit movie clip symbol makes it into an invisible hit area for the parent clip (i.e., your button movie clip). That's fine, but it doesn't really give us anything new or hack-worthy. All we have for our effort is a movie clip that operates like a standard button! Well, there are a couple of things you can do with a button movie clip that you cannot do with a standard button. You can use the methods of the MovieClip class, including those not supported by the Button class. For example, you can make your movie clip go to particular states without it being clicked. If you invoke cButton.gotoAndStop("_over") the button movie clip displays its over state. This can be useful when you want your button to change dynamically. For example, if you have a button used to load an image, you can specify the text "load image" as the up state and a "loading..." message as the down state. When the user clicks on the button, you would want it to remain at the down state until the image is loaded (even if the user releases the mouse button), and you can do this easily by using the MovieClip.gotoAndStop( ) method. You can also add onEnterFrame( ) event handlers to a button movie clip, which, for example, allows you to make parts of your user interface animate after they've been clicked. In the following script, the button movie clip acts like a button until it is clicked. Within the onRelease( ) handler, the button deletes its onRelease( ) handler and defines an onEnterFrame( ) handler. This turns it into an animated clip that slides off screen (to the right). btn_mc.onRelease = function( ) {
// Do some button type stuff here (not shown).
// Now revert to an animated movie clip.
delete this.onRelease;
this.onEnterFrame = function( ) {
if (this._x < 600) {
this._x += 10;
} else {
delete this.onEnterFrame;
}
};
};Perhaps most importantly, you can create button movie clips dynamically using MovieClip.duplicateMovieclip( ) or MovieClip.attachMovie( ) and place text inside them with MovieClip.createTextField( ). These techniques are impossible with the standard buttons because the Button class does not support these methods. So, by emulating a button with a movie clip, we gain a fair bit of extra functionality over standard buttons. If we start editing the button movie clip so that it no longer apes a standard button but actively uses the more advanced features of the movie clip timeline, we can implement additional functionality. Adding Button StatesYou can easily add new button states to a button movie clip. The easiest way to add the necessary code to all movie clips is via the MovieClip.prototype property (this approach is appropriate in both ActionScript 1.0 and 2.0): MovieClip.prototype.disable = function( ) {
this.enabled = false;
this.gotoAndStop("_disable");
};The preceding code adds a disable( ) method to the MovieClip class. The method sends the button movie clip's timeline to the frame labeled _disable, effectively creating a new state that prevents the clip from responding to events. To create the disabled state, add an appropriate graphic (typically a grayed-out version of the _up graphic) to a frame labeled _disable in the button movie clip's timeline, as shown in Figure 8-10. Figure 8-10. Defining the disabled state for our button movie clip Of course, other states and features can be created, such as:
Final ThoughtsAlthough a button movie clip takes a little longer to create than a standard button, it is much more versatile because of its ability to run onEnterFrame( ) scripts and because you can add additional button states as needed. |
|
|
Table of Contents |
|
 Timeline