The Engine
That's enough background; now you can get on with how to actually set up the rendering engine. In this section you'll look at how to use the fundamentals you just learned to cast rays into your world and then, based on the results, render the 3D scene. Get ready; this is where things start to get a little more intense.
Horizontal and Vertical Rays
As I mentioned in the introduction to this chapter, ray tracing is about as fast as your mother's typing. Casting is faster because you sort of hop along in increments equal to the size of each tile in the map. This dramatically reduces the total number of castings you need to do. Because you're dealing with a 2D map, you actually need to cast two sets of rays to cover all the cases. If you take a look at Figure 21.11, you can see a very simple map containing a single wall and a ray being cast through it. In this example I'm taking an origin point and then moving in horizontal tile increments (by incrementing by one tile width on each ray cast) across the map until I hit something.
Figure 21.11. The first set of rays attempts to hit vertical walls. Each ray cast increments by one tile width. (The gray lines are the tile grid lines.)
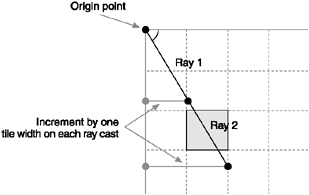
The black circles on the figure are the points to which each of the rays cast. At each of these points, you check whether a wall exists in the tile. Notice that because you're moving in tile-width increments, you're only hitting the vertical lines. In essence, you're casting along the vertical tile lines of the world. You might notice something else: You didn't actually hit the wall! The step between ray 1 and ray 2 meant you jumped right over the wall. To properly cover everything, you need to do the same process using the horizontal lines.
As you can see in Figure 21.12, moving in vertical tile steps gives you a quite different result. Due to the angle you had room to cast 3 rays, not 2, and of course you also hit our wall.
Figure 21.12. To cover the entire map, you also need to cast rays in tile-height increments (the horizontal tile boundaries).
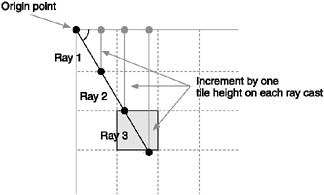
Figures 21.11 and 21.12 illustrate the basic twin-casting algorithm of a ray-casting engine. Starting at the origin point, you need to cast a ray across both vertical and horizontal lines until you get to the edge of the world or you hit something. Using this method you'll never miss a wall; as a bonus, you inherently know whether you struck a vertical or horizontal wall.
The next step in building your engine is figuring out how to actually cast those rays into the world.
Projecting a Ray
Each of the ray castings you do involves incrementing either the x- or y-axis, and then projecting out at a particular angle to determine the other component. Each of these tests requires you to project a ray given only one side of a triangle. Figure 21.13 shows an example of both a vertical and a horizontal increment.
Figure 21.13. Casting a ray to the first horizontal and vertical line
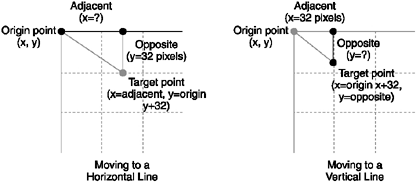
Your goal here is to figure out the x and y coordinates of that target point. Notice how I've started at the origin point and then added the size of the tile to either the x- or y-component. You can then use TAN to discover the other size (either opposite or adjacent). For the adjacent component of the horizontal line, you can use
adjacent = opposite / TAN(angle)
However, for the opposite component of the vertical line calculation you need to be a little trickier and offset the angle by 90 degrees to invert the y-axis. For example, here's all the code to calculate the destination point on a vertical line:
// increment the origin point y by our tile size
int destinationY = originY + TILE_HEIGHT;
// figure out the x delta (distance we need to go to at current angle)
// note: I'm not properly checking the angle-90 for below zero cases
int distanceX = TILE_HEIGHT / TAN( angle  90 );
int destinationX = originX + distanceX;
For the horizontal line it's basically the same thing; you're just working with the opposing components.
// increment the origin point x by our tile size
int destinationX = originX + TILE_WIDTH;

// figure out the y delta (distance we need to go to at current angle)
int distanceY = TILE_WIDTH / TAN( angle );
int destinationY = originY + distanceY;
This all works fine; however, there's one more thing you need to deal with. Notice how I added the x and y values to the origin point; doing this will result in the destination point always being to the right and below the origin point, even if the angle was facing the opposite direction. Check out Figure 21.14 to see what I mean.
Figure 21.14. Based on the quadrant an angle is in, you might need to take away values rather than add them.
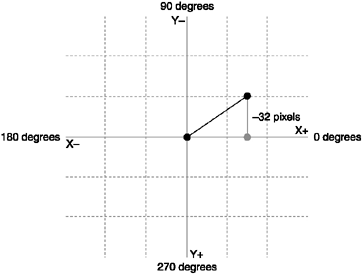
In this example the angle is around 40 degrees so the destination point is in the top-right quadrant relative to the origin point. To get to this point you need to take away the y-component, rather than adding to it. This is pretty easy to accommodate in code; you simply test the angle for each case and adjust the values accordingly. For example, here's the vertical test again, this time with the check added:
int destinationY = 0;
if (rayAngle > 180)  // if ray going down
    // increment the origin point y by our tile size
    destinationY = originY + TILE_HEIGHT;
else                 // going up
    // decrement the origin point y by our tile size
    destinationY = originY - TILE_HEIGHT;

int distanceX = TILE_HEIGHT / TAN( angle  90 );
int destinationX = originX + distanceX;
The same thing applies to calculating out the horizontal step. This time, however, you're testing whether the ray went left or right. Again, remember that this is just pseudocode; you'll use MathFP in the final code.
int destinationX = 0;
if (angle < 90 || angle > 270) // going right
    // increment the origin point x by our tile size
    destinationX = originX + TILE_WIDTH;
else                             // going left
    // decrement the origin point x by our tile size
    destinationX = originX - TILE_WIDTH;

// figure out the y delta (distance we need to go to at current angle)
int distanceY = TILE_WIDTH / TAN( angle );
int destinationY = originY + distanceY;
The First Step
In all the examples I've presented so far, the origin point has always been on a tile boundary. This is convenient for showing you how things work, but it's not practical for your engine. The origin point is going to be where the player is currently standing, so it's not going to stay on the tile boundaries. To accommodate this, you need to make the first cast a shorter one to align up to the tile boundary. You can see this in Figure 21.15.
Figure 21.15. To align to the tile boundary you need to take a smaller initial step.
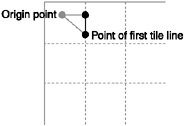
Doing this in code is quite simple; you just get the current tile position (based on the origin point) and then move one tile away. (The direction you move again depends on the angle.) For the horizontal tiles this is something like:
if (angle < 90 || angle > 270)   // if ray going right
    originX = ((startingX / TILE_WIDTH) +1) * TILE_WIDTH) + 1;
else                             // if ray going left
    originX = ((startingX / TILE_WIDTH) * TILE_WIDTH) - 1;
To get the tile coordinate you simply divide the current x position by the tile size. You then offset by one tile and multiply it back out by the tile size again. Notice I've also added 1 to the final number. This is so the point sits inside a tile, not on the edge. This ensures you will always hit the tile you want because when you divide the position by the tile size it will round down to the correct tile. If the point is on the edge it may round down to the wrong tile.
For the y-coordinate it's pretty much the same thing. For example:
if (angle > 180)
    originY = (((startingY / TILE_HEIGHT) +1) * TILE_HEIGHT) + 1;
else
    originY = (((startingY / TILE_HEIGHT) * TILE_HEIGHT) - 1;
Getting a Hit
You've covered the basics of casting rays now. The next question is how you determine whether you hit a wall.
Because a wall is simply a tile, you can check any point by dividing its coordinates by the tile sizes and checking the map array. For convenience, I wrap this into a World class function aptly named isWall (and some friends to help figure out tile positionsyou might recognize some of these from Star Assault).
public final int getTileX(int x) { return x / TILE_WIDTH; }
public final int getTileY(int y) { return y / TILE_HEIGHT; }

public final byte getTile(int x, int y)
{
    int tx = getTileX(x);
    int ty = getTileY(y);
    if (tx < 0 || tx >= tilesWide || ty < 0 || ty >= tilesHigh) return -1;
        return tileMap[ ty ][ tx ];
}

private boolean isWall(int px, int py)
{
    if ( getTile( px, py ) == 1)
        return true;
    return false;
}
Calculating the Distance
Once you cast a ray and discover you got a hit, you need to be able to calculate exactly how far the ray went. This is important because you use the distance to scale the size of the wall (how far it is from the viewer). Figure 21.8 showed a good example of this. (Sorry to make you turn back a few pages.) In this figure, you can see that the rays cast against the side of the tile are further away from the viewer. Based on this distance the lines are drawn smaller, resulting in the effect of distance. It's simple, but it works really well.
Because you know the opposite and adjacent sides of your triangle, one method of getting the distance is to use the Pythagorean Theorem, which states that the square of the hypotenuse is equal to the square of the other two sides added together. This works, but it's a very expensive calculation to make, so you'll use something a little simpler.
A computationally faster method is to use sine and cosine based on the distance of each coordinate of the ray cast. Using an x-axis value, you can determine the hypotenuse by dividing it by the cosine of the angle. For a y-axis value, you need to use the sine. I wrap all this into a World class convenience function that takes both values and uses the larger of the two to determine the final result.
private int getDistanceFP(int dxFP, int dyFP, int angle)
{
    int distanceFP = 0;
    if ( MathFP.abs(dxFP) > MathFP.abs(dyFP) )
        distanceFP = MathFP.div(MathFP.abs(dxFP), lookupCosFP[angle]);
    else
        distanceFP = MathFP.div(MathFP.abs(dyFP), lookupSinFP[angle]);
    return MathFP.abs(distanceFP);
}
Adding Some Limits
To determine whether you hit something, the main ray-casting loop will fire a ray at a certain angle until it hits something. But what if there's nothing to hit? Or the thing is so far away in your world that it takes large number of casts to see it? To handle this you need to add some code to check for reasonable bounds when casting.
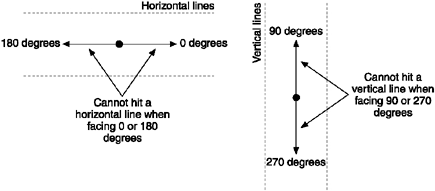
The first and simplest test is to make sure that a ray can possibly hit a tile line. There are a few cases in which it's simply impossible for a ray to get a hit, so you can detect these and not bother casting at all. In Figure 21.16, you can see the two angles each for horizontal and vertical casting.
Figure 21.16. For vertical castings you don't need to bother testing angles of 90 or 270 degrees. Likewise, with horizontal castings it's impossible to hit any tile line with 0 or 180 degree angles.
The second test you need to make is to limit the distance a ray can go. Even with a small tile map you can have a ray being cast a relatively long way, with the resulting walls appearing very small. The problem is that to draw that wall, you've had to make a large number of cast steps to get there. This total number of ray casts will kill the performance of your ray-casting engine. You can think of it as something like the poly count in a 3D game the higher the number of casts, the slower things will go. Those long-distance casts are the ones that really affect performance because it takes so many jumps to get there.
The first distance test is to make sure you are even casting inside the tile map. You can do this by bounds checking each ray and aborting the casting if you've moved beyond the map dimensions. Here's a simple method to determine whether you're on a valid tile location:
private boolean isOnMap(int pointx, int pointy)
{
    if (pointx < 0 || pointy < 0) return false;
    if (pointx > TILE_WIDTH * tilesWide) return false;
    if (pointy > TILE_HEIGHT * tilesHigh) return false;
    return true;
}
Once you cast a ray, you can check whether it is on the map bounds and then abort the casting if you've gone beyond the map boundaries. You'll see this in action in the main casting loop a little later.
Even with the map boundary testing on, you still have cases in which with a large map you'll be drawing walls that are a very long distance away, costing a lot in terms of performance. To speed things up you can add a check to abort a ray cast past a certain distance.
static int HORIZON_DISTANCE_FP = MathFP.toFP(TILE_WIDTH * 20);
Then you can compare each ray's distance and abort the casting once it passes the horizon. Again, you'll see this in action in the main casting loop.
Through trial and error I've found that a distance of 20 tiles works quite well, although you can vary it based on the sort of performance you're getting with your world type.
The Main Loop
Okay, let's start to put all this together. The basic ray-casting loop is to start at your origin point and then, for all the angles in the FOV, cast rays into the world to determine whether you hit anything.
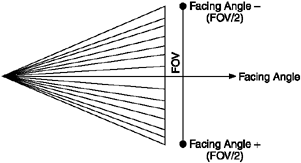
The first step is to determine the angles you need to cast. Assuming you know the facing angle of the player (this is just a variable that you'll change when the player turns), you can figure out the angles using the number of columns you'll be rendering. Because the player is facing the center of the view, you simply take off half the number of columns. You can see this illustrated in Figure 21.17.
Figure 21.17. In the main loop you cast a ray starting at the viewer's facing anglehalf the field-of-viewall the way through to the facing angle plus half the field-of-view.
The code for your basic loop follows. I've also added in some variables you'll need in the casting code. For speed reasons I have both MathFP and normal integer versions of the player's origin point.
int startingXFP = MathFP.toFP(player.getX());
int startingYFP = MathFP.toFP(player.getY());
int startingX = player.getX();
int startingY = player.getY();

int rayAngle=angleChange(player.getDirection(), halfFovColumns);
int pixelColumn = 0;
int destinationXFP=0,destinationYFP=0;
int originXFP=0,originYFP=0;

for (int castColumn=0; castColumn < fovColumns; castColumn++)
{
    rayAngle = angleChange(rayAngle, -1);

    ... cast horizontal ray
    ... cast vertical ray
    ... if we got a hit then draw a wall segment

    // move across to the next column position
    pixelColumn += columnsPerDegree;
}
If you're wondering about the calls to angleChange, that's just a simple method to safely adjust an angle by any value (even negative ones). Here's the code:
private int angleChange(int a, int change)
{
    int angle = a + change;
    if (angle > 359) angle -= 360;
    if (angle < 0) angle = 360 - Math.abs(angle);
    return angle;
}
Now that you have the basic loop, you need to fill in the code to cast the horizontal and vertical rays. You have all the tools to do this now; all you have to do is put it all together. Here's the code to do the complete horizontal cast. Note that I'm now switching over to using MathFP for all the floating-point operations.
// --------- HORIZONTAL RAY ---------
// try casting a horizontal line until we get a hit

boolean gotHorizHit = false;
int horizDistanceFP = 0;

// if the ray can possibly hit a horizontal line
if (rayAngle != 0 && rayAngle != 180)
{
    // cast the first ray to the intersection point
    // figure out the coord of the vert tile line we're after
    // (based on whether we're looking left or right). Note we offset
    // by one pixel so we know we're *inside* a tile cell
    if (rayAngle > 180)
        originYFP = MathFP.toFP( (((startingY / TILE_HEIGHT) +1) * TILE_HEIGHT) + 1 );
    else
        originYFP = MathFP.toFP(((startingY / TILE_HEIGHT) * TILE_HEIGHT) - 1);

    destinationYFP = MathFP.sub(startingYFP, originYFP);
    destinationXFP = MathFP.div(destinationYFP, lookupTanFP[rayAngle]);
    riginXFP = MathFP.add(startingXFP, destinationXFP);

    // get the distance to the first grid cell
    horizDistanceFP = getDistanceFP(destinationXFP, destinationYFP, rayAngle);

    while (!gotHorizHit)
    {
        // abort if we're past the horizon
        if (horizDistanceFP > HORIZON_DISTANCE_FP)
            break;

        // did we hit a wall?
        if (isWall(MathFP.toInt(originXFP), MathFP.toInt(originYFP)))
        {
            gotHorizHit = true;
            break;
        }

        // are we still on the map?
        if (!isOnMap(MathFP.toInt(originXFP), MathFP.toInt(originYFP)))
            break;

        int lastXFP = originXFP;
        int lastYFP = originYFP;

        // project to the next point along
        if (rayAngle > 180)  // if ray going down
            originYFP = MathFP.add(lastYFP, TILE_HEIGHT_FP);
        else                 // if ray going up
            originYFP = MathFP.sub(lastYFP, TILE_HEIGHT_FP);

        destinationYFP = MathFP.sub(lastYFP, originYFP);
        destinationXFP = MathFP.div(destinationYFP, lookupTanFP[rayAngle]);

        // move out to the next tile position
        originXFP = MathFP.add(lastXFP, destinationXFP);

        // add the distance to our running total
        horizDistanceFP = MathFP.add(horizDistanceFP,
                            getDistanceFP(destinationXFP, destinationYFP, rayAngle));
    }
}

if (!gotHorizHit)
    // make sure we don't think this is the closest (otherwise it would
    // still be 0). we use this later to determine which ray was closest
    horizDistanceFP = MathFP.toFP(99999);
Hopefully nothing in there is too scary. It's basically everything you've covered brought together in a complete loop. The end result of this code is two variablesgotHorizHit, which is set to true if the horizontal ray cast actually struck a wall, and horizDistanceFP, which will contain the distance the wall was if a hit occurred. If you didn't get a hit, the distance value is set to a large number (99999). I use a number this big so that it's impossible for it to really occur in the actual engine.
Next take a look at the vertical ray cast. This is the same thing except you're dealing with the vertical case. The basic structure is the same.
// --------- VERTICAL RAY ---------
boolean gotVertHit = false;
int vertDistanceFP = 0;

// if the ray can possibly hit a vertical line
if (rayAngle != 90 && rayAngle != 270)
{
    // cast the first ray to the intersection point

    // figure out the coord of the vert tile line we're after
    // (based on whether we're looking left or right). Note we offset
    // by one pixel so we know we're *inside* a tile cell.

    if (rayAngle < 90 || rayAngle > 270)   // if ray going right
        originXFP = MathFP.toFP((((startingX / TILE_WIDTH) +1) *
                                   TILE_WIDTH) + 1);
    else                             // if ray going left
        originXFP = MathFP.toFP(((startingX / TILE_WIDTH) *
                                  TILE_WIDTH) - 1);
    destinationXFP = MathFP.sub(originXFP, startingXFP);
    destinationYFP = MathFP.div(destinationXFP,
                                  lookupTanFP[angleChange(rayAngle,-90)]);
    originYFP = MathFP.add(startingYFP, destinationYFP);

    // get the distance to the first grid cell
    vertDistanceFP = getDistanceFP(destinationXFP, destinationYFP,
                                    rayAngle);

    while (!gotVertHit)
    {
        if (vertDistanceFP > HORIZON_DISTANCE_FP) break;

        // did we hit a wall?
        if (isWall(MathFP.toInt(originXFP), MathFP.toInt(originYFP)))
        {
            gotVertHit = true;
            break;
        }

        if (!isOnMap(MathFP.toInt(originXFP), MathFP.toInt(originYFP)))
            break;

        int lastXFP = originXFP;
        int lastYFP = originYFP;

        // project to the next point along
        if (rayAngle < 90 || rayAngle > 270)   // if ray going right
            originXFP = MathFP.add(lastXFP, TILE_WIDTH_FP);
        else
            originXFP = MathFP.sub(lastXFP, TILE_WIDTH_FP);

        destinationXFP = MathFP.sub(originXFP, lastXFP);
        destinationYFP = MathFP.div(destinationXFP,
                                        lookupTanFP[angleChange(rayAngle,-90)]);
        originYFP = MathFP.add(lastYFP, destinationYFP);

        // extend out the distance (so we know when we're casting
        // beyond the world edge)
        vertDistanceFP = MathFP.add(vertDistanceFP, getDistanceFP(
                destinationXFP, destinationYFP, rayAngle));
    }
}

if (!gotVertHit)
    // make sure we don't think this is the closest (otherwise it would
    // still be 0). we use this later to determine which ray was closest.
    vertDistanceFP = MathFP.toFP(99999);
Now that you've cast both rays, you've established whether one (and possibly both) of the rays struck a wall and exactly how far away that wall was from the viewer. With this information, you're now ready to draw the wall.
Drawing the Wall
Once you detect that a ray hit a tile, you can draw a segment of the wall using a vertical line. Based on the distance of the ray you adjust the size of this line. This is where that focal distance you worked out before comes into play. To get the size of the wall you first need to set a value corresponding to a full-size wall. In this case, I find that making walls twice as high as the tile size works well. Then you need to multiply this value by the focal distance to get the projected wall height.
static int PROJ_WALL_HEIGHT = TILE_WIDTH*2;
private int projWallHeight;

public World(int viewWidthArg, int viewHeightArg, Actor p)
{
    projWallHeight = MathFP.toFP(WALL_HEIGHT * focalDistance);
    ...
To get the size of the wall, you simply divide the distance (use the smaller of the two if both rays hit) into the projected wall height.
// remember we set the distance to 99999 if a ray didn't hit so it won't be
// used as the minimum in the code below
int distanceFP = MathFP.min(horizDistanceFP, vertDistanceFP);
int wallHeight = MathFP.toInt(MathFP.div(projWallHeight, distanceFP));
Once you have the height of the wall, the rest of the work is pretty easy. You simply need to determine where to start drawing the wall vertically and where to stop. To figure this out, you center the wall on the projection plane, which is just a fancy term for the height of the area on which you're drawing (typically the same as the screen height).
int bottomOfWall = (PROJ_PLANE_HEIGHT / 2) + (wallHeight/2);
int topOfWall = PROJ_PLANE_HEIGHT - bottomOfWall;

if (bottomOfWall >= PROJ_PLANE_HEIGHT)
    bottomOfWall = PROJ_PLANE_HEIGHT-1;
Finally you're ready to actually draw the wall. This is the easy part.
// draw the wall (pixel column)
g.setColor(0x777777);
g.fillRect(pixelColumn, topOfWall, columnsPerDegree, wallHeight);
Distortion
If you run the preceding code, you'll quickly find another problem ...sorry,I mean challenge. Because you are basing the size of the wall on the distance the ray went, walls that are further away will appear smaller than those that are closer. This is what you intended, but as you can see in Figure 21.18, this has the effect of warping walls that should be straight.
Figure 21.18. Because you used the distance to size walls, you have to compensate for the distortion this creates.
Figure 21.19 demonstrates the problem a little better. See how the two rays to either side are more distant than the middle ray? This is what causes the distortion effect.
Figure 21.19. The distance of the outer rays causes the walls to be drawn smaller.
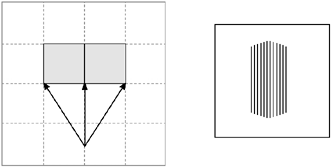
Believe it or not, this is how your eyes work. The eye presents a slightly curved image to your brain; you just don't notice because you're brain is compensating (and the curvature is outside your focal point). You can see what I mean by looking straight along a flat wall. If you focus on the center you'll see that the outer sides actually curve away slightly. Just like your brain, you need to compensate for this effect in your game.
The easiest method I've found to do this is to scale the wall height based on the ray being cast. The scale values correspond pretty much exactly to a circle surrounding the player the further out you go, the bigger the compensation. Based on this, you can simply use the values of cosine from the facing angle outward. It's cute, I know, but it works like a charm. Here's the code to pre-calculate the distortion values for all the FOV columns:
static int[] lookupDistortionFP;

public World(int viewWidthArg, int viewHeightArg, Actor p)
{
    // pre-calculate the distortion values
    lookupDistortionFP = new int[fovColumns+1];
    for (int i = -halfFovColumns; i <= halfFovColumns; i++)
        lookupDistortionFP[i+halfFovColumns] =
                MathFP.div(MathFP.toFP(1),
                MathFP.cos(Actor.getRadiansFPFromAngle(i)));
    ...
When figuring the wall height, you simply look up the corresponding value to the angle and divide by it. For example:
if (lookupDistortionFP[castColumn] > 0 && distanceFP > 0)
    // adjust for distortion
    distanceFP = MathFP.div(distanceFP, lookupDistortionFP[castColumn]);
In Figure 21.20 you can see the results. This is much more like what you'd expect to see.
Figure 21.20. After compensation for distortion, everything lines up nicely.
Wall Shading
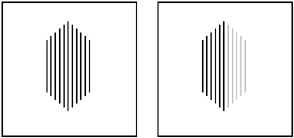
So far your walls have all been drawn in one color. Another nice effect is to use a lighter color for all of one set of walls (say all the vertically aligned ones). The result is a simple lighting effect that gives some extra perspective to the view.
Figure 21.21 shows an example of this effect. The lines that make up the two walls shown on the left all use the same color, whereas on the right I've used a lighter shade for the horizontal rays. As you can see, the right-hand image looks much better.
Figure 21.21. Shading walls makes for a much better 3D effect.
To create this effect you need to set the color of the line being drawn for each wall segment. You can determine this color by checking which ray hit the object (either vertical or horizontal). There's one issue you need to resolve first, thoughtile edges.
At the edge of a tile you can get many cases in which the distance of both rays is equal (or close enough that it doesn't matter). You can see a simple case of this in Figure 21.22. The two rays being cast (horizontal and vertical) both hit around the corner of a tile. In some cases the vertical hit will return a (very slightly) smaller distance than the corresponding horizontal ray.
Figure 21.22. When casting rays near corners, you sometimes hit "hidden" walls.
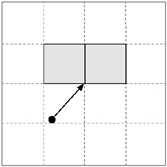
The result of this on the screen is a change in color for wall segments that aren't actually corners. If you look down the left-hand wall in Figure 21.23, you can see the ugly results.
Figure 21.23. The left-hand wall shows the results of not detecting edges properly.
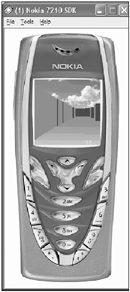
There are a few ways around this. The real problem is the rays are striking something that isn't really a wall in the first place; it's what you might term a hidden edge. To get around this, you could modify your map system to let you detect an edge that should be exposed to the world. This is nice, but unless you have another reason it's a bit of a waste of precious map space.
The second method (and the one I prefer for this case) is to add a little edge detection. What you do is assume that a wall runs along until there is a significant change in the distance of one ray type to another. That way, only a true corner will be picked up. Here's a modified version of the wall drawing code that adds edge detection. For completeness, I've included everything from the previous sections.
public class World
{
    // place this in the class's static list
    static int EDGE_IGNORE_FP = MathFP.toFP(5);

    ...
}
And here's the code to draw the wall slice, utilizing edge detection.
// --------- DRAW WALL SLICE ---------

// since it's possible (especially with nearby walls) to get a ray
// hit on both vertical and horizontal lines we have to figure out
// which one to use (the closest)
if (gotVertHit || gotHorizHit)
{
    int distanceFP = MathFP.min(horizDistanceFP, vertDistanceFP);
    int diffFP = MathFP.abs(MathFP.sub(horizDistanceFP, vertDistanceFP));

    boolean wasVerticalHit = true;

    if (horizDistanceFP > vertDistanceFP)
        wasVerticalHit = false;

    if (diffFP <= EDGE_IGNORE_FP)
        // if distance is the same then we hit a corner. we assume the
        // previous dir hit so as to give us a smooth line along walls
        wasVerticalHit = lastHitWasVert;

    if (wasVerticalHit)
    {
        // VERTICAL EDGE
        if (diffFP > EDGE_IGNORE_FP) lastHitWasVert = true;
        g.setColor(0x777777);
    }
    else
    {
        // HORIZONTAL EDGE

        if (diffFP > EDGE_IGNORE_FP) lastHitWasVert = false;
        g.setColor(0x333333);
    }

    if (lookupDistortionFP[castColumn] > 0 && distanceFP > 0)
        // adjust for distortion
        distanceFP = MathFP.div(distanceFP, lookupDistortionFP[castColumn]);

    if (distanceFP > 0)
    {
        int wallHeight = MathFP.toInt(MathFP.div(projWallHeight, distanceFP));

        int bottomOfWall = PROJ_PLANE_HEIGHT_CENTER + (wallHeight/2);
        int topOfWall = PROJ_PLANE_HEIGHT - bottomOfWall;

        if (bottomOfWall >= PROJ_PLANE_HEIGHT)
            bottomOfWall = PROJ_PLANE_HEIGHT-1;

        // draw the wall (pixel column)
        g.fillRect(pixelColumn, topOfWall, columnsPerDegree, wallHeight);
    }

    // and move across to the next column position
    pixelColumn += columnsPerDegree;
}
The end result of this is a smooth edge along all the walls.
Adding a Background Image
Your engine is really starting to come together now. To make it look even better, you can add a background image to set the scene a little better.
To make a background image look good you need to create something with a horizon around the center of the screen. To give it an outdoor look I've used a grass and blue sky combination for the demo.
Figure 21.24. A sample background image
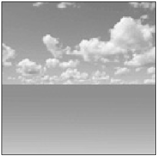
Adding the image into the ray-casting engine simply involves loading it up the normal way. For example:
public World(int viewWidthArg, int viewHeightArg, Actor p)
{
    background = ImageSet.loadClippedImage("/background.png", 0, 0);
    ...
To use the background when rendering the ray-casting view, all you need to do is draw the background image before you do anything else.
public final void render(Graphics g)
{
    // draw the background
    g.drawImage(background, 0, 0, Graphics.TOP|Graphics.LEFT);
Wrapping Up
Those are the basics of your ray-casting enginesee, I told you it wasn't that hard. Hopefully you've learned a little about the techniques you can use to create some interesting types of games using 3D trickery.
However, turning this engine into a game requires a little more work. What you do next really comes down to the type of game you want to make. In the next section I'll cover a few areas you might need.