|
|
Table of Contents |
|
5.6 Recompiling the KernelFirst, ask yourself why you would want to recompile the kernel. There are several valid reasons. If you normally have to recompile your kernel, perhaps because you use less-common hardware or need some special compile option, then you'll definitely need to recompile for openMosix. Or maybe you just like tinkering with things. If you have a reason, go for it. Even if you have never done it before, it is not that difficult, but the precompiled kernels do work well. For most readers, recompiling the kernel is optional, not mandatory. (If you are not interested in recompiling the kernel, you can skip the rest of this section.)
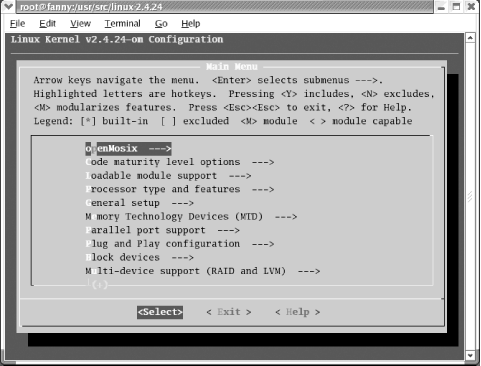
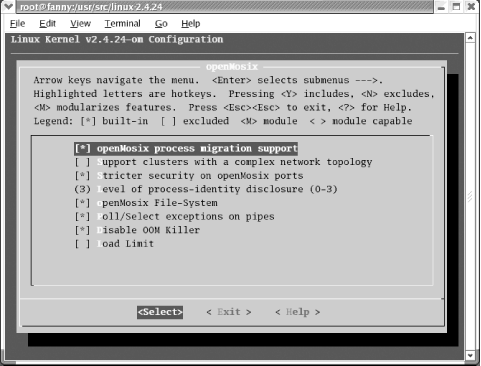
Let's begin by going over the basic steps of a fairly generic recompilation, and then we'll go through an example. First, you'll need to decide which version of the kernel you want to use. Check to see what is available. (You can use the uname -r command to see what you are currently using, but you don't have to feel bound by that.) You are going to need both a set of patches and a clean set of kernel source files. Accepted wisdom says that you shouldn't use the source files that come with any specific Linux releases because, as a result of customizations, the patches will not apply properly. As noted earlier in this chapter, you can download the kernel sources and patches from http://openmosix.sourceforge.net or you can just download the patches. If you have downloaded just the patches, you can go to http://www.kernel.org to get the sources. You'll end up with the same source files either way. If you download the source file from the openMosix web site, you'll have an RPM package to install. When you install this, it will place compressed copies of the patches and the source tree (in gzip or bzip2 format) as well as several sample kernel configuration files in the directory /usr/src/redhat/SOURCES. The next step is to unpack the sources and apply the patches. Using gunzip or bzip2 and then tar, unpack the files in the appropriate directory. Where you put things is largely up to you, but it is a good idea to try to be consistent with the default layout of your system. Move the patch files into the root directory of your source tree. Once you have all the files in place, you can use the patch command to patch the kernel sources. The next step is to create the appropriate configuration file. In theory, there are four ways you can do this. You could directly edit the default configuration file, typically /usr/src/linux/.config, or you can run one of the commands make config, make menuconfig, or make xconfig. In practice, you should limit yourself to the last two choices. Direct editing of the configuration file for anything other than minor changes is for fools, experts, or foolish experts. And while config is the most universal approach, it is also the most unforgiving and should be used only as a last resort. It streams the configuration decisions past you and there is no going back once you have made a decision. The remaining choices are menuconfig, which requires the ncurses library, and xconfig, which requires X windows and TCL/TK libraries. Both work nicely. Figure 5-5 shows the basic layout with menuconfig. Figure 5-5. Main menuconfig menu Configuration parameters are arranged in groups by functionality. The first group is for openMosix. You can easily move through this menu and select the appropriate actions. You will be given a submenu for each group. Figure 5-6 shows the openMosix submenu. Figure 5-6. openMosix system submenu xconfig is very similar but has a fancy GUI. Because there are so many decisions, this is the part of the process where you are most apt to make a mistake. This isn't meant to discourage you, but don't be surprised if you have to go through this process several times. For the most part, the defaults are reasonable. Be sure you select the right processor type and all appropriate file systems. (Look at /etc/fstab, run the mount command, or examine /proc/filesystems to get an idea of what file systems you are currently using.) If you downloaded the sources from the openMosix web page, you have several sample configuration files. You can copy one of these over and use it as your starting point. This will give you some reasonable defaults. You can also get a description of various options (including openMosix options!) by looking in the Documentation/Configure.help file in your source tree. As a general rule of thumb, if you don't need something, don't include it. Once you have the configuration file, you are ready to build the image. You'll use the commands make dep, make clean, make bzImage, make modules, and make modules_install. (You'll need modules enabled, since openMosix uses them.) If all goes well, you'll be left with a file bzImage in the directory arch/i386/boot/ under your source tree. The next to last step is to install the kernel, i.e., arrange for the system to boot from this new kernel. You'll probably want to move it to the /boot directory and rename it. Since you are likely to make several kernels once you get started, be sure to use a meaningful name. You may need to create a ram-disk. You also need to configure your boot loader to find the file as described earlier in this chapter. When copying over the new kernel, don't delete the original kernel! Now you are ready to reboot and test your new kernel. Pay close attention to the system messages when you reboot. This will be your first indication of any configuration errors you may have made. You'll need to go back to the configuration step to address these. Of course, this is just the kernel you've installed. You'll still need to go back and install the user tools and configure openMosix for your system. But even if you are compiling the kernel, there is no reason you can't use the package to install the user tools. Here is an example using Red Hat 9. Although Red Hat 9 comes with the 2.4.20 version of the kernel, this example uses a later version of the kernel, openmosix-kernel-2.4.24-openmosix1.src.rpm. The first step is installing this package. [root@fanny root]# rpm -vih openmosix-kernel-2.4.24-openmosix1.src.rpm 1:openmosix-kernel ########################################### [100%] [root@fanny root]# cd /usr/src/redhat/SOURCES [root@fanny SOURCES]# ls kernel-2.4.20-athlon.config kernel-2.4.24-athlon-smp.config kernel-2.4.20-athlon-smp.config kernel-2.4.24-i386.config kernel-2.4.20-i386.config kernel-2.4.24-i686.config kernel-2.4.20-i686.config kernel-2.4.24-i686-smp.config kernel-2.4.20-i686-smp.config linux-2.4.24.tar.bz2 kernel-2.4.24-athlon.config openMosix-2.4.24-1.bz2 As you can see, the package includes the source files, patches, and sample configuration files. Next, unpack the files. (With some versions, you may need to use gunzip instead of bunzip2.) [root@fanny SOURCES]# bunzip2 linux-2.4.24.tar.bz2 [root@fanny SOURCES]# bunzip2 openMosix-2.4.24-1.bz2 [root@fanny SOURCES]# mv linux-2.4.24.tar /usr/src [root@fanny SOURCES]# cd /usr/src [root@fanny src]# tar -xvf linux-2.4.24.tar ... The last command creates the directory linux-2.4.24 under /usr/src. If you are working with different versions of the kernel, you probably want to give this directory a more meaningful name. The next step is to copy over the patch file and, if you desire, one of the sample configuration files. Then, you can apply the patches. [root@fanny src]# cd /usr/src/redhat/SOURCES [root@fanny SOURCES]# cp openMosix-2.4.24-1 /usr/src/linux-2.4.24/ [root@fanny SOURCES]# cp kernel-2.4.24-i686.config \ > /usr/src/linux-2.4.24/.config [root@fanny SOURCES]# cd /usr/src/linux-2.4.24 [root@fanny linux-2.4.24]# cat openMosix-2.4.24-1 | patch -Np1 ... You should see a list of the patched files stream by as the last command runs. Next, you'll need to create or edit a configuration file. This example uses the supplied configuration file that was copied over as a starting point. [root@fanny linux-2.4.24]# make menuconfig Make whatever changes you need and then save your new configuration. Once configured, it is time to make the kernel. [root@fanny linux-2.4.24]# make dep ... [root@fanny linux-2.4.24]# make clean ... [root@fanny linux-2.4.24]# make bzImage ... [root@fanny linux-2.4.24]# make modules ... [root@fanny linux-2.4.24]# make modules_install ... These commands can take a while and produce a lot of output, which has been omitted here. The worst is over now. You need to copy your kernel to /boot, create a ram-disk, and configure your boot loader. [root@fanny linux-2.4.24]# cd /usr/src/linux-2.4.24/arch/i386/boot/ [root@fanny boot]# cp bzImage /boot/vmlinuz-8jul04 If you haven't changed kernels, you may be able to use the existing ram-disk. Otherwise, use the mkinitrd script to create a new one. [root@fanny boot]# cd /boot [root@fanny boot]# mkinitrd /boot/initrd-2.4.24.img 2.4.24-om The first argument is the name for the ram-disk and the second argument is the appropriate module directory under /lib/modules. See the manpage for details. The last step is to change the boot loader. This system uses grub, so the file /etc/grub.conf needs to be edited. You might add something like the following: title My New openMosix Kernel
root (hd0,0)
kernel /vmlinuz-8jul04 ro root=LABEL=/
initrd /initrd-2.4.24.imgWhen the system reboots, the boot menu now has My New openMosix Kernel as an entry. Select that entry to boot to the new kernel. While these steps should be adequate for most readers, it is important to note that, depending on your hardware, etc., additional steps may be required. Fortunately, there has been a lot written on the general process of recompiling Linux kernels. See the Appendix A for pointers to more information. |
|
|
Table of Contents |
|