|
|
Table of Contents |
|
6.3 Installing OSCARThis section should provide you with a fairly complete overview of the installation process. The goal here is to take you through a typical installation and to clarify a few potential problems you might encounter. Some customizations you might want to consider are described briefly at the end of this section. The OSCAR project provides a very detailed set of installation instructions running over 60 pages, which includes a full screen-by-screen walkthrough. If you decide OSCAR is right for you, you should download the latest version and read it very carefully before you begin. It will be more current and complete than the overview provided here. Go to http://oscar.openclustergroup.org and follow the documentation link. Because OSCAR is a complex set of software that includes a large number of programs and services, it can be very unforgiving if you make mistakes when setting it up. For some errors, you may be able to restart the installation process. For others, you will be better served by starting again from scratch. A standard installation, however, should not be a problem. If you have a small cluster and the hardware is ready to go, with a little practice you can be up and running in less than a day. The installation described here is typical. Keep in mind, however, that your installation may not go exactly like the one described here. It will depend on some of the decisions you make. For example, if you select to install PVFS, you'll see an additional console window early in the installation specific to that software. 6.3.1 PrerequisitesThere are several things you need to do before you install OSCAR. First, you need to plan your system. Figure 6-1 shows the basic architecture of an OSCAR cluster. You first install OSCAR on the cluster's head node or server, and then OSCAR installs the remaining machines, or clients, from the server. The client image is a disk image for the client that includes the boot sector, operating system, and other software for the client. Since the head node is used to build the client image, is the home for most user services, and is used to administer the cluster, you'll need a well-provisioned machine. In particular, don't try to skimp on disk space-OSCAR uses a lot. The installation guide states that after you have installed the system, you will need at least 2 GB (each) of free space under both the / and /var directories while 4 GB for each is recommended. Since the head is also the home for your users' files, you'll need to keep this in mind as well. It is a good idea to put the /, /var, and /home directories on separate disk partitions. This will simplify reinstalls and provide a more robust server. Figure 6-1. OSCAR architecture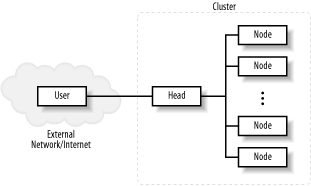 As you can see from the figure, the server or head is dual homed; that is, it has two network interfaces. The interface attached to the external network is called the public interface. The private interface attaches to the cluster's network. While you don't have to use this configuration, be aware that OSCAR will set up a DHCP server on the private interface. If you put everything on a public network with an existing DHCP server, you may have a war between the two DHCP servers. The remainder of this chapter assumes you'll be using a configuration like the one shown in Figure 6-1. It is strongly recommended that you begin with a clean install of your operating system and that you customize your OSCAR installation as little as possible the first time you install it. OSCAR is a complex collection of software. With a vanilla installation, all should work well. This isn't to say you can't do customizations, just do so with discretion. Don't be surprised if a custom install takes a few tries to get right. The installation documentation lists a few supported versions of Linux. It is strongly recommend that you stick to the list. For Red Hat, a workstation install that includes the Software Development group and an X Windows environment should work nicely for the server. (You may also want to add some network utilities such as VNC-server and Ethereal to make life easier, and you may want to remove openOffice to discourage that kind of activity on the cluster. That's your call; it won't affect your OSCAR installation either way.) You should also do manual disk partitioning to ensure that you meet the space requirements and to control the disk layout. (It is possible to work around some allocation problems using links, but this is a nuisance best avoided.) Don't install any updates to your system at this point. Doing so may break the OSCAR installation, and you can always add these after you install OSCAR. 6.3.2 Network ConfigurationSince you have two interfaces, you need to make sure that your network configuration is correct. The configuration of the public interface, of course, will be determined by the configuration of the external network. For example, an external DHCP server might be used to configure the public interface when booting the server. For the cluster's network, use a private address space distinct from the external address space. Table 6-1 lists reserved address spaces that you might use per RFC 1918.
By way of example, assume you have fewer than 255 computers and your organization's internal network is already using the first address range (10.X.X.X). You might select one of the class C ranges from the third address range, e.g., 192.168.1.0 through 192.168.1.255. The usual IP configuration constraints apply, e.g., don't assign the broadcast address to a machine. In this example, you would want to avoid 192.168.1.0 (and, possibly, 192.168.1.255). Once you have selected the address space, you can configure the private interface using the tool of your choice, e.g., neat, ifconfig, or netcfg. You will need to set the IP address, subnet mask, and default gateway. And don't forget to configure the interface to be active on startup. In this example, you might use an IP address of 192.168.1.1 with a mask of 255.255.255.0 for the private interface.[2] The public interface will be the gateway for the private network. This will leave 192.168.1.2 through 192.168.1.254 as addresses for your compute nodes when you set up DHCP. Of course, if you plan ahead, you can also configure the interface during the Linux installation.
Once you have the interfaces configured, reboot the server and verify that everything works. You can use ifconfig -a to quickly confirm that both interfaces are up. If it is possible to put a live machine on the internal network, you can confirm that routing works correctly by pinging the machine. Do as much checking as you can at this point. Once the cluster is installed, testing can be more difficult. You don't want to waste a lot of time trying to figure out what went wrong with the OSCAR installation when the network was broken before you began. Another pre-installation consideration is the security settings for the server you are building. If you have the security set too tightly on the server, it will interfere with the client installation. If you have customized the security settings on a system, you need to pay particular attention. For example, if you have already installed SSH, be sure that you permit root logins to your server (or plan to spend a lot of time at the server). If you can isolate the cluster from the external network, you can just turn off the firewall. Even if the installation goes well, you still may encounter problems later. For example, with Red Hat 9, the default firewall settings may cause problems for services like Ganglia. Since OSCAR includes pfilter, it is usually OK to just turn off Red Hat's firewall. However, this is a call you will have to make based on your local security policies. You should also ensure that the head node's host name is correctly set. Make sure that the hostname command returns something other than localhost and that the returned name resolves to the internal interface. For example, [root@amy root]# /bin/hostname amy [root@amy root]# ping -c1 amy PING amy (172.16.1.254) 56(84) bytes of data. 64 bytes from amy (172.16.1.254): icmp_seq=1 ttl=64 time=0.166 ms --- amy ping statistics --- 1 packets transmitted, 1 received, 0% packet loss, time 0ms rtt min/avg/max/mdev = 0.166/0.166/0.166/0.000 ms Notice that hostname returns amy and that when amy is pinged, the name resolves to the address 172.16.1.254. It is also a good idea to make sure you have enough disk space before going on. You can use the df -h command. This is also a good point to do other basic configuration tasks, such as setting up printers, setting the message of the day, etc. 6.3.3 Loading Software on Your ServerThe next step is to get the software you will need onto the server. This consists of the OSCAR distribution and the Linux packages you need to build the image for the client machines. For the Linux packages, first create the directory /tftpboot/rpm and then copy over the packages. It will be a lot simpler if you just copy everything over rather than try to figure out exactly what is needed. For Red Hat 9, mount each of the three distribution disks and copy over the all the RPM files from ../cdrom/RedHat/RPMS. The sequence looks like this: [root@amy /root]# mkdir -p /tftpboot/rpm [root@amy /root]# mount /mnt/cdrom [root@amy /root]# cd /mnt/cdrom/RedHat/RPMS [root@amy RPMS]# cp *.rpm /tftpboot/rpm/ [root@amy RPMS]# cd / [root@amy /]# eject cdrom You repeat the last five steps two more times, once for each of the remaining CD-ROMs. If your system automounts CD-ROMs, you'll skip the manual mounts. You'll copy more than 1,400 packages, so this can take a while with slower systems. (OSCAR will subsequently add additional packages to this directory.) If you are tight on disk space, you can install the packages on a different partition and link to them. For example, if you've installed the packages in /var/tftpboot/rpm, you could do the following: [root@amy root]# mkdir /tftpboot/ [root@amy root]# ln -s /var/tftpboot/rpm /tftpboot/rpm Note that the directory, not the individual packages, is linked. You can download the OSCAR package from http://oscar.sourceforge.net. You'll have the option of downloading OSCAR with or without the sources (SRPMs) for most of the packages in OSCAR. Since it is unlikely you'll need the sources and since you can download them separately later should you need them, it is OK to skip them and go with the standard download. We'll download to the /root directory, a safe place to install from. Next, you will unpack the code [root@amy root]# gunzip oscar-3.0.tar.gz [root@amy root]# tar -xvf oscar-3.0.tar ... This creates a directory, /root/oscar-3.0, which you should cd to for the next phase of the installation process. You may also want to browse the subdirectories that are created. 6.3.4 A Basic OSCAR InstallationBefore the installation wizard can be run the first time, it must be configured and installed. Log in as root or use su - to become root. Change to the installation directory and run configure and make install. [root@amy root]# cd /root/oscar-3.0 [root@amy oscar-3.0]# ./configure ... [root@amy oscar-3.0]# make install ... Now you are ready to run the wizard. At this point, it is generally a good idea to start another shell so the environment variables are sourced from /etc/profile.d. To start the installation, change to the installation directory and run the install_cluster script from a terminal window under X. The install_cluster script expects the private interface as an argument. Be sure to adjust this parameter as needed. Here is an example of starting the script: [root@amy oscar-3.0]# cd $OSCAR_HOME && pwd /opt/oscar [root@amy oscar]# ./install_cluster eth1 The first time you run the wizard, you will be prompted for a password for the MySQL database. Then, after a bit (depending on dependencies that need to be addressed), the OSCAR GUI-style installation wizard will appear. It may take several minutes for the wizard to appear. The console window from which the script was run will provide additional output, so keep it visible. This information is also written to an install log in the OSCAR installation directory. Figure 6-2 shows the wizard. Figure 6-2. OSCAR Installation Wizard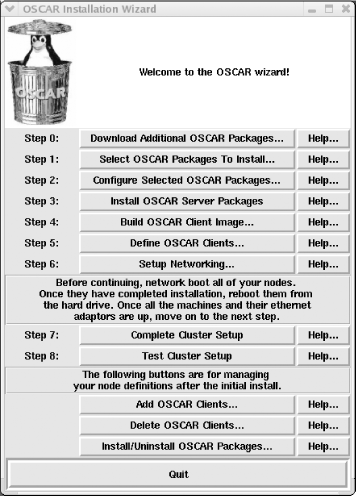 The Installation Wizard shows the basic steps that you will be going through to install your cluster. You can get a helpful explanation for any step by using the adjacent Help... button. 6.3.4.1 Step 0: Downloading additional packagesBefore the installation can proceed, you should download any third-party packages you'll want using opd. Since opd downloads packages over the Internet, you'll need a working Internet connection to use it. Of course, if you are not interested in any of the third-party packages, you can skip this step. Also, it is possible to add packages later. But it is generally simpler if you do everything at once. You'll miss out on some very nice software if you skip this step. opd can be run as a separate program outside of the wizard or you can run it from the wizard by clicking on the first button, Downloading Additional OSCAR Packages.... Generally, it is easier to run opd from the wizard, so that's what's described here. But there are some rare circumstances where you might want use the command-line version of opd, so there is a very brief description in the accompanying sidebar. When you open opd from the wizard, a window will appear as shown in Figure 6-3. Another pop up will appear briefly displaying the message Downloading Package Information... as the OSCAR repositories on the Internet are visited to see what packages are available. (Keep in mind that packages are added over time, so you may see additional packages not shown or discussed here.) Using the downloader is straightforward. If you click on an item, it will display information about the package in the lower pane, including a description, prerequisite packages, and conflict. Just select the appropriate tab. In the upper pane, put a checkmark next to the packages you want. Then click on the Download Selected Packages button. A new pop up will appear with the message Downloading Package File with a file name and a percentage. Be patient; it may look like nothing is happening although the download is proceeding normally.[3] If you have a reasonable connection to the Internet, the download should go quickly. The packages are downloaded to the directory /var/cache/oscar/downloads and are unpacked in separate directories under /var/lib/oscar/packages/.
6.3.4.2 Step 1: Package selectionThe next step is to select the packages you want to install. When you click on the Select OSCAR Packages to Install... button, the Oscar Package Selection window will be displayed as shown in Figure 6-4. This displays the packages that are available (but not the individual RPMs). Figure 6-3. OSCAR's GUI for opd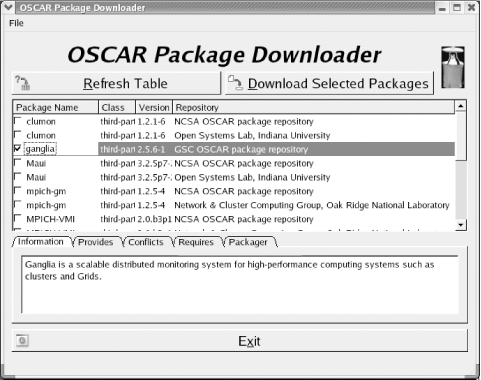 Figure 6-4. OSCAR's package selector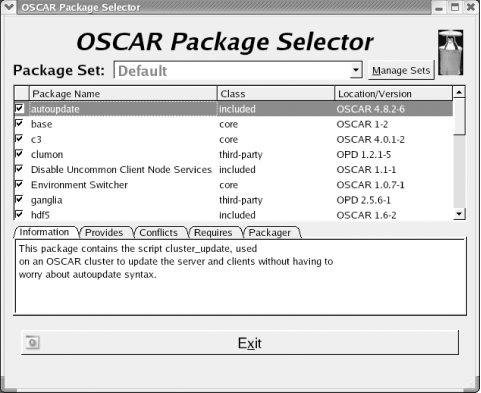 The information provided in the lower pane is basically the same as that provided by the OSCAR Package Downloader window, except the information is available for all the packages. The check boxes in the upper pane determine whether the packages are to be installed. Any package that you added with opd will also be included in the list, but by default, will not be selected. Don't forget to select these. If you haven't downloaded any packages, you probably won't need to change anything here, but scroll down the list and carefully look it over. If there is something you don't need or want, disable it. But keep in mind that it is generally easier to include something now than to go back and add it later. Don't bother trying to remove any of OSCAR's core packages; OSCAR won't let you. And it is strongly recommended that you don't remove pfilter. (If you have a compelling reason not to include pfilter, be sure to consult the installation manual for additional details explaining how to do this correctly.) OSCAR constructs an image for client nodes, i.e., a copy of the operating system files and software that will be installed on the client. With OSCAR, you can build multiple images. If you are going to build multiple images, it is possible to define different sets of installation packages. The drop-down box at the top of the window allows you to select among the sets you've defined. You can define and manipulate sets by clicking on the Manage Sets button at the top of the window. A pop-up window, shown in Figure 6-5, allows you to manipulate sets, etc. The easiest way to create a new set is to duplicate an existing set, rename the set, and then edit it. Figure 6-5. Managing package sets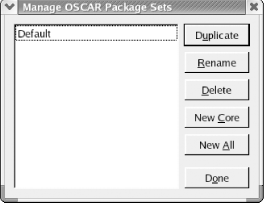 6.3.4.3 Step 2: Configuring packagesStep 2 is the configuration of selected OSCAR packages. All in all, the default configurations should meet most users' needs, so you can probably skip this step. Figure 6-6 shows the configuration menu. Most packages do not require configuration at this point and are not included in the menu. Figure 6-6. Package configuration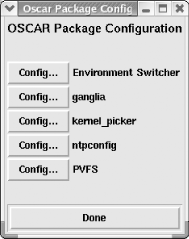 In this example, only five of the packages need or permit additional configuration. Each of these, if selected, will generate a window that is self-explanatory. The Environment Switcher allows you to select either LAM/MPI or MPICH as the default. Since a user can change the default setting, your selection isn't crucial. The switcher script can be run on the command line and is described later in the chapter. The kernel_picker is potentially a complicated option. Fortunately, if you are using the default kernel, you can ignore it completely. Basically, the kernel_picker allows you to change kernels used when building system images. You could use it to install a previously built kernel such as one configured with the openMosix extensions. The kernel_picker window is shown in Figure 6-7. (See the kernel_picker(1) manpage for more information.) Figure 6-7. GUI for kernel_picker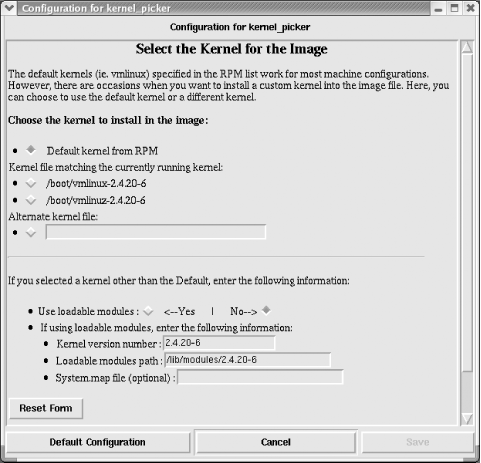 Figure 6-8 shows the ntpconfig window. The ntpconfig option allows you to specify the address of NTP servers used by the cluster server. While the server synchronizes to an external source, the clients synchronize to the cluster server. There are several default NTP servers listed with check boxes, and you can enter your own choices. In this example, salieri.wofford.int has been added. If you have a local timeserver, you'll certainly want to use that instead of the defaults, or if you know of a "closer" timeserver, you may prefer to use it. But if in doubt, the defaults will work. Figure 6-8. Configuring NTP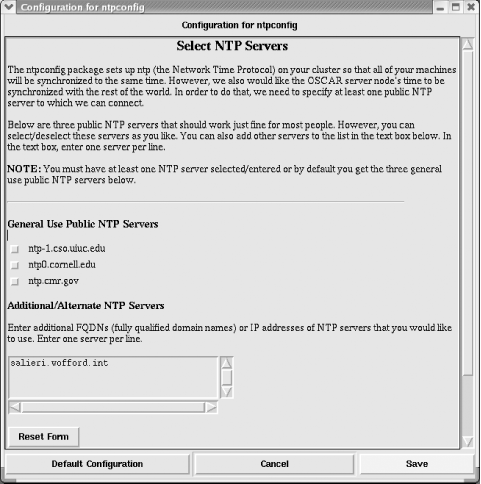 Pretty much everyone can expect to see the three choices just described. If you have added additional packages, you may have other choices. In this example, the packages for Ganglia and PVFS were both added, so there are configuration windows for each of these. (With Ganglia you can change the naming information and the network interface used to reach the client nodes. With PVFS you can change the number of I/O servers you are using.) When you complete a step successfully, you should see a message to that effect in the console window, as shown in Figure 6-9. For some steps, there is also a pop-up window that tells you when the step is finished. While the first two steps are optional, in general be very careful not to go to the next step until you are told to do so. The console window also displays error messages. Unfortunately, the console can be a little misleading. You may see some benign error messages, particularly from rpm and rsync, and occasionally real error messages may get lost in the output. Nonetheless, the console is worth watching and will give you an idea of what is going on. Figure 6-9. Console window during installation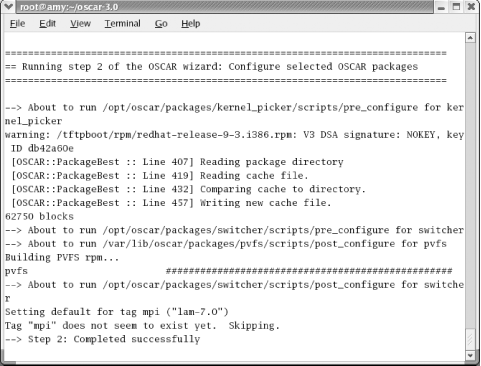 6.3.4.4 Step 3: Installing server softwareIn Step 3, you will install all the packages that the server needs and configure them. There are no fancy graphics here, but you will see a lot of activity in the console window. It will take several minutes to set up everything. A pop-up window will appear, telling you that you were successful or that there was an error, when this step completes. If all is well, you can close the popup window and move on to the next step. If not, you'll need to go to the console window and try to puzzle out the error messages, correct the problem, and begin again. You should need to run this step only once. 6.3.4.5 Step 4: Building a client imageIn Step 4, you build the client image. The client image is all the software that will be installed on a client, including the operating system. Since it is possible to create multiple client images, you are given the option to specify a few details as shown in Figure 6-10. You can specify image names if you have multiple images, the location of the packages used to build the image, and the names of the package list and disk partition files. These last two files are described later in this chapter. The defaults are shown in the figure. If you aren't building multiple images, you can probably stick with the defaults. You can also determine how the IP addresses of the clients are set and the behavior of the clients once the installation completes. Your choices are dhcp, static, and replicant. With static, the IP addresses will be assigned to the clients once and for all at the time of the installation. This is the most reasonable choice. dhcp used DHCP to set IP addresses, while replicant doesn't mess with addresses. The next button allows you to turn multicasting on or off. The possible post-install actions are beep, reboot, or shutdown. With beep, the clients will unmount the file system and beep at you until rebooted. reboot and shutdown are just what you would expect. All in all, OSCAR's defaults are reasonable. When you have made your selection, click on Build Image. Figure 6-10. Creating client images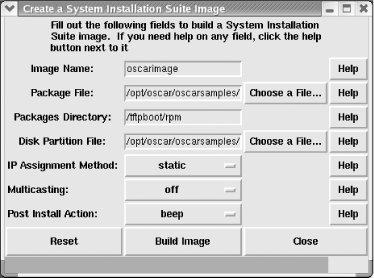 OSCAR uses SIS to create the image. Unlike our example in Chapter 8, you do not need to create a sample system. Image creation is done on the server. This step takes a while to complete. There is a red bar that grows from left to right at the bottom of the window that will give you some idea of your progress. However, you will be done before the bar is complete. Another pop-up window will appear when you are done. You'll run this step once for each different image you want to create. For most clusters, that's one image. Keep in mind that images take a lot of space. Images are stored in the directory /var/lib/systemimager/images. 6.3.4.6 Step 5: Defining clientsOnce you have built the image, things should start going a lot faster. Step 5 defines the scope of your network. This is done using the window shown in Figure 6-11. If you have multiple images, you can select the image you want to use in the first field. The next five fields are used to specify how node names will be constructed. The host name is constructed by appending a number to the base name. That number begins at the start value and is padded with leading zeros, if needed, as specified by the padding field. The domain name is then appended to the node name to form the fully qualified domain name or FQDN. The number of hosts you create is specified in the fourth field. In this example, four nodes are created with the names node1.oscar.int, node2.oscar.int, node3.oscar.int, and node4.oscar.int. (With padding set to 3, you would get node001.oscar.int, etc.) OSCAR assumes that hosts are numbered sequentially. If for some reason you aren't building a single block of sequential hosts, you can rerun this step to build the block's hosts as needed. The last three fields are used to set IP parameters. In this example, the four hosts will have IP addresses from 172.16.1.1 through 172.16.1.4 inclusive. Figure 6-11. Defining OSCAR clients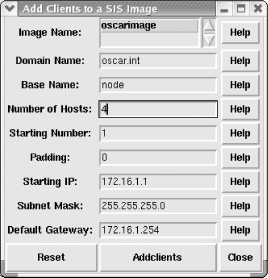 Once you have the fields the way you want them, click on the Addclients button. You should see a small pop-up window indicating that you were successful. If so, you can close the pop-up window and the client definition window and go on to the next step. 6.3.4.7 Step 6: Setting up the networkStep 6, shown in Figure 6-12, sets up the DHCP server and maps IP addresses to MAC addresses. (It is possible to run OSCAR without configuring the head as a DHCP server, but that isn't described here.) This step requires several substeps. First, you will need to collect the MAC or Ethernet addresses from the adapters in each of the client machines. You can do this manually or use OSCAR to do it. If you select the Collect MAC Addresses button and then power on each client, OSCAR will listen to the network, capture MAC addresses from DHCP requests, and display the captured addresses in the upper left pane. However, if no DHCP requests are generated, the machines won't be discovered. (Be sure to turn this option off when you have collected your addresses.) Under some circumstances, it is possible to collect MAC addresses from machines not in your cluster. If this happens, you can use the Remove button to get rid of the addresses you don't want. If you collect the MAC addresses, be sure to save them to a file using the Export MACs to file... button. Figure 6-12. Setting up networking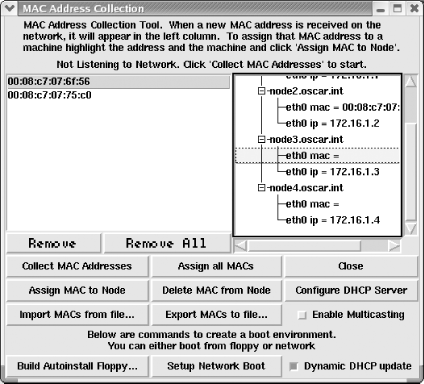 Alternately, if you know the MAC addresses, you can enter them into a file and read the file with the Import MACs from file... button. To create the file, just put one MAC address on a line with the fields separated by colons. Here is part of a MAC file: 00:08:c7:07:6e:57 00:08:c7:07:68:48 00:08:c7:07:c1:73 00:08:c7:07:6f:56 OSCAR can be picky about the format of these addresses. (If you are collecting MAC addresses rather than importing them from a file, it is a good idea to export the collected MAC addresses. In the event you want to reinstall your clusters, this can save some work.) Once you have the MACs, you'll need to assign them to the clients displayed in the top right pane. You can do this all at once with the Assign all MACs button, or you can do it individually with the Assign MAC to Node button. While the first method is quicker, you may prefer the second method to better control which machine gets which address. With the second method, click on a MAC address to select it, click on a client's interface, and then click the Assign MAC to Node button. Repeat this step for each client. If the Dynamic DHCP update checkbox is selected, then each time you assign an MAC address, the DHCP server is refreshed. If not selected, then once you have configured your nodes you can click on Configure DHCP Server. OSCAR creates the DHCP configuration file /etc/dhcpd.conf and starts DHCP. If you already have a DHCP configuration file, OSCAR will save it as dhcpd.conf.oscarbak before creating the new file. SIS is used to push files to the nodes. By default, images are transferred using rsync. It is also possible to distribute images using flamethrower, a multicast-based program. Because the multicast facilities are still somewhat experimental, rsync is the recommended method for new users. If you elect to use flamethrower, you'll need to ensure that your network is properly configured to support multicasting. If the Enable Multicasting checkbox is selected, flamethrower is used to push files. If it is unselected, rsync is used. Chapter 8 provides a detailed description of SIS and rsync. Next, you'll need to create an autoinstall diskette. When the potential client machines are booted with this diskette, the process of downloading their image begins. Click on the button in the lower left of the window and a new window will take you through the creation of the floppy. Use the default standard when prompted for a flavor. If you have a large cluster, you should create several diskettes so you can install several systems at once.
You are through with the Mac Address Collection window but there is one more thing you must do before going to the next step-install the image on your clients. While this sounds formidable, it is very straightforward with OSCAR. Just insert the floppy you just created and reboot each system. You should see a "SYSLINUX 2.0 Screen" with a boot prompt. You can hit return at the prompt or just wait a few seconds. The system will go to the OSCAR server and download and install the client operating system. Repeat this process with each system. You can do all your clients at the same time if you wish. The boot floppy is only used for a couple of minutes so once the install is on its way, you can remove the floppy and move on to another machine. If you have several floppies, you can get a number of installations going very quickly. The installation will depend on how many clients you have, how fast your network is, and how many packages went into your cluster image, but it should go fairly quickly.
When a client's image is installed, the machine will start beeping. If you haven't already removed the floppy, do so now and reboot the system. The filesystems on the clients will not be mounted at this point so it is safe to just cycle the power. (Actually, you could have set the system to automatically reboot back in Step 4, but you'll need to make sure the floppy has been removed in a timely manner if you do so.) 6.3.4.8 Step 7: Completing the setupOnce all the clients have booted, there are a few post-install scripts that need to be run. Just click on the button. After a few minutes, you should get the popup window shown in Figure 6-13. Well done! But just to be on the safe side, you should test your cluster. Figure 6-13. Success!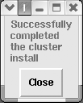 6.3.4.9 Step 8: TestingStep 8 tests your cluster. Another console window opens and you see the results from a variety of tests. Figure 6-14 shows what the output looks like early in the process. There is a lot more output that will vary depending on what you've installed. (Note that you may see some PBS errors because the PBS server is initially shutdown. It's OK to ignore these.) Figure 6-14. Testing the cluster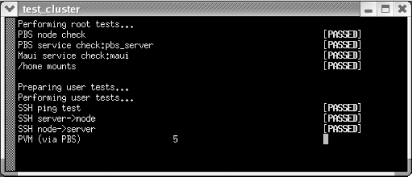 Congratulations! You have an OSCAR cluster up and running! This probably seems like a complicated process when you read about it here, but it all goes fairly quickly. And think for a moment how much you have accomplished. If something may goes wrong with your installation, OSCAR provides a start_over script that can be used to clean up from the installation and give you another shot at installing OSCAR. This is not an uninstaller. It will not return your machine to the pristine state it was in before the installation but should clean things up enough so that you'll be able to reinstall OSCAR. If you use this script, be sure to log out and back onto the system before you reinstall OSCAR. On the other hand, you may just want to go back and do a clean install. 6.3.5 Custom InstallationsAs should be apparent from the installation you just went through, there are several things you can do to customize your installation. First, you can alter the kernel using kernel_picker. For example, if you want to install the openMosix kernel on each system, you would begin by installing the openMosix kernel on the head node. Then, when installing OSCAR, you would use kernel_picker to select the openMosix kernel. This is shown in Figure 6-15. Figure 6-15. Using the openMosix kernel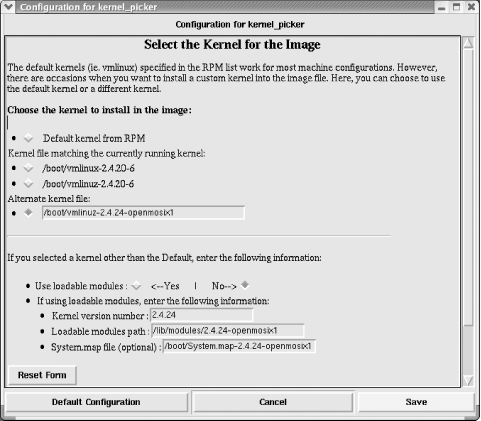 Of course, for a new kernel to boot properly, you'll need to ensure that the appropriate kernel load modules are available on each machine. For openMosix, you can do this by installing the openMosix package. Fortunately, it is straightforward to change the packages that OSCAR installs. For example, if you are installing the openMosix kernel, you'll want the openMosix tools as well. If you look back at Figure 6-10, one of the fields was Package File. In the directory /opt/oscar/oscarsamples there are several files, one for each supported Linux distribution. These files contain the packages that will be installed by OSCAR. For example, for Red Hat 9 the file is redhat-9-i386.rpmlist. If there are some additional packages that you would like to install on the cluster nodes, you can make a backup copy of the desired lists and then add those packages to the list. You should put one package per line. You need to include only the package name, not its version number. For example, to install the openMosix tools package, you could add a line with openmosix-tools (rather than openmosix-tools-0.3.5-1.i386.rpm). The package list is pretty basic, which leads to a quick install but a minimal client. Of course, you'll need to make sure the packages are in (or linked to) the /tftpboot/rpm directory and that you include all dependencies in the package list. While you are in the /opt/oscar/oscarsamples directory, you can also alter the disk setup by editing either the sample.disk.ide or sample.disk.scsi file. For example, if you have an IDE drive and you want to use the ext3 file system rather than ext2, just change all the ext2 entries to ext3 in the file sample.disk.ide. Of course, unless you have a compelling reason, you should probably skip these changes. 6.3.6 Changes OSCAR MakesIt is pretty obvious that OSCAR has just installed a number of applications on your system. As you might expect, OSCAR made a number of additional, mostly minor, changes. It will probably take you a while to discover everything that has changed, but these changes shouldn't cause any problems. While OSCAR tries to conform to standard installation practices, you won't get exactly the same installation and file layout that you might have gotten had you installed each application individually. The changes are really minimal, however. If you've never done individual installations, the whole issue is probably irrelevant unless you are looking at the original documentation that comes with the application. You can expect to find most configuration files in the usual places-typically but not always under the /etc directory. Configuration files that OSCAR creates or changes include c3.conf, crontab, dhcpd.conf, gmetad.conf, gmond.conf, ntp.conf, ntp/step-tickers, pcp.conf, pfilter.conf, ssh/ssh_config, and files in xinetd.d. OSCAR will also update /etc/hosts, /etc/exports, and /etc/fstab as needed. Several of the packages that are installed require accounts, which are created during the install. Take a look at /etc/passwd to see which accounts have been added to your system. For the global user profiles, OSCAR includes a link to a script to set up SSH keys and adds some paths. You might want to look at /etc/profile.d/ssh-oscar.sh and /etc/profile.d/ssh-oscar.csh. OSCAR restarts all affected services. 6.3.7 Making ChangesThere are three more buttons above the Quit button on the wizard. Each does exactly what you would expect. The Add OSCAR Clients... adds additional nodes. Adding a node involves three, now familiar steps. When you select Add OSCAR Clients... you'll get the menu shown in Figure 6-16. Figure 6-16. Adding nodes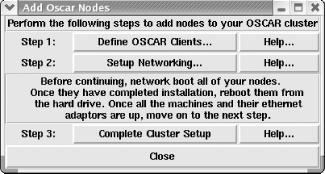 The first step defines the client or range of clients. You'll get the same menu (Figure 6-11) you used when you originally set up clients. Be sure you set every field as appropriate. OSCAR doesn't remember what you used in the past, so it is possible to end up with inconsistent host names and domains. (If this happens, you can just delete the new nodes and add them again, correcting the problem, but be sure to exit and restart OSCAR after deleting and before adding a node back.) Of course, you'll also need to set the starting node and number of nodes you are adding. In the second step, you map the MAC address to a machine just as you've done before (see Figure 6-12). Finally, with the last step you run the scripts to complete the setup. Deleting a node is even easier. Just select the Delete OSCAR Clients... button on the wizard. You'll see a window like the one shown in Figure 6-17 listing the nodes on your cluster. Select the nodes you want to delete and click on the Delete clients button. OSCAR will take care of the rest. (Deleting a node only removes it from the cluster. The data on the node's hard disk is unaffected as are services running on the node.) Figure 6-17. Deleting nodes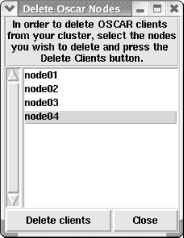 Figure 6-18. Adding and removing packages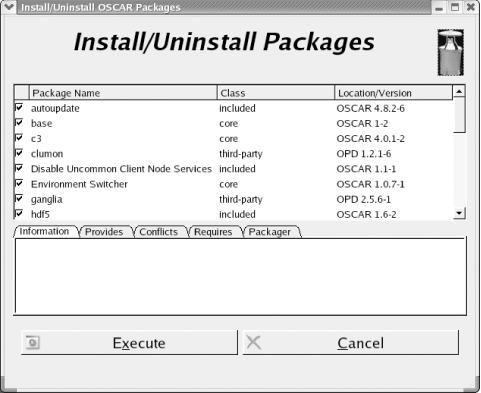 Finally, you can install and uninstall packages using the Install/Uninstall OSCAR Packages... button. This opens the window shown in Figure 6-18. Set the checkbox and click on the Execute button. Any new packages you've checked will be installed, while old packages you've unchecked will be uninstalled. This is a new feature in OSCAR and should be used with caution. |
|
|
Table of Contents |
|
