It's been our experience that many people get stuck at this point in a development project. (This is especially likely if they've skipped preliminary design.) The technique we describe below evolved from helping students get "unstuck" during dozens of training workshops over the past several years.
Figure 7-2 shows the four steps you perform when drawing sequence diagrams the ICONIX way.
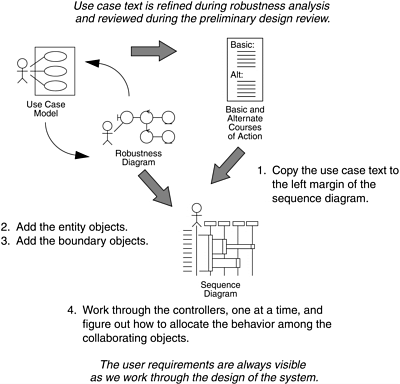
Copy the text for the given use case from the use case specification. Paste it onto the left margin of the page. Copying use case text to begin the corresponding sequence diagram enables that text to serve as an ongoing reminder of what you're trying to accomplish. The result of this is that when you're doing the design, the required system behavior is always staring you in the face. Note that if you don't have all the relevant alternative courses of action written out for each of your use cases, you should not proceed with your sequence diagram. The diagrams will not cover all special cases, and you will not uncover all the behavior of the use case. This means that you won't discover all of the necessary methods for your objects. (Do Not Pass GO; Do Not Collect $200.)
Add the entity objects from the robustness diagram. Each of these objects is an instance of a class that appears on the class diagram that represents your static model. (If you forgot to update your static class diagrams in response to new objects discovered during robustness analysis, do it now. These objects should have most of their attributes in place. Many of them will be serving data to other objects.) You can expect to discover missing attributes as you work through your sequence diagram. Be religious about adding them to your static model; this is likely to be your last step before code.
Add the boundary objects and actors from the robustness diagram. We didn't mention adding boundary objects to your domain model because these objects are part of the solution space; the domain model addresses the problem space. By accounting for boundary objects on your sequence diagrams, you begin integrating the two spaces at the start of detailed design.
If you follow the ICONIX approach, the first three steps in drawing sequence diagrams are completely mechanical in nature. (In fact, we've reduced them to an executable script that automatically generates a skeleton of a sequence diagram. If you use Rational Rose, you can download a copy of this script from http://www.iconixsw.com/RoseScripts.html. Similar functionality is becoming available for other tools, such as GDPro from Embarcadero and Together/J from TogetherSoft.) Scripts such as this have proven to be very useful in achieving momentum as you get serious about your design. You get an immediate payback in time savings from the work you invested in your robustness diagrams, which can be very useful as you get serious about your design. The fourth step, deciding which methods go on which classes, is the essence of interaction modeling.
Putting methods on classes involves converting the controllers from your robustness diagram, one at a time, to sets of methods and messages that embody the desired behavior. (Occasionally, you might elect to turn a controller into a real control object.) Along these lines, we suggest that you use your robustness diagram as a checklist to make sure you have all the required system behavior accounted for on your sequence diagrams. You simply check off each control object as you draw the corresponding message(s) on the sequence diagrams. This will help you eliminate the "oops, I forgot about that function" error-which, as you might guess, is an insidious one. (Note that one controller on a robustness diagram can translate to several methods on a sequence diagram.)
There are two basic strategies for converting the controllers from your robustness diagrams: "control in the screen" and "use case controller." If you were to head consistently in one or the other direction during your sequence diagramming efforts across all of your use cases, that would qualify as patternizing. The idea is that the team members who are responsible for the diagrams should establish, early in this task, some design standards that can be used across all your use cases.
Looking in another direction: As you're diagramming the interactions among the various objects, well-established design patterns, such as those you might find in the Gang of Four book (Erich Gamma, Richard Helm, Ralph Johnson, and John Vlissides: Design Patterns, Addison-Wesley, 1995) would fit in nicely. Or perhaps you might develop new patterns to establish a standardized approach to design problems that appear across multiple use cases. Now is the time to visit your static model and reflect those design decisions on your class diagrams, then draw your sequence diagrams to match. This is where much of real object-oriented design (OOD) takes place.
You've already checked the robustness diagrams against your use case text. By checking your sequence diagrams against your robustness diagrams, you add a measure of assurance that you're designing in response to what the user needs (in other words, meeting your requirements).