|
|
Table of Contents |
|
Hack 4 Create SWFs from Animated GIFs
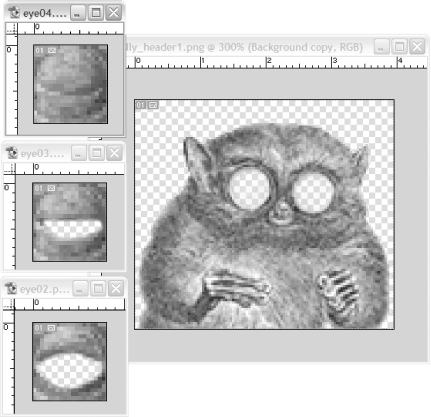
Quickly repurpose animated GIFs for use in Flash effects. I thought it would be fun to show how you can enhance a GIF by reproducing it in Flash. So I went to the O'Reilly home page (http://www.oreilly.com) where I was greeted by the little critter-I'm told it's a tarsier-shown in Figure 1-17. The filename is oreilly_header1.gif, which is typical of slices created for an HTML-based table, so I knew I had a GIF I could work with. Anyway, I kept looking at him, given that he looks so cute, and then I blinked. He blinked back. After the surprise and obligatory double take, I realized he's an animated GIF. Figure 1-17. The O'Reilly tarsier mascot on oreilly.com So I started thinking...doing a Flash version of this critter would be a good example of the difference between Flash and traditional HTML design. This hack shows how you can reduce filesizes by using Flash instead of your animated GIFs. Once the 2D blinking tarsier animation is in Flash, you can modify it to simulate a 3D blinking tarsier [Hack #35] . The GIF Animated CritterWe can obtain a copy of our animated friend using a web browser's Save option. In Internet Explorer on Windows, for example, we right-click on the GIF and select Save Picture As from the pop-up menu to download the image to our local drive. Another advantage of Flash animations over animated GIFs is that you can make them harder to steal than this critter was from O'Reilly's site by obfuscating the SWF [Hack #98] in the browser cache, which is where users ordinarily look for downloaded SWFs. If you open the O'Reilly GIF file in an image editor (such as Fireworks or Photoshop/ImageReady), you will see that the blink animation runs every 12 seconds (the first frame has a delay of 12 seconds), and the animation is 12 seconds in total. One thing worth noticing is that an awful lot of pixels in the image don't change between frames-only the eyes do. So converting it to Flash and animating only the eyes should give us a big filesize advantage straight away. Notice also that the animation is not interactive. In this case, the lack of interactivity is appropriate design-you don't want the critter's actions to distract the reader-but we will add interactivity for fun and show that the SWF will still be smaller than the original GIF. Create the Animation AssetsThe best way to import all the sections of our GIF animation is as a series of PNGs because these will not reduce the quality of the original (especially if we use PNG-24), and we can easily add an alpha channel. Although GIFs support transparency, it's really only a mask in which you can have pixels showing or not showing. The PNG-24 format supports true alpha, where transparency has a percentage value. Figure 1-18 shows the PNGs (as seen in Photoshop) ready for export into Flash. Figure 1-18. The animated GIF as PNG files I've used a couple of cool hacks here:
To add transparency to an imported image in Photoshop:
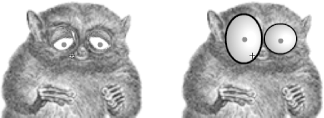
If you import the PNG images into Flash (using File Figure 1-19. The eyeballs, pupils, eyelids, and body Note that the eyeballs are vectors in this version. The blink sequence is implemented as a movie clip consisting of the three bitmaps with the eyes closing progressively and the same three bitmaps being reversed to reopen them. The pupils are two dots named leftEye_mc and rightEye_mc. When controlled by the following script, they will keep a wary eye on the mouse cursor, as shown in Figure 1-20. As usual, you can add this code to the first frame of your actions layer on the main timeline. Figure 1-20. Tracking the mouse position followMouse = function ( ) {
this.startX = this._x;
this.startY = this._y;
this.onEnterFrame = animateEye;
};
animateEye = function ( ) {
var distX = (_xmouse - this._x) / 50;
var distY = (_ymouse - this._y) / 50;
if (Math.abs(distX) < 5) {
this._x = this.startX+distX;
}
if (Math.abs(distY) < 5) {
this._y = this.startY+distY;
}
};
leftEye_mc.onEnterFrame = followMouse;
rightEye_mc.onEnterFrame = followMouse;The followMouse( ) function is specified as the onEnterFrame event handler for both pupils. Once it is called, it simply captures the starting pupil position and changes the onEnterFrame event handler to animateEye( ) for subsequent frames. This function moves the pupils a distance from the start position, based on the mouse position, giving the appearance that the critter is watching the mouse. You can, of course, give your critter a much wider range of emotions than the animated GIF, as shown in Figure 1-21, but that's not a hack-that's what Flash is all about. Figure 1-21. A sad tarsier and his drinking buddy Final ThoughtsAlthough this is a fairly standard animation, the way it was (very) quickly converted from an existing animated GIF shows how easy it is to create a more versatile Flash animation. Bitmaps with transparency can be stacked above one another to create layered animations using the animated GIF bitmaps themselves. This trick is also a good way to export Photoshop PSD files into Flash; simply export each layer as a separate PNG-24, which will include transparency. You can then reassemble the PNGs in the correct order using Flash layers. The only difference, of course, is that you can then animate your layers! |
|
|
Table of Contents |
|