|
|
Table of Contents |
|
Hack 35 Simulate 3D
Flash doesn't support true 3D, but you can fake it by arranging 2D image slices as if they are filling a 3D space. Although Flash doesn't support 3D assets, you can simulate 3D in various ways using 2D assets. One simple approach is to arrange slices of 2D imagery but offset them to create the illusion of 3D. That is, a stack of flat 2D slices is used to create the illusion of a 3D object with volume. This hack is inspired by a number of sites including the 3D head at sofake (go to http://www.sofake.com, click the 10th white square at the bottom of the home page, and click the link for haircut.swf ) and Andy Foulds's "Leader of the Free World" (go to http://www.foulds2000.freeserve.co.uk/index_v2.html and click on the 8th square above the Amusements heading). However, I first saw this trick used back in Flash 4 by Rouien Zarin (http://www.zarinmedia.com) and Ant Eden (http://www.arseiam.com). Ant Eden also designed a wonderful 3D slice engine, which extends the concept by rotating and scaling the slices (click on the 3D icon at http://www.arseiam.com/index2.htm). This allows his slices to move in 3D space, rather than in just two dimensions as per this hack. We learned earlier how to create a Flash animation by stripping a GIF, importing it into Flash, and then rebuilding it with a richer set of animation options [Hack #4]. This hack introduces the O'Reilly mascot (a tarsier from the cover of Learning the vi Editor) to the world of 3D. Although he doesn't look very 3D in Figure 5-1, see the critter02.fla on this book's web site to fully appreciate the effect. Figure 5-1. A 3D tarsier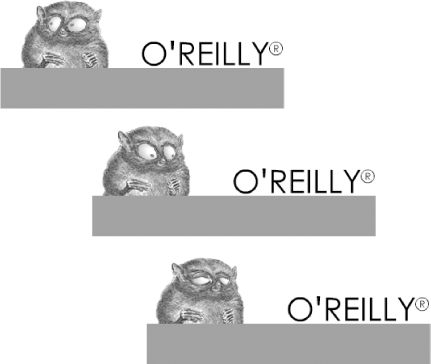 Slice 2D to Create an Extra DimensionSuppose you are slicing an apple parallel to the core. If the slices are cut really thin, you end up with many 2D cross sections. By stacking them in the order they existed in the original apple, you can re-create a 3D apple. This hack works on the same principle: create a lot of 2D slices of an object, then move them as if they were stacked together in the original object. If done properly, the result looks like it is a 3D shape that has volume. Cut Up the TarsierWe create our slices using the all-purpose "you'll never think of this" solution: masking. Think about what the tarsier would look like if we sliced him into cross sections (from front to back) and put him back together. Instead of seeing his internal organs, all you see is his outer pelt. Taking that into account, the slices we need would look something like those shown in Figure 5-2. Figure 5-2. Tarsier slices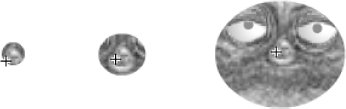 Get the picture? It's simply an expanding circular mask centered on the tarsier's snout (the closest point to us in 3D space). However, if we stack these slices on a flat screen, they don't appear to have any depth; all we see is the original tarsier. We add depth by emulating what happens when the tarsier turns his body. If the tarsier turns to his right (our left), in reality, the slices must rotate to display his left side (on our right). But if we keep the rotation small, we can approximate the 3D movement by simply sliding the slices around. The topmost slice (the one in the foreground) moves slightly to the left, and the bottommost slice (furthest away from the viewer) moves slightly to the right. That's the whole premise of the hack, and once you know it, the rest is relatively simple. To create the slices, we tween an expanding circle and use it to mask the original tarsier clip. The mask tween stops at frame 19 so that at frame 20 we can see our full, unmasked critter as the last slice. To see the slices, load up critter02.fla from this book's site, edit symbol critter in 3D in the Library, and scrub the playhead along the symbol's timeline, as shown in Figure 5-3. Figure 5-3. The tweened circular mask progressively reveals the tarsier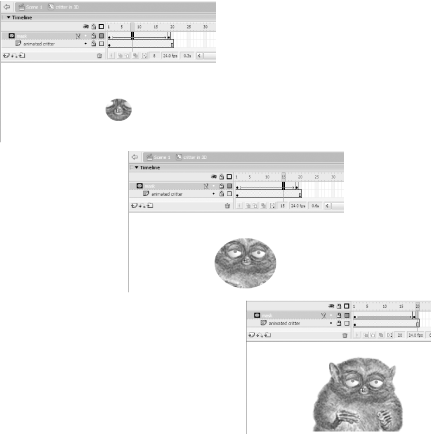 To display 20 slices of the tarsier on the Stage, attach 20 instances of the critter in 3D clip to the main timeline. Each slice's timeline is stopped at one of the 20 frames in our animation. this.attachMovie("menu", "menu_mc", 1000);
// Place the O'Reilly bar on the Stage
menu_mc._x = 200;
menu_mc._y = 270;
// Create an initialization object for the
// movie clips we are placing on stage.
var init:Object = new Object( );
init._x = 200;
init._y = 200;
var sliceDepth:Number = 20;
// Attach 20 critter movie clips to the Stage, each
// stopped at a different frame to create the slices.
for (var i:Number = 1; i < sliceDepth + 1; i++) {
var critterName:String = "critter" + (sliceDepth - i);
var critter:MovieClip = this.attachMovie("critter",
critterName, sliceDepth - i, init);
critter.gotoAndStop(i);
critter.offset = ((sliceDepth - i) - (sliceDepth / 2)) * 0.05;
critter.onEnterFrame = initClip;
}Attach the preceding code to frame 1 of the main timeline. The 20 slices (named critter20 through critter1) are placed at depths from 20 down to 1 at position (200, 200). All standard stuff. This line is the important one: critter.gotoAndStop(i); It stops each instance at one of the 20 frames in the masking animation, giving us 20 unique slices. Another important line is this one: critter.offset = ((sliceDepth - i) - (sliceDepth / 2)) * 0.05; It adds a property named offset, whose value varies between -0.5 and 0.5, to each clip. The offset controls how much our slices move to the left and right in response to mouse movement (our pet tarsier is trained to turn toward the mouse position). The event handlers that control the movement per slice are shown next. The initClip( ) function is used as the onEnterFrame( ) event handler for each slice; it's a simple initialization script that deletes itself after running once. initClip = function ( ) {
// Initialize this slice
this.startX = this._x;
this.startY = this._y;
delete (this.onEnterFrame);
this.onMouseMove = mover;
};
mover = function ( ) {
// Move this slice according to its position in the slice stack.
var distX = this.offset * (_xmouse - this._x) / 50;
var distY = this.offset * (_ymouse - this._y) / 50;
this._x = this.startX + distX;
this._y = this.startY + distY;
updateAfterEvent( );
};Following initialization, the mover( ) function runs whenever the mouse moves. This onMouseMove( ) event handler is almost identical to the earlier eye movement code implemented within an onEnterFrame( ) handler [Hack #4]. The major difference is that in this slice animation, the offset property gives a slightly different range of movement for each slice. That's all there is to the effect. It's a surprisingly simple concept and simple code. Why did we choose a different event than the one used in earlier eye movement animation? Flash issues onMouseMove events as frequently as it can while the mouse is moving. The onEnterFrame event runs at the frame rate. When the mouse is stationary, onEnterFrame events are still issued, but during mouse movement, onEnterFrame events occur less often than onMouseMove events. You can confirm this by running both event handlers at the same time with the onMouseMove( ) handler incrementing a counter variable each time it is called, and the onEnterFrame( ) handler decrementing the same counter. You will find that the counter climbs when the mouse is moving because, during that time, onMouseMove( ) is invoked more often than onEnterFrame( ). So we choose an event to supply responsiveness in the user's area of focus: we concentrate more processing power [Hack #71] on the 3D animation because we expect the user to look at it more intently. The earlier eye movement animation is too subtle to look any better if we throw more processing resources at it, so we use the less-processor-intensive onEnterFrame event instead. You can also vary the width and height of the slices as they move. As an object rotates left or right, each slice's width should change when viewed from the front. Likewise, when an object rotates up or down, each slice's height should change. Adding the following lines (shown in bold) to the main animation script sometimes (but not always) helps the effect look more realistic: mover = function ( ) {
// Move this slice according to its position in the slice stack.
var distX = this.offset * (_xmouse - this._x) / 50;
var distY = this.offset * (_ymouse - this._y) / 50;
this._x = this.startX + distX;
this._y = this.startY + distY;
this._width = 100 - Math.abs(distX)
this._height = 100 - Math.abs(distY)
updateAfterEvent( );
};Final ThoughtsOur 2D-to-3D bitmap effect could use further refinement now that you grasp the basic technique. The basic technique effectively maps the image slices onto a cone. If you move the mouse cursor a great distance from the tarsier, the cone shape reveals itself, as seen in Figure 5-4. Figure 5-4. Slices are subject to distortion because they are mapped to a cone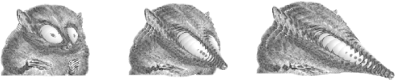 Because the mask consists of a simple circle that gets bigger, the slices' perimeters mark out a cone. By hand drawing each slice mask using perimeters that map to the true 3D object more closely, you can create an effect that holds up at severe angles, allowing rotation to almost 180 degrees. (You can't rotate to a full 180 degrees because the thickness of the slices tends toward zero at that extreme. You'd have to switch to another set of slices created with the object viewed at a different angle.) The more slices you use, the better the effect, which comes at the expense of performance. You can make your slices more numerous where the contour of the 3D shape curves the most. You must then vary the offset in a nonlinear way to emulate the fact that the slices are no longer equally spaced in depth. |
|
|
Table of Contents |
|