|
|
Table of Contents |
|
Hack 18 Imitate Escher
Create repeating tiles reminiscent of M.C. Escher's artwork. Repeating tiles need not be limited to simple geometric grids. This hack explores the principles of the divided plane to create complex interlocking tiles. Even if you're not familiar with M.C. Escher by name, you'll undoubtedly recognize many of the Dutch artist's famous works. We didn't license them for reproduction, but you can find them all over the Web, such as at http://www.mcescher.com. Some of his most popular works make use of divided planes, in which one or more repeated shapes interlock seamlessly. Some of Escher's most famous examples include interlocking birds, fish, and reptiles. You can Google for "tessellation" or "divided plane" to find many such examples on the Web. ("Tessellation" is just a fancy word for seamless tiling, such as in a checkerboard or mosaic pattern.) The Divided PlaneWith the negative-space trick [Hack #16] behind us, you may be feeling pretty confident. That technique used a single tile with negative and positive space to simulate a geometric pattern, but the tiles were all square, and the design consisted of simple geometric shapes. What if you want to create an Escher-like repeating pattern that uses complex interlocking shapes? How do we make tiles more interesting than squares and hexagons yet ensure they interlock seamlessly? The trick to making seamless tiles is to start with a regular shape and modify it into something more interesting. Let's again start with a square because it is easiest to work with. Draw a square. Convert it a movie clip symbol using F8. Next, tile other square movie clips around it (i.e., arrange multiple instances of the movie clip symbol on stage) so that you end up with a 3x3 grid as shown in Figure 3-18. Double-click the middle clip in the grid to edit it in place. Figure 3-18. A grid of squares forms the basis for our interlocking tiles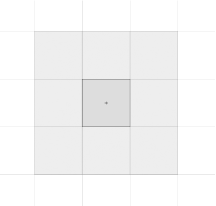 Now modify, say, the left side of the square by curving the side using the Selection tool. All nine movie clip instances change to reflect this, as shown in Figure 3-19, so you can see what a 3x3 grid of your new tile will look like. However, you'll notice that some of the tiles obscure the curved part of tiles below, so the pattern isn't seamless. Figure 3-19. Adding a curved side to make the tile more interesting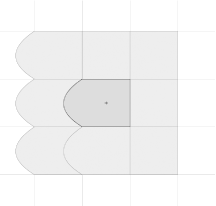 So let's modify the righthand side of our clip so that it still tiles seamlessly with the left edge of the adjacent tile. How do you make a perfect fit? Simply copy the stroke from the left edge of the clip and use it to replace the right edge of what was formerly a square. You can, of course, use the Zoom tool to get the placement right. You will see the other instances again give you real-time feedback of the finished pattern. Figure 3-20 restores our seamlessly tiled pattern in a slightly more interesting design than the original square tiles. Figure 3-20. Matching the curve on the other side to maintain tessellation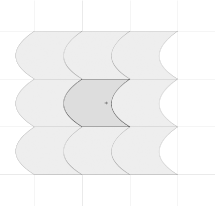 Without much effort, you've created a new shape that can be tiled.
Of course, this is a long way from the work of Escher, or is it? You can create a tile with an arbitrary outline by "cutting" pieces from one side of the shape and pasting the piece on the other side of the shape. Then you can look at the outline of the shape and decide what it looks like. Draw in an eye and some feathers, and perhaps it looks like a bird. Draw in scales and fins, and perhaps it looks like a fish instead. A repeating tile doesn't necessarily have to cover the entire area seamlessly to interlock. So far, we have just changed the shape outline, but you can also increase the whitespace between tiles simply by scaling the movie clip you are editing. The 3x3 grid will automatically update to reflect the additional areas between tiles created by this change, as shown in Figure 3-21. You can now create more complex tile patterns because the tiles must interlock only where they touch. We are effectively assuming the whitespace is actually part of the tile and using it as our "positive space." Figure 3-21. If you scale the middle movie clip while in Edit in Place mode, the other instances will reflect the change and also scale down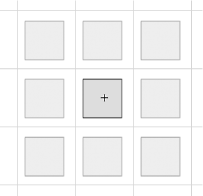 As soon as you realize that the tiles don't necessarily have to completely fill the tiled area (but do have to interlock), you can create a new set of shapes similar to the ones shown in Figure 3-22. Figure 3-22. A flock of spiky things...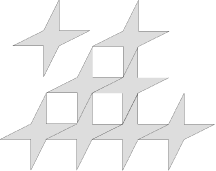 The shape at the top left of Figure 3-22 doesn't look as if it will tile, but it does, as you can see by the pattern created beneath it. The trick is to scale your shape as well as change its basic outline. You can also rotate it: the symmetry of the grid will reflect anything you do as long as you do not exit out of Edit in Place mode. We are effectively using the fact that the 3x3 matrix will remain symmetrical around any line that passes through the center of the matrix. Of course, a flock of spiky things is not of much use, but that was just my starting point. After creating a 3x3 grid of spiky things, I turned them into something much more in keeping with Escher, as shown in Figure 3-23. Here, I made sure that the curves of the bird's wings and neck fit into each other even when offset. I started by adding lots of positive space (i.e., I scaled the squares down to create lots of whitespace between them), then filled it with the bird's wings, tail, and neck. I also rotated the whole 3x3 matrix slightly to get the diagonal effect of the tessellated flock (note that this is different from rotating the central square in Edit-in-place mode, which causes each tile to remain where it is but rotate on its own axis). And if you draw in the ears and a nose, the negative space in Figure 3-23 looks like a sleeping bunny rabbit! Figure 3-23. ...Becomes a flock of Escher-esque birds in flight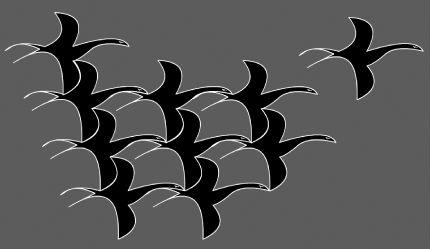 The only difference between our regular, rectangular-shaped tiles and these more complicated tiles is that you cannot easily get the offset values for each tile just by looking at the clip _height and _width. Instead, you have to work the offsets out manually by looking at the (x, y) positions between tiles when they have been placed in an interlocking pattern. The same code we used previously [Hack #17] will then work with our "flock of birds" tiled pattern. Final ThoughtsAs with most design, it's always a good idea to try emulating the style of well-known artists, just to see where it takes you and what new ideas you can bring to your designs. In this case, we've just scratched the surface of the prints created by M.C. Escher. Emulating some of his works will certainly create some striking Flash animations and sites! |
|
|
Table of Contents |
|