The J2ME Wireless Toolkit
Command-line development is probably the most basic of programming environments, although personally I'm a big fan of the shell, especially when working on UNIX. However, Sun has another trick up its sleeve to help with developmentthe J2ME Wireless Toolkit.
The J2ME Wireless Toolkit (or simply the Toolkit, for short) provides some nice features to assist with MIDlet development. These features include
A host of excellent device emulators on which to test things.
An application profiler, which provides facilities to analyze method execution time and use frequency.
A memory monitor tool, which lets you see your application's memory use.
A network monitor, which shows traffic across a simulated network (including tools to vary the simulated performance).
Speed emulation tools, which let you adjust the device's operating performance, including slowing bytecode execution.
Before moving on I'd like to clear up a common misconception about the role of the Toolkit. It's not an IDE (Integrated Development Environment), so when you load things up, don't go looking for where you can edit source code. When I first downloaded and installed the Toolkit, that was exactly what I expected, so I spent quite some time trying to figure out where the source window was. In fact, I got so frustrated that I finally threw my hands in the air, got up from my desk, shaved my head, flew to Tibet, and became a monk for six years.
All right, so I didn't really shave my head, but this confusion is common. The Toolkit's role is to provide expanded command-line tools, convenience utilities for managing MIDlet creation, and profiling and device emulators. Its role is not the Mobile Jbuilder; you need to look elsewhere for a complete editing suite.
However, the Toolkit does provide some excellent (arguably mandatory) tools for use during J2ME development, so it's certainly worth becoming familiar with it. Even if you later use an IDE to assist with development, you'll still use many of the tools provided with the Toolkit.
Installing the Toolkit
You can download the Toolkit from the Sun Web site at http://java.sun.com/products/j2mewtoolkit.
NOTE
Tip
Make sure you download version 1.x of the Toolkit. Version 2 is for development using MIDP 2, not MIDP 1.
Once you've downloaded it, follow the instructions for installing the application on your computer.
NOTE
Tip
When installing the Toolkit, I recommend you set the target directory to one that does not contain spaces, such as C:\Program Files\Toolkit. Spaces can interfere with the successful operation of some of the tools.
After you have the Toolkit installed, feel free to browse around the directory to see what's available. In the next few sections, I'll walk you through how to build and run an application, Toolkit-style.
Using the KToolbar
The biggest application in the Toolkit, known as the KToolbar, helps to make the typical process for creating MIDlets faster and easier. It provides a GUI to let you easily create projects, alter manifest and JAD files, and run a host of different MID emulators.
As always, I think the best way to learn about something is to play around with it. Create another MIDlet, this time using the Toolkit to help you.
Creating a New Project
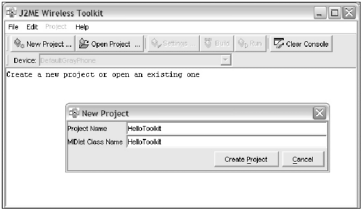
The first step is to create a new project using the KToolbar. To do this, start the KToolbar application using the Start menu item, and then create a new project and MIDlet class named HelloToolkit.
Figure 4.11. Creating a new project using the J2ME Wireless Toolkit

NOTE
Note
One thing I dislike about the KToolbar is the way it handles project locations and files. I'm not sure whyperhaps to avoid the possibility of the KToolbar conflicting with the role of an IDEbut the KToolbar restricts the locations of your projects, as well as the organization of the files within projects. This means you can't tell the KToolbar to use an existing project directory, such as your c:\j2me\projects\hello project, and you can't specify the directories to use within that project space.
Don't worry too much about this for now; later on you'll use the tools directly (from build scripts), rather than from the KToolbar.
Working with Settings
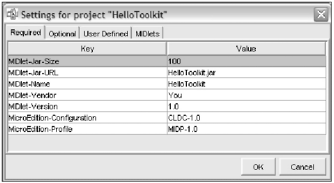
After creating your project, the KToolbar will automatically open the Settings window for your new project. This window lets you quickly and easily edit all the manifest and JAD variables for your project.
Figure 4.12 shows the settings you will use for your project; these are mostly just the default values set by the KToolbar when it created the project.
Figure 4.12. The first panel in the KToolbar Settings window lets you easily edit JAD and manifest attributes.

While you're looking at the KToolbar, I'll also show you how to take advantage of user-defined JAD properties. You can add these attributes to your JAD file and later use them to customize the execution of your MIDlet without having to change code. This use of attributes is a little like command-line arguments, which you don't have in the J2ME environment. The most common use for these properties is to customize your application to suit different environments, such as the variable capabilities of some mobile phone networks. You'll learn more about this in later chapters.
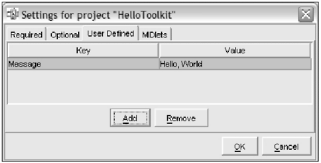
For your sample application, create a custom property by opening the settings window, clicking on User Defined and then creating a new property named "Message" with the value Hello, World (see Figure 4.13). Feel free to substitute anything that turns you on here.
Figure 4.13. Setting a User Defined property.

Your application is going to read this variable and display the message on the screen. Cool, huh?
Hello Toolkit
The next step is to write the code for your new Toolkit-powered MIDlet. Things are pretty much the same as in the previous Hello application, except for some changes to the constructor.
import javax.microedition.midlet.MIDletStateChangeException;
import javax.microedition.lcdui.*;

/**
 * An example used to demonstrate how to access, and then display, a property
 * value set within a JAD file.
 *
 * @author Martin J. Wells
 */

public class HelloToolkit extends javax.microedition.midlet.MIDlet
         implements CommandListener
{
   protected Form form;
   protected Command quit;

   /**
    * Constructor for the MIDlet which instantiates the Form object
    * then uses the getAppProperty method to extract the value associated with
    * the "Message" key in the JAD file. It then adds the value as a text field
    * to the Form and sets up a command listener so the commandAction method
    * is called when the user hits the Quit command. Note that this Form is not
    * activated (displayed) until the startApp method is called.
    */
   public HelloToolkit()
   {
      // create a form and add our components
      form = new Form("My Midlet");

      // display our message attribute
      String msg = getAppProperty("Message");
      if (msg != null)
         form.append(msg);

      // create a way to quit
      form.setCommandListener(this);
      quit = new Command("Quit", Command.SCREEN, 1);
      form.addCommand(quit);
  }

  /**
   * Called by the Application Manager when the MIDlet is starting or resuming
   * after being paused. In this example it acquires the current Display object
   * and uses it to set the Form object created in the MIDlet constructor as
   * the active Screen to display.
   * @throws MIDletStateChangeException
   */
  protected void startApp() throws MIDletStateChangeException
  {
     // display our form
     Display.getDisplay(this).setCurrent(form);
  }

  /**
   * Called by the MID's Application Manager to pause the MIDlet. A good
   * example of this is when the user receives an incoming phone call whilst
   * playing your game. When they're done the Application Manager will call
   * startApp to resume. For this example we don't need to do anything.
   */
  protected void pauseApp()
  {
  }

  /**
    * Called by the MID's Application Manager when the MIDlet is about to
    * be destroyed (removed from memory). You should take this as an opportunity
    * to clear up any resources and save the game. For this example we don't need
    * to do anything.
    * @param unconditional if false you have the option of throwing a
    * MIDletStateChangeException to abort the destruction process.
    * @throws MIDletStateChangeException
    */
   protected void destroyApp(boolean unconditional)
            throws MIDletStateChangeException
   {
   }

   /**
    * The CommandListener interface method called when the user executes
    * a Command, in this case it can only be the quit command we created in the
    * constructor and added to the Form.
    * @param command
    * @param displayable
    */
   public void commandAction(Command command, Displayable displayable)
   {
      // check for our quit command and act accordingly
      try
      {
         if (command == quit)
         {
            destroyApp(true);

            // tell the Application Manager we're exiting
            notifyDestroyed();
         }
      }

      // we catch this even though there's no chance it will be thrown
      // since we called destroyApp with unconditional set to true.
      catch (MIDletStateChangeException me)
      {
      }
   }
}
The main change here is the addition of the getAppProperty call to retrieve the contents of the Message attribute. To integrate this into your project, create a text file containing this source within the src subdirectory of the HelloToolkit project directory (you'll find this under the apps directory of the main Toolkit installation directory), for example C:\WTK104\apps\HelloToolkit\src\HelloToolkit.java.
Building and Running the Program
When your new source file is ready, click on the Build button in the KToolbar. This will automatically compile and preverify your class file. Errors will appear in the console window.
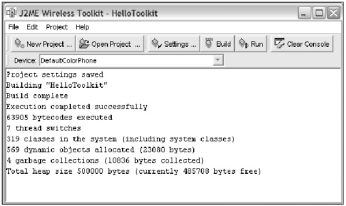
When the build is successful, you can hit the Run button to view the MIDlet running in the default emulator. When you run the MIDlet, you should see the output of the property you set in the JAD file. Feel free to change it and run it with difference values and emulators. After each run, you'll see some pretty useful information about the execution of the MIDlet. Figure 4.14 shows an example of the output.
Figure 4.14. Useful information that appears in the Toolkit console after executing a MIDlet.

NOTE
Tip
If you're running using version 2 of the Toolkit and you see SecurityException then you may need to remove the MIDP_HOME environment variable to execute this properly.