Creating the Full Package
Now that you've made your first MIDlet, finish things off by creating a full MIDlet suite. The best way to demonstrate this is by including a second MIDlet.
Hello, Again
Using the following code example, create a second MIDlet in a file named Hello2.java.
import javax.microedition.midlet.MIDletStateChangeException;
import javax.microedition.lcdui.*;

/**
* Another basic MIDlet used primarily to demonstrate how multiple MIDlets make
 * up a MIDlet Suite. This class extends the existing Hello class and overrides
 * the constructor so it displays different content in the Form.
 *
 * @author Martin J. Wells
 */

public class Hello2 extends Hello
{
   /**
    * Constructor for the MIDlet which instantiates the Form object and
    * then adds a text message. It then sets up a command listener so it
    * will get called back when the user hits the quit command. Note that this
    * Form is not activated (displayed) until the startApp method is called.
    */

   public Hello2()
   {
      // create a form and add our text
      form = new Form("My 2nd Midlet");
      form.append("Hello, to another Micro World!");

      // create a way to quit
      form.setCommandListener(this);
      quit = new Command("Quit", Command.SCREEN, 1);
      form.addCommand(quit);
   }
}
As you can see, I've taken a little shortcut. Rather than create a new MIDlet, I used the Hello class as a base to derive another class. The only difference is the addition of revised title and text components to the constructor.
NOTE
Note
Looking at the code for your first MIDlet, you might notice that the three fieldsdisplay, form, and quitare in protected, not private, scope. This way, when you derive Hello2, you have access to these fields inside its constructor.
Building the Class
When you have the hello2.java file ready, go ahead and compile, preverify, and test it using the following commands:
javac -target 1.1 -bootclasspath %MIDP_HOME%\classes Hello2.java
preverify -cldc -classpath %MIDP_HOME%\classes;. -d . Hello2
midp -classpath . Hello2
From these commands, you can see that the only real difference is the class name.
After you correct any errors, you will have not one, but two fully operational Battle Stationsoops, I mean MIDletswithin your directory, hello and hello2.
Creating the JAR
Now that you have all your classes ready, the next step is to create the JAR (Java Archive) file.
NOTE
JAR Files
A JAR file is an archiving system used to wrap up the various components of a Java application package, such as class, image, sound, and other data files. The file format is based somewhat on the popular ZIP file, with a few extras such as a manifest, which contains information on the contents of the JAR.
You can create or modify a JAR file using the jar command-line tool that comes with the JDK. What's also cool is that you can manipulate JAR files using the java.util.jar API.
Table 4.3 provides a short list of some useful JAR commands.
|
Command |
Description |
|---|---|
|
jar -cvf my.jar * |
Creates a new JAR named my.jar, which contains all of the files in the current directory. |
|
jar -cvfm my.jar manifest.txt * |
Creates a new JAR named my.jar, which contains all of the files in the current directory. Also creates a manifest file using the contents of the manifest.txt file. |
|
jar -xvf my.jar * |
Unpacks all of the files in the my.jar into the current directory. |
|
jar -tvf my.jar |
Allows you to view the table of contents for my.jar. |
As you can see, most commands revolve around the -f argument, which specifies the JAR file to work on, and the -v argument, which asks for "verbose" output. Combine these with the c, x, and t switches, and you've covered the most common JAR operations.
The next step is to create the corresponding manifest file. Using a text editor, make a new file named manifest.txt in the project directory. This new file should contain the following code:
MIDlet-Name: MegaHello
MIDlet-Version: 1.0
MIDlet-Vendor: J2ME Game Programming
MIDlet-1: My First Hello, ,Hello
MIDlet-2: My Second Hello, ,Hello2
MicroEdition-Profile: MIDP-1.0
MicroEdition-Configuration: CLDC-1.0
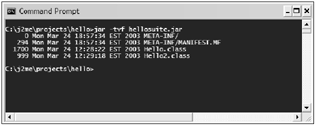
You can then create the JAR file using the command jar -cvfm hellosuite.jar manifest.txt *.class. This command will create a new JAR file named hellosuite.jar in the directory. If you view the contents of the file now, you should see something like Figure 4.9.
Figure 4.9. The output from a jar command used to create an archive.

You might notice that the manifest file has the name manifest.mf, not manifest.txt. This is a common point of confusion. The manifest file supplied on the command line is just the input to create a manifest; it isn't the file itself.
Creating the JAD
Now create a corresponding JAD file to represent your suite. Using a text editor, make a new file named hellosuite.jad in the project directory. This file should contain the following text. (To save time, you can copy the contents of the manifest.txt file and adjust it accordingly.)
MIDlet-Name: MegaHello
MIDlet-Version: 1.0
MIDlet-Vendor: J2ME Game Programming
MIDlet-1: My First Hello, ,Hello
MIDlet-2: My Second Hello, ,Hello2
MIDlet-Jar-Size: 2010
MIDlet-Jar-URL: hello.jar
There are two differences between this JAD file and the original manifest file. This file no longer has the two version lines, and it has two additional lines referencing the JAR file. The first, MIDlet-Jar-Size is used to specific the size in bytes of the corresponding JAR file, and the second, MIDlet-Jar-URL specifies its location. These variables give a potential user of the JAR the opportunity to see its size (before downloading or installing the JAR) and then to determine where to acquire the JAR file from (such as an internet Web site).
You should check the size of the final hellosuite.jar using the dir command. Make sure it matches the size in the JAD file; it should be around 2000 bytes. Keep in mind that it must be accurate, which also means you'll have to update it every time you change things and recompile. Don't worry, thoughChapter 14, "The Device Ports," will show you how to automate this using build scripts.
Running the Package
Ta da! Your super-kilo-multi-MIDlet-magic-packagetry saying that quickly with a mouthful of peanut butteris ready to go; all you need to do now is run it in the emulator. You can do this using the command midp -classpath . -Xdescriptor hellosuite.jad.
NOTE
Tip
Take care with the spaces when entering things on the command line. Mistyping them can sometimes result in errors.
Notice that in this case, you're specifying that a JAD file be executed, not a class file. This is because the emulator will load everything it needs from the JAR file referenced inside the JAD configuration, so you don't need to name a class file to execute.
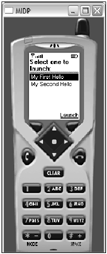
Once the MIDlet package is running, you should see something like Figure 4.10.
Figure 4.10. When loading a JAR containing multiple MIDlets the emulator will ask which one to execute.

When you run this package, you see the emulator's JAM (Java Appli cation Manager) presenting a list of all the MIDlets available in the suite. If you want to play around a little, try expanding the list of MIDlets in the JAD file to four or five. (You can just reference the same class file repeatedly.) Then you'll see each one show up as a unique item in the JAM menu.
If you do this, you might also notice that you don't need to modify the corresponding entries in the manifest file. This is because the entries within the JAD file always take precedence.
This concludes the grand tour of the J2ME command-line development environment. In the next section, you'll look at what Sun's J2ME Wireless Toolkit offers as an alternative.