A New World
You used the concept of a game world quite a bit in the previous examples. A world (also known as a level, stage, or map) is simply a container for all the objects in a game. To encapsulate this concept we'll create a new class in this chapter called (you guessed it) World.This new class will take over some of the functionality of the current GameScreen in that it now acts as the container and manager of the actors. GameScreen will instantiate the World instance for your game and then make calls to cycle and render all the actors onto its Canvas.
Nature of the Universe
Up until now, you've kept your game worlds simple by limiting them to the size of the screen and only dealing with basic actor objects. This isn't enough for Star Assault (or most other action- or adventure-style games) so I want to expand things a little.
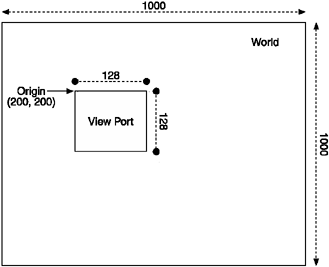
In Figure 11.1, you can see the layout of a game world that is 1000 pixels square. This is obviously much larger than the size of the screen, so at any point in time what's on the screen only represents a small portion of the entire world. This area, known as the view port, stays relative to the position of the player object (such as the ship in Star Assault), thus creating the scrolling effect you see so often.
Figure 11.1. A game world can be much larger than the screen size. The section of the world visible on the screen at any point in time is known as the view port.

Managing game play within this larger environment requires quite a few changes to the way you've been coding your game. First, you'll need to expand your coordinate system beyond the screen.
World Coordinates
Having a larger world means you need to store the position of all the actors using coordinates relative to the world, not the screen. To then draw an actor on the screen, you have to translate its world position into a relative screen position. For example, take the case of an actor located at position 250, 250 in the world. If your screen is only 128 x 128, there's no way you'll ever see that actor without changing your view port because it lies beyond the edge of the screen.
In Figure 11.1, the top left of the view port is set to a point of 200, 200. Because the screen is 128 x 128 pixels, you should see all the actors with world positions between 200, 200 and 328, 328. Take a look at how you'd modify the actor-rendering code to handle this.
public class World
{
    ...
    public void render()
    {
       for (int i = 0; i < actors.size(); i++)
       {
          Actor a = (Actor) actors.elementAt(i);
          if (a.getX()-a.getWidth() > viewX && a.getX() < viewWidth &&
              a.getY()-a.getHeight() > viewY && a.getY() < viewHeight)
             a.render(g, viewX, viewY);
       }
    }
}
In this code, you're testing whether an actor's bounding rectangle lies somewhere in the view port (including a case in which only part of the actor extends down onto the screen). Notice that I've added two parameters to the actor's render method call. This is used to draw the image at the correct location on the screen (relative to the current view port coordinates). This is simpler than it sounds. All you need to do is offset its world position by the view port origin. For example, here's the Ship actor's render method with an origin offset added:
public class Ship extends Actor
{
   public void render(Graphics graphics, int offsetX, int offsetY)
   {

       ...
       shipSprite.draw(graphics, getX()-offsetX, getY()-offsetY);
   }
Assuming your view position is at 200, 200, the rendering code will draw your actor with a world position of 250, 250, at position 250 minus 200, or at 50, 50 on the screen.
Scrolling the View Port
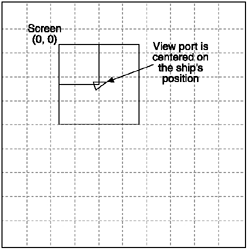
If you continue on with the previous example, imagine the ship at world position 250, 250 is moving. If you don't keep your view port at the same position, the ship will eventually fly off the area of the world covered by the screen. What you need to do next is control the position of the view port to stay focused on the action. Typically, this will be a position that keeps the player's actor (such as his ship in Star Assault) in the center of the screen (see Figure 11.2).
Figure 11.2. Scrolling is achieved by moving the view port over the world to follow the player's ship.

Doing this is a lot easier than it sounds. You adjust the view port position on each game cycle to the center position of the player's actor, minus half the screen width and height.
For example, the following code is a modified version of the GameScreen cycle method, which modifies the view position:
public void cycle()
{
   world.setView(playerShip.getX() + playerShip.getWidth()/2 - getWidth()/2,
                  playerShip.getY() + playerShip.getHeight()/2 - getHeight()/2);
   world.cycle();
}
As you can see, I'm referring to a World class. (You'll get to that one soon.) The setView method simply updates the viewX and viewY members later used in a world render method.
Once you have this in place, the player's ship actor will remain centered in the screen with the world scrolling around it. If you want to have the ship stay in a different part of the screen, such as on the far left in a side scroller or at the bottom in a vertical scrolling game, simply adjust the position of the view relative to where you want the actor to appear.
Panning the View Port
One reason horizontal (side) or vertical scrolling games are popular for small screens are they maximize the available screen space for seeing what's coming. However, since Star Assault is a four-way scrolling game, with the player in the center, you can only give the player half a screen's warning. Even with a typical platform game you'll find you'll need to adjust the view port in order to maximize the amount of available space. In this section you'll use a technique known as "panning" to move the view port around in order to make more screen space available to see the action.
Right now the view port is positioned so the player's ship is always kept in the center of the screen. If you want to let the player see more of the action then you logically need to update the view port to focus more on the areas of the screen where the action is. The question is what determines the best view? There are a few techniques for determining the correct view, ranging from complex to simple. One sophisticated method is to check the locations of enemy ships within a few screens' distance of the player and balance the position of the view (based on a system of weightings varying according to the distance of each enemy) to try and fit everybody on the screen. This is typically buggy though and has the added issue of effectively warning a player where the enemy is coming from.
Another far simpler system is to pan the view according to the direction the player is facing. Since the player will naturally turn to face the action anyway, this is usually a great method for just about any game type. In this section you'll implement a panning view for use in Star Assault.
It really is hard to describe exactly how a panning view works, so I'd highly recommend you playing around with the demonstration MIDlet on the CD under the Chapter 11 source code directory "SimpleWorldTest" in order to get a feel for it in a real game.
To make the process of adjusting the view to an optimal location, you could just set the view port position each cycle. Unfortunately this will create a very direct effect with the view spinning as the player changes direction. It's a disconcerting overreaction to what might be a very temporary direction adjustment by the player (and it'll also likely make the player motion sick). Instead, our view system will slowly move "toward" the optimal point. This is what gives that smooth "springy" panning camera effect that you're after. To do this you need to set a rate at which the view will move toward the optimal point in pixels per second. The higher this number, the faster the view move pans towards this point, and thus the faster it will react to the player's direction changes (feel free to try out different numbers). For this example I'm using a value of 22 pixels per second.
Okay, time to look at some code. To add a directional panning view to Star Assault you first need to add some new variables to the GameScreen class in order to track the current view position.
public class GameScreen extends Canvas
{
The view panning code you'll add later will update the currentViewPosX and currentViewPosY
to be the top left-hand corner of the view port.
private int currentViewPosX;
private int currentViewPosY;
This is the actual number of pixels the view can move in one millisecond (0.022). A MathFP value is used since it's a fraction. You'll see this in action in the panning code later. The panPixelsToMoveFP keeps track of how many pixels to move, again as a MathFP value.
private int pixelsPerMSFP = MathFP.div(22, 1000);
private int panPixelsToMoveFP=0;
To get all this to work you need to know how much time has passed in the GameScreen cycle method. These two variables are used to track that.
private long msSinceLastCycle;
private long lastCycleTime;
Next, you need to add the panning code to the GameScreen cycle method.
public void cycle()
{
First, the code calculates the amount of elapsed time in milliseconds.
msSinceLastCycle = System.currentTimeMillis() - lastCycleTime;

if (msSinceLastCycle > 0)
{
To calculate how far to move the view, the code multiplies the number of elapsed milliseconds since the last execution of the cycle method by the number of pixels to move per millisecond. Since this value is commonly less than 1 pixel (since the cycle method is commonly called up to 80 times per second), the next line rounds up the number of whole pixels that the view can be repositioned by.
panPixelsToMoveFP += MathFP.mul(pixelsPerMSFP,
                             MathFP.toFP((int)msSinceLastCycle));
// Figure out how many whole pixels to move.
int wholePixels = MathFP.toInt(panPixelsToMoveFP);
Next, you calculate the optimal point the view should be at based on the direction the player's ship is facing. The target view position is calculated by projecting outwards from the front of the ship by around a third of the screen's width. This will leave a reasonable amount of room around the edge of the view, rather than panning all the way to the edge.
// Calculate the ideal position for the view based on the
// direction the player's ship is facing.
int[] targetViewPos = Actor.getProjectedPos(
         playerShip.getX(), playerShip.getY(),
         playerShip.getDirection(), getWidth() / 3);
Once the target point has been calculated, you next move toward that point by the number of whole pixels. The following code simply checks the relative coordinates of the target point and adjusts each axis.
// Adjust the current move slightly towards the ideal view
// point.
if (currentViewPosX < targetViewPos[0])
   currentViewPosX += wholePixels;
if (currentViewPosX > targetViewPos[0])
   currentViewPosX -= wholePixels;
if (currentViewPosY < targetViewPos[1])
   currentViewPosY += wholePixels;
if (currentViewPosY > targetViewPos[1])
   currentViewPosY -= wholePixels;
After successfully moving, the number of whole pixels is subtracted from the current pixel movement count.
// Take away the pixels that were moved.
panPixelsToMoveFP = MathFP.sub(panPixelsToMoveFP,
                                  MathFP.toFP(wholePixels));
Next you set the World view port to correspond to the newly adjusted position. Half the screen's width and height are subtracted because you want the target point to end up in the center of the screen.
       world.setView(currentViewPosX-getWidth()/2,
                      currentViewPosY-getHeight()/2);
   }
}
world.cycle();
Finally, you record the time of this cycle in order to calculate the elapsed time the next time around.
   lastCycleTime = System.currentTimeMillis();
}