Creating a Tile Engine
Imagine for a moment that you're creating a game with a large world (1000 x 1000 pixels). The next thing you'd need to do is fill the world with objects that the player will collide with, fire at, or pick up. Assuming you use your current system, you would create an Actor object for all of these items and then add them dynamically to a Vector object. Given that your level is reasonably large (around 10 screens, or 1 million square pixels), you would probably have upwards of 500 items in a level. Unfortunately, your current system will never work for a world with that density.
First, constructing tens of objects in J2ME is a very slow process; constructing hundreds is simply not practical. (It would literally take minutes on some MIDs!) Constructing this many objects would also cause serious problems in terms of memory space.
Next, you'd need to call the cycle method on all these actors. Without any form of organization, you'd have to do this for every actor in the world, on every game cycle! This is not only impractical; it's a waste of time. If an actor is nowhere near the player, or if the actor doesn't move or change anyway, there's no need to bother calling the cycle method.
Rendering a world of this size has similar problems. Because drawing is extremely slow, you need to check whether an actor is actually within the view port before you bother to draw it on the screen. Checking whether an actor's rectangle falls within the boundary of the view port is a reasonably expensive test. With your current system, you would again need to do this on every cycle.
Last, and certainly not least (as if there aren't enough problems already), is the issue of collision detection. If you have 500 actors in the world, you would need to check whether any of these objects collides with any other object. That would require 500 tests against 500 objectsa total of (gulp) 250,000 collisions tests!
Now, some of these limits are because of J2ME (object construction speed and memory limits); however, even a modern PC will turn purple trying to do 250,000 collision tests 50 times a second.
There are many methods you can use to get around these problems. For 2D games, the most common solution is tiling. Tiling is a technique that takes advantage of the fact that much of the content in a game world is static. Take the walls of a room, for example; the player might collide with these, but they generally don't move, turn, or animate. For these static elements, there's no need to use a full Actor object. All you really need is a basic type to identify the element (such as a wall) and its position.
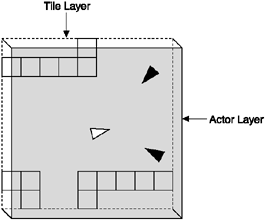
In order to do this, you first need to separate your game world into different layersone for your dynamic actors (the actor layer) and one for the more static elements (the tile layer). Take a look at Figure 11.3 to see what I mean.
Figure 11.3. The view of a game world divided into two distinct layers: a static layer of tiles and an active layer of Actor.
The Tile Map
Tiling takes its name from the way it divides a layer into equally-sized squares that are much like the tiles on that shower wall you stare at thinking of game ideas all the time. Suppose you have a game world of 800 pixels square. You can divide it into 16 pixel areas (tiles), which would give you 50 tiles across and 50 tiles down, for a total of 2500 tiles. Because a tile is not a full class Actor (you don't need to store attributes such as position or direction), you can use a single byte for the type of tile at a given location. Your code can then represent the world using an array of these bytes. For example:
byte tileMap[50][50];
NOTE
Tip
Since there is a large number of elements in a tile map, I use a byte (requiring only a single byte of memory) rather than a short (2 bytes) or int (4 bytes). This means you can only have 256 different tiles in your game, which is more than enough for most games.
Notice it's an array of 50 x 50 bytes, not 800 x 800. You're only storing a byte for the type of tile at each 16-pixel location, not every pixel.
To differentiate between different tiles and no tile at all, you can declare some simple byte constants.
public static final byte NO_TILE = 0;
public static final byte WALL_TILE = 1;
You can now alter the type of tile at any location simply by changing the value at the corresponding array point. To access any point relative to the world, you need to divide by the size of the tile. For example, you can set a wall tile at world location x=320, y=120 by using:
int tileX = 320;
int tileY = 120;
tileMap[ tileY / 16 ][ tileX / 16 ] = WALL_TILE;
As you can see, you're referencing first the y and then the x component of the array, rather than x and then y. You may be wondering why I'm accessing y first in the array, rather than x. This is really just to follow the general convention of accessing data as a row then a column. You can think of it like reading down a page, and then across.
You can access this array using any code. For example, this code creates a border around your tile map. Take note of my use of the variables tx,for a tile x position (column) and ty,for a tile y position (row). You'll be seeing these a lot.
// Set the array elements down the left and right sides of the world.
for (int tileY=0; tileY < 50; tileY++)
{
   tileMap[tileY][0] = WALL_TILE;
   tileMap[tileY][49] = WALL_TILE;
}
// Set the array elements across the top and bottom.
for (int tileX = 0; tileX < 50; tileX++)
{
   tileMap[0][tileX] = WALL_TILE;
   tileMap[49][tileX] = WALL_TILE;
}
Rendering the Tile Layer
Rendering your tile layer is also quite simple. All you need to do is draw an image corresponding to the byte type in each array position. First, however, you need some images to draw.
The images for your tiles should be the same size (16 x 16 pixels) in order to align correctly. If you load these images into an ImageSet using the same order for your byte values, you can reference each frame using that byte. This makes life much easier than trying to map your types to a particular image.
Image tileGraphics = ImageSet.loadClippedImage("/world.png", 0, 0, 16, 16);
tiles = new ImageSet(1);
tiles.addState(new Image[]{tileGraphics}, 0);
To render the tiles, you first need to figure out which part of the tile map lies within the current view port. Because tiles might appear only partly onscreen, you'll include one tile row above and below the screen size. In this code I'm assuming the current view port coordinates are in the viewX and viewY variables.
// Calculate which tiles to start at.
int startTileX = (viewX / 16) - 1;
int startTileY = (viewY / 16) - 1;

// Calculate which tile we should stop at (both across and down).
int endTileX = ((Math.abs(viewX) + viewWidth) / 16) + 1;
int endTileY = ((Math.abs(viewY) + viewHeight) / 16) + 1;

// check where within tile map range
if (endTileX > tilesWide) endTileX = tilesWide;
if (endTileY > tilesHigh) endTileY = tilesHigh;
if (startTileX < 0) startTileX = 0;
if (startTileY < 0) startTileY = 0;
Once you know the starting and ending tiles, you can loop through drawing the tiles on the screen.
First you need a byte to hold each tile map entry as it is read.
byte t = 0;
Next you start a loop for all the rows of the tile map that need to be drawn, then all the columns. This starts at startTileY and goes down until we get to the last viewable row at endTileY, then for each of these it goes across the map from startTileX to endTileX.
for (int drawTileYy = startTileY; ty < endTileY; drawTileY++)
{
   for (int drawTileX = startTileX; drawTileX < endTileX; drawTileX++)
   {
Inside the double loop you can access the entry corresponding to this location. Since most tile maps contain empty space, the code also does a quick check to see if it can just ignore this entry if the byte equals the default value 0 (NO_TILE).
tileType = tileMap[drawTileY][drawTileY];
if (tileType == NO_TILE) continue; // quick abort if it's nothing
Now comes the tricky bit. Based on the byte value, this code draws an image from the ImageSet loaded in the constructor. To keep this simpler I've mapped the frames in the graphics file to the same byte values in the map. That way the code doesn't need to translate the values when drawing themif the tile map byte is the number two, the second frame from the loaded world images will be drawn (note that I take one away from the byte value to account for zero meaning no tile in the world).
Finally, to figure out where to draw the tile, the code multiples the tile x (tx) and tile y (ty) values by the tile size again, and takes away the view port offset.
         // draw the image using tile type  1 (WALL_TYPE=frame 0)
         // we offset drawing by the view port origin
         tiles.draw(g, 0, tileType-1, (drawTileX * TILE_WIDTH) - viewX,
                                          (drawTileY * TILE_HEIGHT) - viewY);
   }
}
Tile Collision Detection
Now that you're using your tile layer for all the walls in your game, you need to add code to detect collisions between the tiles and actors. The good news is that because tiles are at a fixed location and there are relatively few of them, your collision tests are extremely fast.
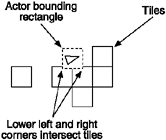
In order to determine whether an actor has collided with a tile, all you need to do is look at what tiles are "underneath" that actor. If you do this for all the possible tile positions that fall within the actor's bounding rectangle, you can determine whether it's in a collision state (see Figure 11.4) if any of those entries in the tile map are not equal to TILE_NONE (byte 0).
Figure 11.4. To check whether an actor is colliding with any tiles, you check the tile map entries that lie underneath the actor.
The code to do this is relatively simple. The following method checks the tiles under a given rectangle by stepping through all the tile-sized areas within an actor's rectangle.
for (int tileY=actorToCheck.getY(); tileY <= actorBottom;
     tileY += TILE_HEIGHT)
{
   for (int tileX=actorToCheck.getX(); tileX <= actorRightSide;
         tileX += TILE_WIDTH)
   {
        if (getTile(tileX, tileY) > NO_TILE)
           return true;
   }
}
The getTile method just grabs the tile at a given location (with some sanity checking).
public final byte getTile(int x, int y)
{
   int tileX = x / 16;
   int tileY = y / 16;
   if (tileX < 0 || tileX >= tilesWide || tileY < 0 || tileY >= tilesHigh) return -1;
   return tileMap[ tileY ][ tileX ];
}
NOTE
Tip
If you're getting lost as to how all this comes together, you can take a look at a complete example in the CD Chapter 11 source directory, "SimpleWorldTest".
As you can see, collision detection against tiles is much faster than against dynamic actors. You only need to do four (very quick) array checks for each actor, instead of doing a full rectangle intersection for all actors.
Animated Tiles
So far your tiles have been simple static images. Sometimes, though, it's nice to animate tiles to bring those backgrounds to life. One method is to make the animating parts of your backgrounds actors, but then you're back to the performance issues.
Another method is to draw your tiles using sprite objects and just cycle the one copy of a sprite object for all the tiles of a particular type. To do this, you need to modify the tile rendering code to draw a sprite instead of an image frame. For example:
byte tileType = 0;
for (int tileY = startY; tileY < endTileY; tileY++)
   {
   for (int tileX = startX; tileX < endTileX; tileX++)
   {
      tileType = tileMap[tileY][tileX];
      switch(tileType)
      {
          case NO_TILE: continue; // quick abort if it's nothing

          case WALL_TILE:
             tiles.draw(g, 0, tileType-1, (tileX * TILE_WIDTH) - viewX,
                                            (tileY * TILE_HEIGHT) - viewY);

             break;

          case GLOWING_WALL_TILE:
            torchSprite.draw(g, (tileX * TILE_WIDTH) - viewX,
                                  (tileY * TILE_HEIGHT) - viewY);
            break;
      }
   }
}
Inside the cycle code for your world, you need to call the cycle method for all your world sprites (such as the torchSprite used in the previous code). This will cause all the tiles associated with the sprites to animate.
The only issue you might have with this system is that all tiles will animate using the same frames at the exact same time. Under certain circumstances it's something you'll really notice, such as a line of animated torches along a wall all dancing perfectly in sync. A clever way I've used to get around this (without having to use separate sprite objects for every tile) is to offset the frame displayed by the position of the tile (a fixed number). For example:
case GLOWING_WALL_TILE:
    // offset the frame by a fixed number (relative to position)
    int offsetFrame = (tileX + tileY) % torchImageSet.getTotalFrames();

    // add the offset to the current frame number
    int f = (torchSprite.getCurrentFrame() + offsetFrame);

    // wrap around the frame count if you have to
    if (f > torchImageSet.getTotalFrames())
        f -= torchImageSet.getTotalFrames();

    torchImageSet.draw(g, 0, f, (tileX * TILE_WIDTH) - viewX,
                                  (tileY * TILE_HEIGHT) - viewY);
    break;
This code uses the position of the tile (tileX + tileY) as a Modula offset to the current frame. Notice I'm using the image set to draw a specific frame, not the sprite (which would draw the current frame based on the sprite animation timing). The end result is that each tile draws a slightly different frame based on its position.
Activator Tiles
Adding a tile layer has significantly reduced the number of actors required in your world because you no longer need objects to represent static elements. However, there are still quite a few elements in the game that need to be proper objects. If you think about fighting your way from the start of a complex level to the end, it's not unreasonable to encounter upwards of 100 enemies. Although this isn't as high as your original 500, you're still talking about a significant number of actors contained within the world. (Does this bring back all those memories of collision detection, construction delays, and memory hogging?)
To solve this problem, you need to answer a simple (but classic) question. If a tree falls in your world, and the player isn't around to see it, did it really happen? In your case, the answer is no. If a player is nowhere near an enemy, then you certainly don't need that enemy to be a full object. It's only when the player moves into the object's area of effect that you want to bring the enemy to life. This same concept applies to many aspects in your game. You only want to activate things when the player moves into range.
To introduce this, you need a way to trigger code based on the player's location. As soon as you detect the player getting close, you execute that code and activate the component of the game. The player will be none the wiser. Because you already have a sophisticated tile system, you can also use it to trigger game events using special tile types known as acti vator tiles. For the purposes of Star Assault, your activator tiles are pretty simple. You use a specific type of tile to represent an enemy unit (a mine, fighter, or turret). For more sophisticated game types, you could make activators spawn enemies of different types over time or otherwise alter the game. Most of this, however, will come back to the same basic processwhen it is within range, the activator tile executes code and removes itself from the world. The first code you need is for some new tile types for your activators. I've added some bounding constants as well (such as START_ACTIVATOR_TILE). You'll use these in the following code to test for certain types of tiles.
public static final byte NO_TILE = 0;

public static final byte WALL_TILE = 1;

// Since you'll likely have many different activator type
// tiles you use a range (starting from the first entry through
// to the last entry).
public static final byte START_ACTIVATOR_TILE = 2;
public static final byte FIGHTER_ACTIVATOR_TILE = 2;
public static final byte END_ACTIVATOR_TILE = 2;
A good place to detect an activator tile now is when you draw it. Here's the original tile rendering code with the activator added. Notice I'm using the bounding constants to check for a range of tile types.
for (int drawTileY = startTileY; drawTileY < endTileY; drawTileY++)
{
   for (int drawTileX = startTileX; drawTileX < endTileX; drawTileX++)
   {
      if (drawTileY >= 0 && drawTileX >= 0)
      {
         tileType = tileMap[drawTileY][drawTileX];
         if (tileType == NO_TILE) continue; // quick abort if it's nothing
This is where the code detects if the tile at this location is an activator by checking if the tile number is in the START_ACTIVATOR_TILE to END_ACTIVATOR_TILE range. If it is, the work is then done by an activateTile method, which you'll see below.
         if (tileType >= START_ACTIVATOR_TILE &&
            tileType <= END_ACTIVATOR_TILE)
           activateTile(drawTileX, drawTileY)
         else
         {
            xpos = (drawTileX * TILE_WIDTH) - viewX;
            ypos = (drawTileY * TILE_HEIGHT) - viewY;

            if (xpos > 0 - TILE_WIDTH && xpos < viewWidth &&
                ypos > 0 - TILE_HEIGHT && ypos < viewHeight)
            {
               tiles.draw(graphics, 0, 0, xpos, ypos);
            }
         }
      }
   }
}
Inside the World class activateTile method you can now do whatever you want based on the tile type. For Star Assault,you simply replace the tile with the type of enemy you want.
private final void activateTile(int tileX, int tileY)
{
   byte tileType = tileMap[tileY][tileX];
   int xpos = (tileX * TILE_WIDTH);
   int ypos = (tileY * TILE_HEIGHT);

   switch (tileType)
   {
      case FIGHTER_ACTIVATOR_TILE:
         Ship s = new Ship(this, true, xpos, ypos);
         addActor(s);
         break;
   }
   // clear the activator tile
   tileMap[tileY][tileX] = NO_TILE;
}
That last line is pretty important. If you don't remove the activator, it will trigger again on the next cycle. You'll end up creating about 80 actors per second until the MID explodes!
Non-Collidable Tiles
Often in worlds you'll want to have certain types of tiles which do not collide with the player (floor for example). Doing this with your tile engine is pretty simple. First you need to set up a mechanism to detect whether you want a tile to cause a collision with the player object or not. With a traditional tile engine, you'd add a flag indicating this to the tile map data, but with J2ME that's a waste of precious memory. Instead, you can use a type range like we did with the activators to indicate which tiles are "real". For example, here's the tile static list again with a real tile range added:
public static final byte NO_TILE = 0;

public static final byte START_REAL_TILE = 1;
public static final byte WALL_TILE = 1;
public static final byte END_REAL_TILE = 1;

// Activator tiles are not within the real tiles range.
public static final byte START_ACTIVATOR_TILE = 100;
public static final byte FIGHTER_ACTIVATOR_TILE = 100;
public static final byte END_ACTIVATOR_TILE = 100;
Next you simply modify the collision code to ignore anything other than this range. For example:
for (int tileY=actorToCheck.getY(); tileY <= actorBottom;
     tileY += TILE_HEIGHT)
{
   for (int tileX=actorToCheck.getX(); tileX <= actorRightSide;
      tileX += TILE_WIDTH)
   {
      byte tileType = getTile(tileX, tileY);
      if (tileType >= START_REAL_TILE &&
           tileType <= END_REAL_TILE)
         return true;
   }
}
Background Layers
So far you've seen how to create two distinct layers for your gamethe tile layer and the actor layer. You don't have to stop there, though; you can add further layers if you want. Typically, though, any additional layer will tend to be for backgrounds, rather than for yet more tiles or actorsit's just not worth the added memory and processing.
Background layers (and you can certainly have more than one) are usually at a different scale than the other layers. This means they scroll at a different relative speed to the primary layers. This is the effect you'll often see used in side-scrolling or car-driving games in which the backgrounds move much slower than the player does. This difference in speed is what creates the illusion that the backgrounds are far away. To do this you can just create another tile layer using a scrolling speed different than the current view port.
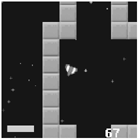
For Star Assault,you'll create a similar effect using a background star field (rather than a new tile map). As you can see in Figure 11.5, you'll draw the star field below the other layers by drawing it first.
Figure 11.5. Star Assault adds an additional drawing layer for a scrolling background star field.
To give the illusion of great distance, the scroll speed of the star field will be very low relative to the front layers. This means you only need a small area for the entire field (256 x 256 pixels). In addition, you don't need any collision detection, activator tiles, or map editing, so there's no need to create a complex data array. You can just whip up some code to generate a random-looking blob of stars.
public final class Tools
{
   ...
   /**
    * Draws a background star field using little star images (ranging in size
    * from 1 to 3 pixel square; loaded from the general.png image file). The
    * field is drawn as a 256 by 256 pixel map of stars using a simple
    * placement method of incrementing a value to give an impression of
    * distribution of stars across the map.
    * @param graphics The graphics context upon which to draw.
    * @param offsetX The relative x offset of the current view port.
    * @param offsetY The relative y offset of the current view port.
    * @param viewWidth The width of the current view port.
  * @param viewHeight The height of the current view port.
  */
public final static void drawStarField(Graphics graphics,
                                        int offsetX, int offsetY,
                                        int viewWidth, int viewHeight)
{
   // Load the static star graphics inmageset.
   if (smallStarImages == null)
      smallStarImages = ImageSet.extractFrames(ImageSet.loadClippedImage(
                              "/general.png", 0, 0), 0, 6, 4, 2, 3, 3);

   // Draw the stars on the background by running through all the positions
   // in the 256 by 256 star map jumping in different increments to give
   // a scattered but consistent distribution of stars.
   int jumpBy = 160;
   for (int i = 0; i < (256 * 256); i += jumpBy)
   {
      int starX = i / 256 - (offsetX);
      int starY = i % 256 - (offsetY);

      // Check whether the star image will fit on the current view and then
      // draw a frame relative to the position in the map.
      if (starX > -MAX_STAR_WIDTH && starX < viewWidth &&
          starY > -MAX_STAR_HEIGHT && starY < viewHeight)
         graphics.drawImage(smallStarImages[i % smallStarImages.length],
                              starX, starY, Graphics.TOP | Graphics.LEFT);
      // Change the jump value increment to randomize the distribution
      // somewhat.
      jumpBy += 33;
   }
}
This code looks complex, but basically I'm just playing with numbers in order to generate a random-looking group of stars. The offset passed into the method call determines how much you scroll. When you draw the star field you should keep this offset value relative to the view port, but scaled up according to how fast you want it to move relative to the player. For example:
// Draw a star field scrolling 10 times slower than the view.
Tools.drawStarField(g, viewX / 10, viewY / 10, viewWidth, viewHeight);
You can see the final result in Figure 11.6, although it's a much cooler effect when you see it moving!
Figure 11.6. A screenshot of the scrolling star field background in action (it looks much cooler as you fly around).
You can use images as part of your background by using a tile layer. Given the slow scrolling speed, the total size of a background tile map can be much smaller than your previous one. You can also use much larger tiles, say 64 x 64 pixels.
Putting It All Together
You've covered a lot of different territory in the last few sections. To bring it all together as a working system, you'll need to create a new version of the GameScreen class that supports the World class. You'll then need to wrap up all the code presented so far into the World class itself.
Below is an outline of the revised GameScreen class (I've left out the unimportant bits). As you'll see, most of the work is passed off to a new World instance.
/**
 * GameScreen class now modified to support a World class. The main
 * difference is the world takes care of cycling, rendering and
 * handling actors (so there's no more Actor vector required).
 */

public class GameScreen extends Canvas
{
   private Ship playerShip;
   private World world;

   /**
    * Constructs a new GameScreen which in turn constructs a new world 10 by
    * 10 tiles in size with a view port the size of the screen. A player ship
    * is then constructed and added to this world.
    */
   public GameScreen()
   {
      ...

      // Construct a new world 10 by 10 tiles in size using a view port the
      // size of the screen.
      world = new World(10, 10, getWidth(), getHeight());

      // Create the player ship and add it to the world.
      playerShip = new Ship(world, false, 20, 20);
      world.addActor(playerShip);
   }
   /**
    * Canvas paint method used to render the world.
    * @param graphics The graphics context upon which to draw the Actors.
    */
   protected void paint(Graphics graphics)
   {
      graphics.setColor(0);
      graphics.fillRect(0, 0, getWidth(), getHeight());

      world.render(graphics);
   }

   /**
    * Called by the run method to set the view port to center on the player's
    * ship and then cycle the world.
    */
   public void cycle()
   {
      world.setView(playerShip.getCenterX() - getWidth()/2,
                     playerShip.getCenterY() - getHeight()/2);
      world.cycle();
   }
   /**
    * React to keys pressed by the user.
    * @param keyCode The code of the key the players pressed.
    */
   protected void keyPressed(int keyCode)
   {
      int action = getGameAction(keyCode);

      if (action == RIGHT)
         playerShip.setNegPeakSpin();
      if (action == LEFT)
         playerShip.setPeakSpin();
      if (action == UP)
         playerShip.setFiring(true);
   }

   /**
    * React to key being released. For this example the code stops the spin.
    * @param keyCode The code for the key that was released.
    */
   protected void keyReleased(int keyCode)
   {
      int action = getGameAction(keyCode);
      if (action == RIGHT)
         playerShip.setSpin(0);
      if (action == LEFT)
         playerShip.setSpin(0);
      if (action == UP)
         playerShip.setFiring(false);
   }
}
Since we're now using a World instead a GameScreen the Actors need to be modified to use this as a reference, for example: abstract public class Actor
{
   private World world;                // the world this actor is within.
   ...

   public Actor(World worldArg, ...)
   {
      world = worldArg;
You'll then need to change the various Actor derived classes, such as Ship and Bullet, to set the new parameter in the constructor.
Next you need to create a World class as a new home for the tiles and actors. Since you've pretty much seen all the code for this already I'll save some trees and let you refer to the CD "SimpleWorldTest" project in the Chapter 11 source code directory for a complete example (note that an example of activator tiles appears in the GeneratedWorldTest example).