Game API
The MIDP 2 game library is probably the best set of features for game developers. It has two major areasthe GameCanvas,which improves the basic structure of a game application, and layers, which provide a standard mechanism for managing and drawing multiple graphics layers, including sprites.
To use the new Game API classes you need to import javax.microedition.lcdui.game.*.You'll tackle the GameCanvas first because it affects the fundamental structure of a gaming MIDlet.
GameCanvas
The GameCanvas class provides a version of the Canvas class with some extra capabilities for handling input and rendering.
For handling input, you no longer use the keyPressed method. GameCanvas takes care of interpreting events and setting a state for you, so all you need to do is check the state of keys using the getKeyStates() method. GameCanvas now also has the constants listed in Table 19.4 for all the standard game keys.
|
LEFT_PRESSED |
|
RIGHT_PRESSED |
|
UP_PRESSED |
|
DOWN_PRESSED |
|
FIRE_PRESSED |
|
GAME_A_PRESSED |
|
GAME_B_PRESSED |
|
GAME_C_PRESSED |
|
GAME_D_PRESSED |
For example, in the following code you grab the key states and then check whether the left game key is down.
int keyStates = getKeyStates();
if ((keyStates & LEFT_PRESSED) != 0)
    // do something incredibly exciting
This method of handling input, known as polling, has the side effect that you need to constantly check the state of keys in order to trigger effects based on any change of state (which is a general waste of time). Using the Canvas class, you used to be able to respond to direct events when they happened (through callback methods), so you knew, for example, when a key was released because the keyReleased method was called. With GameCanvas you need to continually check to see whether the state changed to achieve the same result. For example, in the following code you grab the key state and compare it to a saved one. If it has changed, you know the event has occurred.
previousState = currentKeyStates;
currentKeyStates = getKeyStates();
if ((currentkeyStates & LEFT_PRESSED) == 0 &&    // key is NOT pressed now
    (previouskeyStates & LEFT_PRESSED) != 0)     // but it WAS before
    // react to a key being released
GameCanvas also relieves you from much of the burden of managing the drawing state. When using Canvas you have to call repaint to trigger a call to your overridden paint method. You then use the graphics context passed into this method to do your drawing. GameCanvas simplifies this by making a graphics context available all the time. When you want to render the screen you flush it to the display using the flushGraphics method. This also means you don't have any issues with having your rendering code execute in a different thread than the rest of the game. GameCanvas also takes care of any double buffering (if it's required by the MID).
Using GameCanvas's new input and graphics means your run method is much simpler. You can check for input, cycle the game, and then do your rendering in a linear order without needing to worry about who is calling what when.
public void run()
{
    while (true)
    {
        // set the state of the keys
        int keyState = getKeyStates();

        // code to handle input

        // code to paint to the GameCanvas graphics
        // use getGraphics() to grab the current graphics context

        // flip graphics
        flushGraphics();
        // pause if we need to
    }
}
Okay, now it's time to put all this into action. In the following example you can see the basics of a MIDlet that uses GameCanvas at its core.
NOTE
Tip
The following code, along with all the example classes shown in this chapter can be found in the Chapter 19 source code directory on the CD.
import javax.microedition.lcdui.*;
import javax.microedition.lcdui.game.*;
import javax.microedition.midlet.MIDlet;
import javax.microedition.midlet.MIDletStateChangeException;
import java.io.IOException;
This MIDlet class is basically the same as a MIDP 1 version. The real changes are in the custom canvas below.
public class GameCanvasExample extends MIDlet
{
    private MyGameCanvas myCanvas;

    public GameCanvasExample()
    {
        myCanvas = new MyGameCanvas();
    }

    protected void startApp() throws MIDletStateChangeException
    {
        Display.getDisplay(this).setCurrent(myCanvas);
        myCanvas.start();
    }

    protected void pauseApp()
    {
    }

    protected void destroyApp(boolean unconditional) throws MIDletStateChangeException
    {
    }
}
This class extends the MIDP 2 GameCanvas rather than the MIDP 1 Canvas class.
class MyGameCanvas extends GameCanvas implements Runnable
{
    private boolean running;
    private int x, y;
    private Image alienHeadImage = null;

    public MyGameCanvas()
    {
        super(true);

        x = getWidth() / 2;
        y = getHeight() / 2;

        try
        {
            alienHeadImage = Image.createImage("/alienhead.png");
        }

        catch (IOException ioe)
        {
            System.out.println("unable to load image");
        }
    }

    public void start()
    {
        running = true;
        Thread t = new Thread(this);
        t.start();
    }

    public void run()
    {
        Graphics g = getGraphics();

        while (running)
        {
The following code to handle the key states is quite different to how it's done in MIDP 1. You'll notice though that the end effect is the same as what is done in Star Assault;read keys and set a state value. In this example it checks if an arrow key is down and changes the position of the image accordingly.
            // handle the state of keys
            int keyStates = getKeyStates();

            if ((keyStates & LEFT_PRESSED) != 0)   x--;
            if ((keyStates & RIGHT_PRESSED) != 0)  x++;
            if ((keyStates & UP_PRESSED) != 0)     y--;
            if ((keyStates & DOWN_PRESSED) != 0)   y++;

            if (x < 0) x = getWidth();
            if (x > getWidth()) x = 0;
            if (y < 0) y = getHeight();
            if (y > getHeight()) y = 0;

            // draw the world
            g.setColor(0x000000);
            g.fillRect(0, 0, getWidth(), getHeight());
            g.drawImage(alienHeadImage, x, y, Graphics.VCENTER|Graphics.HCENTER);
This is the other major change from MIDP 1. You don't need to worry about setting up an off-screen buffer; you just call flushGraphics when ready to paint to the screen.
            // flush the graphics buffer (GameCanvas will take care of painting)
            flushGraphics();

            // sleep a little
            try
            {
                Thread.sleep(10);
            }
            catch (InterruptedException ie)
            {
            }
        }
    }

}
Layer upon Layer upon …
The second major part of the Game API is direct support for layers. This includes a whole host of functionality revolving around managing distinct screens in a game, as well as support for basic game sprites.
When you developed Star Assault you used layers extensively. Basically, they're a way of separating the rendering of the different parts of your game. The star-field background, world tiles, and sprites are all examples of the different layers in a game. You can think of it a little like an onion, where each layer is drawn outward toward the viewer. When you combine them all, you get the final image of the game. Using layers, you can logically separate the distinct components in your game as well as manage the order in which they are drawn.
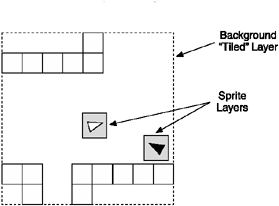
The two types of layers supported by MIDP 2 are tiled layers, using the TiledLayer class, and sprites, using the Sprite class. In Figure 19.15, you can see the different types of layers used in a typical game. You can have as many of these layers as you want.
Figure 19.15. The MIDP 2 game API provides for two distinct types of layerstiles and sprites.
NOTE
Note
The Layer class is an abstract base class for the TiledLayer and Sprite classes. I have no idea why, but Sun decided not to include a public constructor in the Layer class (only a private one), so you cannot derive a class directly from Layer.
Tiled Layer
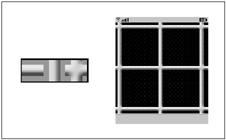
Tiles are sets of equally sized graphics that you can arrange in a grid, or tile layer. By arranging (and repeating) these tiles, you can present proportionally large areas with small source images. In Figure 19.16, for example, you can see three tiles (each 16 x 16 pixels) representing horizontal, vertical, and cross pieces. Next to this is an example of these tiles arranged in a grid to form a series of interlocking lines.
Figure 19.16. Using three very simple tiles, you can create a much larger "tiled" image.
NOTE
Note
The performance of a TiledLayer is directly relevant to the size of each tile. The smaller each tile is, the slower it will render. Therefore, anything below 16 x 16 usually will cause issues.
To create your own tiled layer, you can construct a TiledLayer class, passing in the size of the grid, the source image, and the size of each tile frame. In the following example, you load the pipes.png image and use it to construct a TiledLayer with a grid size of 20 x 20. Each tile is 16 x 16 pixels.
try
{
    backgroundTilesImage = Image.createImage("/pipes.png");
}
catch (IOException ioe) { }

TiledLayer tileLayer = new TiledLayer(20, 20, backgroundTilesImage, 16, 16);
You can set which tiles appear in each cell using the setCell and fillCells methods. Each tile is referenced by the sequence number in which it appears in the tile image set. For example, the horizontal pipe is 1; the vertical is 2; and so on. So to create the lines in Figure 19.16, you can use
// draw horizontal lines
for (int y=0; y < 20; y+=5)
    tileLayer.fillCells(0, y, 19, 1, 1);   // set horizontal pipe

// draw vertical lines
for (int x=0; x < 20; x+=5)
    tileLayer.fillCells(x, 0, 1, 19, 2);   // set vertical pipe

// fill in the cross pieces
for (int y=0; y < 20; y+=5)
    for (int x=0; x < 20; x+=5)
        tileLayer.setCell(x, y, 3);            // set the cross piece
NOTE
Tip
One restriction with a TiledLayer is you can only associate it with one image. So what do you do if you have multiple sets of tiles or you want to do processing on images before they become tiles (such as changing colors)? To handle this, use the image tools to assemble a tile set image before you construct the TiledLayer, and then pass in the modified one. If you need to change a tile set after the TiledLayer has been created, use the setStaticTileSet method.
Keep in mind that the tile index starts at 1, not 0. Index 0 represents a blank (empty) tile, which is not drawn.
To make tile layers a little more interesting, you can add animation. The simplest way to do this is to periodically change the index of certain tiles. For example, you can add a set of animated tile frames at a certain position in the tile setsay, tile indices 10 to 20. When you populate the cells, start the animated tiles at index 10 and then periodically update any cell with an index between 10 and 20 by 1 (going back to position 10 if you pass 20). This will create an animated effect by changing the tile index to the next one in sequence.
This method is pretty simple. However, there's a major problemit's about as quick as the International Convention on Slow Things' Really Slow Thing of the Year. In order to do the animation, you would have to check every cell in the grid to see whether its tile index falls into the animation range. For a tile map of 50 x 50, that's 2500 tests for every animation step. Not good.
A good general-purpose method to avoid this sort of thing is to use a secondary reference. To do this, you make a certain index range (say, anything negative or above a certain value) in the map have a special meaning. When the rendering goes to draw that tile index, it detects the special case and looks up a secondary reference to determine the actual tile type. Because there are very few entries in the secondary reference map (one for each animating tile type, rather than one for every instance of that tile), it's very fast to sweep through and update.
The TiledLayer supports this exact system for animation. A negative number indicates all animated tiles. You create a new special tile group using the createAnimatedTile method, which returns an index you can then use to reference the tile group. These start at 1 and go upward (or is that downward?), so the next one is 2, then 3, and so on.
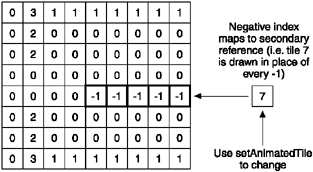
Using the setCell and fillCells method, you can then populate the map with these negative values. To update the animation, you need to manage your own timer and then call the setAnimationTile method. When the MID sees a negative value, it will use whatever tile index has been set with the setAnimationTile method corresponding to that negative value. You can see this illustrated in Figure 19.17.
Figure 19.17. Using negative indices to reference animation tiles (which you can change separately to grid cells)
NOTE
Tip
The animation tiles in TiledLayer are not limited to only doing animation. If you have any reason to use a secondary reference to group tiles together and then change them in one go, you can use the animation tile functionality. You could, for example, open all the doors on a level, turn off laser barriers, or even change scripted events. Feel free to use this functionality for more than just animation.
To render a TiledLayer,you can call its paint method from within your main game loop. For example:
tileLayer.paint(g);
That's all there is to tiled layers. Next you'll look at how sprites are handled. After you have that sorted out, you'll look at a complete Game API example using both tiles and sprites.
Sprites
The Sprite class provides basic functionality to create game sprites. In the Game API, these are implemented as distinct layers, so you can handle each sprite as a distinct layer when positioning and drawing. Sprites also support animation and image transforms.
To construct a sprite, you need to load up the image containing all the frames and then construct it using the frame size. For example, if your frames are 16 x 16 pixels, you can simply do:
Sprite mySprite = new Sprite(imageFrames, 16, 16);
Notice that you didn't specify how many frames there are in the image. The Sprite class assumes the entire image is for the sprite, so it simply divides the dimensions of the image by the tile size to figure out how many tiles there are.
To animate a sprite you need to set up your own timing process and then call nextFrame or prevFrame to progress through the frame sequence.
mySprite.nextFrame();
The animation sequence defaults to all the frames in the source image. You can change this sequence using the setFrameSequence method, passing in an array of integers for each of the frames. For example:
int[] seq = { 1, 2, 2, 2, 3, 3, 3, 4 };
mySprite.setFrameSequence(seq);
NOTE
Tip
The Sprite class does not support animating through a sequence of frames. It only handles the order they are in. To animate a Sprite instance, you must write your own animation timing code (similar to that in the Star Assault Sprite class) and then call the MIDP 2 Sprite class's nextFrame to progress the animation to the next frame in the defined sequence.
The sequence doesn't have to reflect the number of frames you have in the original image, nor does it have to have any particular order. As you can see in the preceding sample code, you can even repeat frames.
NOTE
Tip
Both Sprite and TiledLayer are derived from the abstract Layer base class. You can use the methods in this class to set a layer's position (move and setPosition), change visibility (isVisible and setVisible), and render (paint).
Sprites also support basic transformations. Using the setTransform method, you can mirror or rotate the image in the same way you did using the Graphics.drawRegion method. Transforms are done around a reference point in each image. The reference point is basically what the frame will spin around when it's transformed. If, for example, you set a reference point near the top of an image and flip it vertically, you'll find the reference point now toward the bottom of the image. If you want a demo of this, get a piece of paper with a drawing on it. Hold it flat on a table and put your finger on one point. Now turn the paper, and you'll see it rotate around the point where your finger is. That's the reference point for a transform.
The default reference point for a transform is 0, 0. Much of the time you want to rotate around the center of an image; you can do so using the following code:
// rotate around the center
mySprite.setRefPixelPosition(mySprite.getWidth()/2, mySprite.getHeight()/2);
mySprite.setTransform(Sprite.TRANS_ROT90);
Using different transforms for individual frames is not supported, so you'll need to manually change the transform each time you change the frame if you want to do this.
Sprites also provide some basic collision detection using the collidesWith methods. There are three methods available for checking against collisions with a TiledLayer, another Sprite,or an Image.You can specify whether you want rectangular or pixel-level collisions. A pixel-level collision will take into account any transparent pixels in the sprite when determining whether a collision has occurred. However, this is much slower than bounding-box collision, so I recommend you do that test before you test at the pixel level.
When checking against a TiledLayer,any cell with an index greater than zero will register a collision.
// test if the sprite collided with any tiles
if (mySprite.collidesWith( tiledLayer, false ))
{
    // If it did then do a more accurate test at the pixel level (slow).
    // Use true here to do a rectangular collision and false for a pixel
    // level collision.
    if (mySprite.collidesWith( tiledLayer, true ))
    {
        // explode!
    }
}
NOTE
Note
When you transform a sprite using setTransform, the bounding box of the sprite (and thus the collision rectangle) is updated automatically.
Layer Manager
The LayerManager class handles the management and rendering of layers, including support for a single view port through which all layers are presented. Layers are drawn in what's termed the z- order.(You call it z because it reflects the third dimensional depth going down into the screen.) You can see this illustrated in Figure 19.18.
Figure 19.18. The layer manager draws layers based on z-order, with 0 being the closest to the viewer (and the last one drawn).
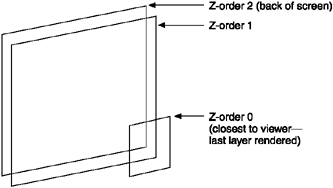
To use the layer manager, you simply construct one and then add layers to it in the reverse order in which you want them to appear.
LayerManager layerManager = new LayerManager();

// add the sprite
mySprite = new Sprite(imageFrames, 16, 16);
layerManager.append(mySprite);

// add the background tile layer
TiledLayer tileLayer = new TiledLayer(20, 20, backgroundTilesImage, 16, 16);
layerManager.append(tileLayer);
Notice how I added the sprite first. This means it will appear on top of the background tile layer. You can also use the insert and remove methods to change the layer setup as well as change the order of layers.
To draw the layers, you use the LayerManager paint method. By default, this will render using the entire screen, starting at position 0, 0. If you want to change this you can use the viewPort method to set the x, y, width, and depth of the view.
Bringing It All Together
Now that you've seen all of the classes in the Game API, take a look at a more complete example. In this sample, you can see the use of a tiled background layer and a floating mine sprite that spins around. The position of the sprite is changed based on the state of the arrow keys.
import javax.microedition.lcdui.*;
import javax.microedition.lcdui.game.*;
import javax.microedition.midlet.MIDlet;
import javax.microedition.midlet.MIDletStateChangeException;
import java.io.IOException;
This is a simple MIDlet to show off a MIDP 2 custom canvas, this time using layers.
public class LayerExample extends MIDlet
{
    private AnotherGameCanvas myCanvas;

    public LayerExample()
    {
        myCanvas = new AnotherGameCanvas();
    }

    protected void startApp() throws MIDletStateChangeException
    {
    Display.getDisplay(this).setCurrent(myCanvas);
    myCanvas.start();
    }

        protected void pauseApp()
    {
    }

    protected void destroyApp(boolean unconditional) throws MIDletStateChangeException
    {
    }
}

/**
 * A class which extends the new MIDP 2 Game Canvas.
 */

class AnotherGameCanvas extends GameCanvas implements Runnable
{
    private boolean running;
    private int x, y;
    private Image orbImage = null;
    private Image backgroundTilesImage = null;

    private Sprite orbSprite;
    private BackgroundLayer backgroundLayer = null;
    private LayerManager layerManager = null;

    public AnotherGameCanvas()
    {
        super(true);

        x = getWidth() / 2;
        y = getHeight() / 2;

        try
        {
            orbImage = Image.createImage("/orb.png");
            backgroundTilesImage = Image.createImage("/pipes.png");
        }

        catch (IOException ioe)
    {
        System.out.println("unable to load image");
    }
Note the construction of a layer manager, sprite, and background layer. The sprites and background layer are then added to the layer manager.
    layerManager = new LayerManager();

    // create the orb sprite and add it to the layer manager
    orbSprite = new Sprite(orbImage, 16, 16);
    layerManager.append(orbSprite);

    // add the background layer as well
    backgroundLayer = new BackgroundLayer(backgroundTilesImage);
    layerManager.append(backgroundLayer);
}

public void start()
{
    running = true;
    Thread t = new Thread(this);
    t.start();
}

public void run()
{
    Graphics g = getGraphics();

    while (running)
    {
        // handle the state of keys
        int keyStates = getKeyStates();

        if ((keyStates & LEFT_PRESSED) != 0)   x--;
        if ((keyStates & RIGHT_PRESSED) != 0)  x++;
        if ((keyStates & UP_PRESSED) != 0)     y--;
        if ((keyStates & DOWN_PRESSED) != 0)   y++;

        if (x < 0) x = getWidth();
        if (x > getWidth()) x = 0;
        if (y < 0) y = getHeight();
        if (y > getHeight()) y = 0;
Here's where the position of the sprite is updated and the animation takes place. This code advances one frame on each cycle.
            // update the sprite position and animation frame
            orbSprite.setPosition(x, y);
            orbSprite.nextFrame();

            // clear the display
            g.setColor(0x000000);
            g.fillRect(0, 0, getWidth(), getHeight());
This is the main difference with using a layer manager. Notice there's no code to draw the sprite or background layer. This is all taken care of by their inclusion in the layer manager. When you call paint on the layer manager, all the included layer will also be painted.
            // draw the layers
            layerManager.paint(g, 0, 0);

            // flush the graphics buffer (GameCanvas will take care of painting)
            flushGraphics();

            // sleep a little
            try
            {
                Thread.sleep(5);
            }
            catch (InterruptedException ie)
            {
            }
        }
    }
}
An example of a background tiled layer that fills cells around the edges as well as cross pieces in the center.
class BackgroundLayer extends TiledLayer
{
    private static final int HORIZONTAL = 1;
    private static final int VERTICAL = 2;
    private static final int CROSS = 3;

    public BackgroundLayer(Image tiles)
    {
        super(20, 20, tiles, 16, 16);
        // draw horizontal lines
        for (int y=0; y < 20; y+=5)
            fillCells(0, y, 19, 1, HORIZONTAL);

        // draw vertical lines
        for (int x=0; x < 20; x+=5)
            fillCells(x, 0, 1, 19, VERTICAL);

        // fill in the cross pieces
        for (int y=0; y < 20; y+=5)
            for (int x=0; x < 20; x+=5)
                setCell(x, y, CROSS);
    }

}
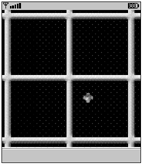
You can see the final result in Figure 19.19.
Figure 19.19. The results of a simple example of the Game API in action
