SQL Server supports only statement-level triggers. It doesn't support row-level triggers. This means that if you issue a DELETE command that deletes 10 rows, the trigger will fire once for the entire statement—not 10 times, once for each deleted row.
SQL Server doesn't support BEFORE triggers, but it supports AFTER (also named FOR) triggers and, starting with SQL Server 2000, INSTEAD OF triggers.
The important difference between AFTER (FOR) triggers and INSTEAD OF triggers is that AFTER triggers are called after any existing constraints have been checked. INSTEAD OF triggers are called immediately, even if the rows being inserted or updated wouldn't pass existing constraints.
Working with SQL Server triggers implies working with two special data tables: Inserted and Deleted. These tables exist only inside the trigger, and they're the means by which SQL Server tells you what happened and why the trigger was called.
When the trigger fires because of an INSERT statement, the row or rows that were inserted (or were going to be inserted, in case of an INSTEAD OF trigger) are saved in the Inserted table. Similarly, when deleted, they're available through the Deleted table. UPDATE operations are regarded as a pair of DELETE and INSERT operations—the old values are saved to Deleted, and the new ones to Inserted.
| Tip |
Inserted and Deleted have the same structure as the table on which the trigger is created. |
Let's now start playing with some triggers using the scenario introduced earlier.
Let's first create the FriendAudit table that will record the log data:
CREATE TABLE FriendAudit
(FriendAuditID INT IDENTITY PRIMARY KEY NOT NULL,
 Operation VARCHAR(10),
 RecordedOn DateTime DEFAULT GETDATE(),
 OldName VARCHAR(50),
 NewName VARCHAR(50),
 OldPhone VARCHAR(15),
 NewPhone VARCHAR(15));
In this code, you supplied a default value of GETDATE() for the RecordedOn field; so whenever you add new values to FriendAudit without specifying a value for RecordedOn, the current date and time will be automatically supplied.
Let's start by logging only the INSERT operations that happen to your table. Create LogFriendTrigger like this:
CREATE TRIGGER LogFriendTrigger
ON Friend
FOR INSERT
AS
DECLARE @NewName VARCHAR(50)
DECLARE @NewPhone VARCHAR(15)

SELECT @NewName=Name FROM Inserted
SELECT @NewPhone=PhoneNo FROM Inserted

INSERT INTO FriendAudit (Operation, NewName, NewPhone)
VALUES ('Insert',@NewName,@NewPhone);
Let's test the new trigger by inserting some values to Friend:
INSERT INTO Friend(Name, PhoneNo) VALUES('Jerry', '001-Jerry')
INSERT INTO Friend(Name, PhoneNo) VALUES('Harrison', '999-Harry');
INSERT INTO Friend(Name, PhoneNo) VALUES('Peter', '223223223');
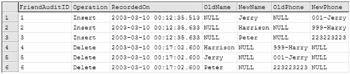
Now let's see what happened to FriendAudit:
SELECT * FROM FriendAudit;
Figure 13-2 shows the results.
The trigger can be improved (you'll see in a minute why and how), but it works well on most occasions. When creating the trigger, you needed to specify its name, the table it protects, and the action on which it fires:
CREATE TRIGGER LogFriendTrigger
ON Friend
FOR INSERT
Then the game begins. The body of LogFriendTrigger reads Name and PhoneNo from Inserted (remember that Inserted has the same structure as Friend) and saves them to FriendAudit by using two variables named @NewName and @NewPhone:
AS
DECLARE @NewName VARCHAR(50)
DECLARE @NewPhone VARCHAR(15)
SELECT @NewName=Name FROM Inserted
SELECT @NewPhone=PhoneNo FROM Inserted

INSERT INTO FriendAudit (Operation, NewName, NewPhone)
VALUES ('Insert',@NewName,@NewPhone)
The problem with this implementation is that if more rows are inserted using a single SQL statement (say, with INSERT INTO...SELECT), the trigger fires only once, and only one record is added to FriendAudit. In the following exercise, you'll see how to deal with this scenario.
Here, not only will you improve your trigger to log DELETE operations, but you'll also improve the way it handles INSERT operations.
For situations when you want to change an existing trigger, instead of dropping and re-creating it, SQL Server provides you with the ALTER TRIGGER command. Execute the following command:
ALTER TRIGGER LogFriendTrigger
ON Friend
FOR INSERT, DELETE
AS

IF EXISTS (SELECT 1 FROM Inserted)
  BEGIN
    INSERT INTO FriendAudit (Operation, NewName, NewPhone)
      SELECT 'Insert', Inserted.Name, Inserted.PhoneNo
      FROM Inserted
  END

ELSE IF EXISTS (SELECT 1 FROM Deleted)
  BEGIN
    INSERT INTO FriendAudit (Operation, OldName, OldPhone)
      SELECT 'Delete', Deleted.Name, Deleted.PhoneNo
      FROM Deleted
  END;
To test the new trigger, just delete the rows you inserted previously:
Note that this DELETE statement affects more rows—so using a logging similar to the one used in the first trigger (for INSERT operations) would have only logged a single item, not all the deleted rows. Now if you read the FriendAudit table, you see something like Figure 13-3.
In the new trigger, first you see the new FOR DELETE clause in its definition:
ALTER TRIGGER LogFriendTrigger
ON Friend
FOR INSERT, DELETE
AS
Second, using IF clauses, you check if the trigger has been called because a row was inserted or deleted. This detail is important because you need to know from which table to gather the information to save in FriendAudit—from Inserted or from Deleted?
You do this by first verifying if there are any rows in the Inserted table:
IF EXISTS (SELECT 1 FROM Inserted)
If there are any rows in Inserted, you copy them into FriendAudit with INSERT INTO combined with a SELECT clause. (Remember that you learned about this construct in Chapter 3, "Modifying Data.") For example:
IF EXISTS (SELECT 1 FROM Inserted)
  BEGIN
    INSERT INTO FriendAudit (Operation, NewName, NewPhone)
      SELECT 'Insert', Inserted.Name, Inserted.PhoneNo
      FROM Inserted
  END
This method has the advantage that it works even when multiple rows have been added to Friend in a single SQL statement.
You then do the same test for Deleted although this time it's not really necessary. Because this is a FOR INSERT, DELETE trigger, if no rows have been inserted, you can be sure it was a DELETE operation that executed the trigger. You use the same technique to extract rows from the Deleted table and append them to FriendAudit:
ELSE IF EXISTS (SELECT 1 FROM Deleted)
  BEGIN
    INSERT INTO FriendAudit (Operation, OldName, OldPhone)
      SELECT 'Delete', Deleted.Name, Deleted.PhoneNo
      FROM Deleted
  END
When a trigger is fired after an UPDATE operation, both Inserted and Deleted tables are populated. The following example shows the new trigger, which logs INSERT, DELETE, and UPDATE operations to FriendAudit. It also displays a message specifying what kind of operation was logged.
Enter the following code to amend the trigger:
ALTER TRIGGER LogFriendTrigger
ON Friend
FOR INSERT, DELETE, UPDATE
AS

IF EXISTS (SELECT 1 FROM Inserted) AND EXISTS (SELECT 1 FROM DELETED)
  BEGIN
   INSERT INTO FriendAudit (Operation, OldName, OldPhone, NewName, NewPhone)
      SELECT 'Update', d.Name, d.PhoneNo, i.Name, i.PhoneNo
      FROM Deleted d JOIN Inserted i
      ON d.Name = i.Name
   PRINT 'Update Logged'
  END
ELSE IF EXISTS (SELECT 1 FROM Inserted)
  BEGIN
    INSERT INTO FriendAudit (Operation, NewName, NewPhone)
      SELECT 'Insert', Inserted.Name, Inserted.PhoneNo
      FROM Inserted
    PRINT 'Insert Logged'
  END
ELSE IF EXISTS (SELECT 1 FROM Deleted)
  BEGIN
    INSERT INTO FriendAudit (Operation, OldName, OldPhone)
      SELECT 'Delete', Deleted.Name, Deleted.PhoneNo
      FROM Deleted
    PRINT 'Delete Logged'
  END;
To test the new trigger, proceed with the following steps. First, clear the Friend and FriendAudit tables (note that the order is important):
DELETE FROM Friend;
DELETE FROM FriendAudit;
Then perform the following operations on Friend:
INSERT INTO Friend(Name, PhoneNo) VALUES('Jerry', '001-Jerry');
INSERT INTO Friend(Name, PhoneNo) VALUES('Harrison', '999-Harry');
INSERT INTO Friend(Name, PhoneNo) VALUES('Peter', '223223223');
UPDATE Friend SET PhoneNo = 'Unknown';
DELETE FROM Friend;
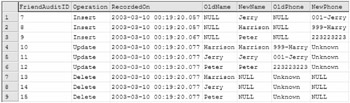
Now, if you read the FriendAudit table, you should see something like Figure 13-4.
The latest version of the trigger is interesting; take a closer look at the piece of code that logs UPDATE operations:
IF EXISTS (SELECT 1 FROM Inserted) AND EXISTS (SELECT 1 FROM DELETED)
  BEGIN
   INSERT INTO FriendAudit (Operation, OldName, OldPhone, NewName, NewPhone)
      SELECT 'Update', d.Name, d.PhoneNo, i.Name, i.PhoneNo
      FROM Deleted d JOIN Inserted i
      ON d.Name = i.Name
   PRINT ''Update Logged'
  END
An inner join is used to get the necessary data to populate FriendAudit.
In LogFriendTrigger, you can populate the FriendAudit table with a single query by making a FULL JOIN between Inserted and Deleted—that's good news for lazy fingers. However, by only using the full join, you can't populate the Operation field differently based on the operation being done:
ALTER TRIGGER LogFriendTrigger
ON Friend
FOR INSERT, DELETE, UPDATE
AS

INSERT INTO FriendAudit (Operation, OldName, OldPhone, NewName, NewPhone)
  SELECT 'Log', d.Name, d.PhoneNo, i.Name, i.PhoneNo
    FROM Deleted d FULL JOIN Inserted i
    ON d.Name = i.Name;
If you want to make sure Operation is correctly filled, the following is a possible approach that also uses IF and CASE statements:
ALTER TRIGGER LogFriendTrigger
ON Friend
FOR INSERT, DELETE, UPDATE
AS

DECLARE @Operation TINYINT
SELECT @Operation=0
IF EXISTS (SELECT 1 FROM Inserted) SELECT @Operation = @Operation + 1
IF EXISTS (SELECT 2 FROM Deleted) SELECT @Operation = @Operation + 2

INSERT INTO FriendAudit (Operation, OldName, OldPhone, NewName, NewPhone)
  SELECT CASE @Operation
            WHEN 1 THEN 'Insert'
            WHEN 2 THEN 'Delete'
            WHEN 3 THEN 'Update'
         END,
         d.Name, d.PhoneNo, i.Name, i.PhoneNo
    FROM Deleted d FULL JOIN Inserted i
    ON d.Name = i.Name;
There are times when, for performance reasons, you want to temporarily disable existing triggers. A common scenario of this is during large data loads into the database, when disabling the triggers can considerably improve performance.
When created, triggers are enabled by default. You can turn off a trigger using the ALTER TABLE command. Here's how you can disable LogFriendTrigger:
ALTER TABLE Friend DISABLE TRIGGER LogFriendTrigger;
And here's how you enable it again:
ALTER TABLE Friend ENABLE TRIGGER LogFriendTrigger;
To enable or disable all existing triggers associated with a table, use ALL instead of a specific trigger name.