|
|
Table of Contents |
|
You can specify any built-in listener of your choice to Ant. When you run Ant, it starts up with all the built-in listeners you have specified. In addition to the specified built-in listeners, you can create custom listeners using the BuildListener interface and the BuildEvent class.
Using user-defined listeners, you can specify commands to Ant that run before the build starts, before the link processes, or after the build finishes.
The BuildEvent class represents an event that occurs during the course of a build. You build an event by specifying a project, a target, or a task. A project-level event contains a project reference, a target-level event contains project and target references, and a task-level event contains project, target, and task references. The BuildEvent class extends the EventObject class.
The DefaultLogger and XmlLogger classes implement the BuildListener interface, which consists of several methods that you can use to create custom listeners.
A custom listener needs the implementation of the org.apache.tools.ant.BuildListener interface. You create custom listeners using the BuildEvent class and the BuildListener interface. Ant provides several build events.
Table 4-5 lists the build events of Ant:
|
Event |
Occurrence |
|---|---|
|
Build Started |
Fired at the beginning of the build |
|
Build Finished |
Fired at the completion of the build |
|
Target Started |
Fired when a target starts |
|
Target Finished |
Fired when a target finishes |
|
Task Started |
Fired when a task starts |
|
Task Finished |
Fired when a task completes |
|
Log Message |
Fired when a message logs |
Table 4-6 lists the occurrence of events:
|
Event |
Occurrence |
|---|---|
|
buildFinished(BuildEvent event) |
Fired after the last target finishes |
|
buildStarted(BuildEvent event) |
Fired before any targets start |
|
messageLogged(BuildEvent event) |
Fired when a message logs |
|
targetFinished(BuildEvent event) |
Fired when a target finishes |
|
targetStarted(BuildEvent event) |
Fired when a target starts |
|
taskFinished(BuildEvent event) event |
Fired when a task finishes |
|
taskStarted(event) |
Fired when a task starts |
Event listeners serve two purposes, custom logging and reacting to specific build events. The information contained in the instance of BuildEvent that is passed as an argument varies with the type of event fired. The exception field is set only for finished events and only if an exception is thrown. If a log message event is thrown, the priority and message fields contain valid information. You can specify many listeners but only one logger. One logger logs information from any number of listeners. As a result, Ant allows you to use only one logger.
Table 4-7 lists the order of priorities for log messages:
|
Priority |
Value |
|---|---|
|
0 |
MSG_ERR |
|
1 |
MSG_WARN |
|
2 |
MSG_INFO |
|
3 |
MSG_VERBOSE |
|
4 |
MSG_DEBUG |
The default value of a log message is project.MSG_verbose.
You create the custom listener, TestListener listener, using the built-in EventListener interface and the TestListener, DemoFileList, TestSource, EventDisp, FirstListener, SecondListener, and ThirdListener user-defined classes. You also create the build file to compile the Java files that contain the classes.
Listing 4-1 shows how to create the TestListener.java file:
public class TestListener
{
    TestSource ds;
    public TestListener()
    {
        try
        {
            ds = new TestSource();
            FirstListener FL = new FirstListener();
            SecondListener SL = new SecondListener();
            ThirdListener TL = new ThirdListener();
            ds.addDemoFileList(FL);
            ds.addDemoFileList(SL);
            ds.addDemoFileList(TL);
            ds.notifyEventDisp();
        }catch(Exception ex){ex.printStackTrace();}
    }
    public static void main(String args[])
    {
        new TestListener();
    }
The above listing creates three listener objects and a TestSource object and then links the listener object to the TestSource object. The constructor of the TestListener class executes the notifyEventDisp() method of the TestSource class, which in turn executes the EventDisp() method in the listener classes.
Listing 4-2 shows how to create the DemoFileList.java file:
import java.util.EventListener;
public interface DemoFileList extends EventListener
{
    public void EventDisp(EventDisp dm);
}
The above listing creates an interface that contains the EventDisp() method.
Listing 4-3 shows how to create the TestSource.java file:
import java.util.*;
public class TestSource
{
    private Vector repository = new Vector();
    DemoFileList dl;
    public TestSource()
    {
    }
    public void addDemoFileList(DemoFileList dl)
    {
        repository.addElement(dl);
    }
    public void notifyEventDisp()
    {
        Enumeration enum = repository.elements();
        while(enum.hasMoreElements())
        {
            dl = (DemoFileList)enum.nextElement();
            dl.EventDisp(new EventDisp(this));
        }
    }
}
The above listing creates the class that contains the methods that link the listener to the event class.
Listing 4-4 shows how to create the EventDisp.java file:
import java.util.EventObject;
public class EventDisp extends EventObject
{
	Object obj;
	public EventDisp(Object source)
	{
		super(source);
		obj = source;
	}
	public Object getSource()
	{
		return obj;
	}
	public void say()
	{
        System.out.println("My method is here...");
	}
}
The above listing creates the EventDisp() method.
Listing 4-5 shows how to create the FirstListener.java file:
The above listing creates the class that implements the DemoFileList interface, which is the first listener.
Listing 4-6 shows how to create the SecondListener.java file:
The above listing creates the class that implements the DemoFileList interface.
Listing 4-7 shows how to create the ThirdListener.java file:
The above listing creates the class that implements the DemoFileList interface.
Listing 4-8 shows how to create a build file to compile the code in Listing 4-1 to Listing 4-7:
<project name="MyProject" default="dist" basedir=".">
<description>
simple example build file
</description>
<!-- set global properties for this build -->
<property name="src" location="src"/>
<property name="build" location="build"/>
<property name="dist"  location="dist"/>
<target name="init">
<!-- Create the time stamp -->
<tstamp/>
<!-- Create the build directory structure used by compile -->
<mkdir dir="${build}"/>
</target>
<target name="compile" depends="init"
description="compile the source ">
<!-- Compile the java code from ${src} into ${build} -->
<javac srcdir="${src}" destdir="${build}"/>
</target>
<target name="dist" depends="compile" description="generate the distribution">
<!-- Create the distribution directory -->
<mkdir dir="${dist}/lib"/>
<!-- Put everything in ${build} into the MyProject-${DSTAMP}.jar file -->
<jar jarfile="${dist}/lib/MyProject-${DSTAMP}.jar" basedir="${build}"/>
</target>
<target name="clean" description="clean up">
<!-- Delete the ${build} and ${dist} directory trees -->
<delete dir="${build}"/>
<delete dir="${dist}"/>
</target>
</project>
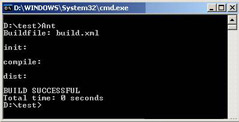
The above listing shows the build file to first compile and then test the listener, TestListener. The output of the build file appears, as shown in Figure 4-7:
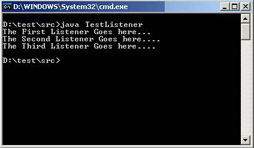
Specify the following command at the command prompt and press Enter:
java TestListener
Figure 4-8 shows the output that appears:
|
|
Table of Contents |
|