Building Worlds
Creating a tile engine is only the beginning of constructing a world. All you really have so far are the tools to create your game environments; what you need to do next is create that environment. First you should take a look at what makes up a game level.
Level Design
Up until now what you've been doing is creating an engine for your game. This isn't the game, though; it's just a bunch of tools. The first time you'll really start to see your game come to life is when you begin the level design process. Designing this environment for your game can be quite a challengelevel design is a serious profession in itself now.
To create the levels, I recommend that you first create a list of all the content elements in your game. This is basically just a list of new elements the player could encounter, such as terrain, enemies, and any new capabilities.
When you have the list, you should then consider at what point in your game you will introduce each component. Depending on the size and complexity of your content, you'll want to keep the player interested without overwhelming him with new features and using up all your content too quickly.
New content is also your primary reward for the player who meets your challenges. This doesn't always have to be defeating a massive boss monster; it could be just for progressing through the game. Consider this when you're designing your levels. Present a challenge, and then reward the player with something new. This is also important because you don't want to use up all your content too quickly. You'll find that J2ME games have a very limited scope on game features, so you need to time their introduction to keep the player feeling rewarded throughout the life of the game.
You should also be somewhat considerate of first-time players of your game. While you don't want to bore people with ridiculously simple (read slow and boring) introductions, you should start out slowly to give them a chance to work their way into the game play.
For Star Assault I'm keeping things simple by having only two significant content elementslevel complexity and your three enemy types (drones, turrets, and fighters). If this were a commercial game project, I would also add a variety of boss enemies (for placement at the end of some levels), a series of power-ups that the player can pick up along the way to enhance his ship, and a few more tile sets to represent some different environments (star bases, asteroid fields, and so on).
Constructing levels is a time-consuming process, so investing some solid time into methods to make level design easy and fast is well worth the effort. The quality of your tools can significantly impact your overall development speed and thus the quality of your game (because you'll be able to use all that extra time on improvements). You'll also find level design to be an iterative process. As you continue to tweak all the parameters of the game and inevitably implement new content ideas, you'll constantly modify levels to maintain a good balance. If modifying your levels is a painstaking exercise, you'll find yourself cutting corners or excluding features just because it's "too hard to redo the map." The moral of the story is: Invest time in your tools. Invest time in your tools. Invest time in your tools. Invest time in your tools. Invest time in your tools. Invest time in your tools. Invest time in your tools. Invest time in your tools. Got it yet? It's one of the keys to developing a great game. Take the time to work with your tools to make the process of creating your game easier. It'll come back a hundredfold in the quality of your final game.
All right, so how do you go about creating those levels? Well, because you're using a tile engine you really need to be able to fill in that tile map array with bytes corresponding to the contents of the level. There are a number of methods you can use to construct a world; which one you use depends on the type of game you're making. Thankfully, there are also quite a few tools out there to help in the process. However, as with most things, you need to make some adjustments to suit the micro world. Take a closer look at the various methods and tools you can use to build your world.
Array Maps
The simplest method to create a level is to initialize the tile map array using Java code. For example, the following code creates a 10 x 10 tile map; the 0s represent empty tiles and the 1s represent wall tiles.
byte[][] level0 = {
   {0, 0, 0, 0, 0, 0, 0, 0, 0, 0},
   {0, 1, 1, 1, 1, 1, 0, 0, 0, 0},
   {0, 1, 0, 0, 0, 1, 0, 0, 0, 0},
   {0, 1, 0, 0, 0, 1, 1, 1, 1, 0},
   {0, 1, 0, 0, 0, 0, 0, 0, 1, 0},
   {0, 1, 0, 0, 0, 0, 0, 0, 1, 0},
   {0, 1, 0, 0, 0, 1, 1, 1, 1, 0},
   {0, 1, 1, 1, 1, 1, 0, 0, 0, 0},
   {0, 0, 0, 0, 0, 0, 0, 0, 0, 0},
   {0, 0, 0, 0, 0, 0, 0, 0, 0, 0}
};
This might seem like a pretty silly way to make levels, but keep in mind this is J2ME. More sophisticated map-editing systems will cost you in terms of code (and map data files); array initialization code will end up being extremely small in a compiled JAR file. If your requirements are very light and the levels aren't going to change too often, then creating a level directly using Java code might be a good idea.
Using code to generate levels doesn't stop here, though. You can use more sophisticated code to generate highly complex (and fun) level content. In the next section, you'll look at how to generate some sophisticated levels using a random level generator.
Random Level Generator
A great way to keep things fresh for players (and thus increase replayability) is to generate new levels for them using a random level generator. Many games (such as Diablo) use random level generators so effectively it's hard to tell the difference between hand-edited maps and generated ones.
There are many forms of map generator techniques, most of which are tailored to the type of map that is being generated. From fantasy dungeons such as those used in Diablo to complex terrain generators used in real-time strategy games, the generators are custom-built to suit the game requirements. As an example, you'll build a relatively simple corridor-room system for Star Assault. You can see an example of the levels you'll be generating below.
To keep things organized all the code will go into a new LevelGenerator class.
Creating Rooms
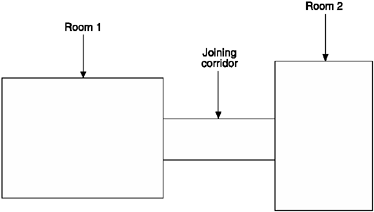
In Figure 11.7 you can see two rooms connected by a corridor. This is the basic building block of your generator. The system is quite simple. Based on a starting room, move a random distance in a random direction (directly left, right, up, or down) and create another room. Then build a corridor between these two to connect them.
Figure 11.7. Your random level generator creates random rooms and then connects them using corridors.
The first step in generating the level is to construct a room. To do this you just need to set all the bytes of a rectangle in the tile map, for example:
// Set the array elements down the left and right sides of the room.
for (int tileY=topOfRoom; tileY < heightOfRoom; tileY++)
{
   tileMap[tileY][0] = WALL_TILE; // Left side.
   tileMap[tileY][widthOfRoom-1] = WALL_TILE; // Right side.
}
// Set the array elements across the top and bottom.
for (int tileX = leftSideOfRoom; tileX < widthOfRoom; tileX++)
{
   tileMap[0][tileX] = WALL_TILE; // Top.
   tileMap[heightOfRoom-1][tileX] = WALL_TILE; // Bottom.
}
Once you have a room, the next step is to create another at a distance and then connect the two using a corridor. In the left-hand illustration in Figure 11.8 you can see the results of this and you can also see your next problem: there are no doors, so the player won't be able to move from room to room.
Figure 11.8. Two rooms connected by a corridor (left) need the overlapping tiles (excluding corners in this case) to be inverted to create doorways (right).
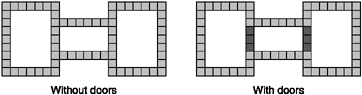
In the illustration on the right, I've highlighted the parts of the walls that need to be opened up in order to let the player fly through. Notice something? The doors are where the walls for the rooms intersect (I've excluded the corners in this example). A simple method of opening doorways therefore is to just change any part of the wall that overlays another into an opening. In effect what you need to do is "invert" tiles as you create the walls for each room.
To do this you start with a method that takes care of inverting tiles.
public class LevelGenerator
{
   /**
    * Inverts an existing map tile between either empty or a wall tile.
    * @param tileX The x position of the tile to invert.
    * @param tileY The y position of the tile to invert.
    */
   private void invertTile(int tileX, int tileY)
   {
      // Turn an empty tile into a wall or vice versa.
      if (tileMap[tileY][tileX] == World.WALL_TILE)
         tileMap[tileY][tileX] = World.NO_TILE;
      else
         tileMap[tileY][tileX] = World.WALL_TILE;
   }
Next is a method to set the tiles corresponding to a room rectangle by inverting the tiles already on the map. (From Figure 11.8 you can also see the code should not invert the corner tiles. This is because for this type of tile map you always want them to be walls in order to avoid ugly gaps in the edges of the doorways. Setting corners separately is also useful later on if you decide to have special tile graphics for corners or junctions.)
/**
 * Toggles tiles in the tilemap to either a wall or an empty space (based on
 * what is there already) in an outline rectangle using the supplied bounding
 * coordinates. Note that corners are NOT inverted, they are always set as
 * walls.
 * @param roomTileX The starting x position of the room to create.
 * @param roomTileY The starting y position of the room to create.
 * @param roomTilesWide The width of the room to create.
 * @param roomTilesHigh The height of the room to create.
 */
private void addWallsToMap(int roomTileX, int roomTileY,
                              int roomTilesWide, int roomTilesHigh)
{
   // Add the top and bottom line.
   for (int tileX = roomTileX; tileX < roomTileX + roomTilesWide; tileX++)
   {
      // Invert the tiles along the top.
      invertTile(tileX, roomTileY);
      // Invert the tiles along the bottom.
      invertTile(tileX, roomTileY + roomTilesHigh - 1);
   }

   // Left and right side lines.
   for (int tileY = roomTileY + 1; tileY < roomTileY + roomTilesHigh - 1;
         tileY++)
   {
      // Invert the tiles down the left side.
      invertTile(roomTileX, tileY);
      // Invert the tiles down the right side.
      invertTile(roomTileX + roomTilesWide - 1, tileY);
   }

   // Mark corners as walls (not inverted).
   tileMap[roomTileY][roomTileX] = World.WALL_TILE;
   tileMap[roomTileY][roomTileX + roomTilesWide - 1] = World.WALL_TILE;
   tileMap[roomTileY + roomTilesHigh - 1][roomTileX] = World.WALL_TILE;
   tileMap[roomTileY + roomTilesHigh - 1][roomTileX + roomTilesWide - 1] =
            World.WALL_TILE;
}
When you're trying to create each new room, you need to make sure that there is available space on the map and that the size and position of the room leave enough area to create a corridor between them.
To do this the generator needs to keep track of the locations of all previous rooms using a room array like this:
private int[] roomX;
private int[] roomY;
private int[] roomW;
private int[] roomH;
To now add a room you just combine the code to add the walls to the map and to add an entry to the room array. This following method, addRoom, also uses the supplied level number to fill the room with enemy.
/**
 * Adds a room to the level by setting all the bytes in the tilemap to be
 * walls. Note that existing wall tiles will be inverted by this process
 * (except for corners) in order to "carve out" doorways where the walls
 * between rooms and corridors overlap.
 * @param level The level number is a relative density level used to fill
 * the room with objects.
 * @param tileX The x position of the new room.
 * @param tileY The y position of the new room.
 * @param tileWidth The width of the new room.
 * @param tileHeight The height of the new room.
 */
private void addRoom(int level, int tileX, int tileY, int tileWidth,
                      int tileHeight)
{
   addWallsToMap(tileX, tileY, tileWidth, tileHeight);

   roomW[roomCount] = tileWidth;
   roomH[roomCount] = tileHeight;
   roomX[roomCount] = tileX;
   roomY[roomCount] = tileY;
   roomCount++;
The following code adds the enemy to the room by picking a random location inside the room and setting it to be a FIGHTER_ACTIVATOR_TILE.
// Add enemy to this room (we base the number on the level they're on)
int maxEnemy = level + 1;
if (maxEnemy > 10) maxEnemy = 10;
int numEnemy = Tools.getRand(0, maxEnemy);

int numAdded = 0;
Since the location picked for a new fighter might already be populated, the code keeps trying until the tries count is past the rather arbitrary value maxEnemy * 2.
   int tries=0;

   while (numAdded < numEnemy && tries++ < maxEnemy * 2)
   {
      // Pick a random tile and try to add an activator there (may be filled
      // by another one)
      int randomTileX = Tools.getRand(tileX + 1, tileX + tileWidth - 2);
      int randomTileY = Tools.getRand(tileY + 1, tileY + tileHeight - 2);

      if (tileMap[randomTileY][randomTileX] == World.NO_TILE &&
               (randomTileX != playerStartX && randomTileY != playerStartY))
      {
         numAdded++;
         tileMap[randomTileY][randomTileX] = World.FIGHTER_ACTIVATOR_TILE;
      }
   }
}
Now that you have the code to add a single room, you're almost ready to start generating the level. First though you need a few more helper methods to get the job done.
Utility Methods
The code for all this starts with a few utility methods. The first is used to return a random direction from a list of available ones.
When inside the main loop the code will try to create a room in a random direction (left, right, up or down), however it's better to try directions that haven't previously failed first since they have a better chance of not being blocked (by the map dimensions or another room). To track previously tried directions, the code uses an array of four boolean (representing the four directions) which are set to true if a direction has been tried. The following code returns a random choice from the array entries that are false (excluding the true ones).
/**
 * Based on an array of booleans this returns a random choice from a limited
 * list of ones that are currently false. The level generator uses this to
 * randomly choose a direction, but only from ones that have not previously
 * been tried (set to true in the array).
 */
private static final int getRandDir(boolean[] dirs)
{
   // we only do a random test on the number of available dirs, so let's
   // find out how many there are first
   int numDirs = 0;
   for (int i = 0; i < 4; i++)
      if (!dirs[i]) numDirs++;
   if (numDirs == 0) return 0;

   // now pick one at random
   int n = 0;
   if (numDirs > 1)
      n = Tools.getRand(0, numDirs - 1);
   // and return the dir corresponding to the nth result by figuring
   // the array index of the nth true value
   int c = -1;
   int i = 0;
   while (i < dirs.length)
   {
      if (!dirs[i++]) c++;
      if (c == n) return i - 1;
   }

   return 0;
}
The loop code also checks to see if all directions have been tried for the current room (if
it has, the directions are reset so it can retry them all again). The following method tests
whether an array of booleans are all true.
/**
 * @param b An array of booleans to test.
 * @return True if all the booleans in the array are true.
 */
private static final boolean areAllTrue(boolean[] b)
{
   for (int i = 0; i < b.length; i++)
      if (b[i] == false) return false;
   return true;
}
Another utility method used by the main loop tests whether a proposed new room is close to another room on the map. To keep the map uncluttered, the code ensures a distance of at least three tiles between each room.
/**
 * Checks to see if the supplied rectangle is within 3 tiles of any other
 * room (including corridors).
 * @param tileX The x position of the room to be checked.
 * @param tileY The y position of the room to be checked.
 * @param tilesWide The width of the room to be checked.
 * @param tilesHigh The height of the room to be checked.
 * @return True if the rectangle (room) is within 3 tiles of another.
 */
private final boolean isRectNearRoom(int tileX, int tileY, int tilesWide,
                                        int tilesHigh)
{
   for (int i = 0; i < roomCount; i++)
   {
      if (Tools.isIntersectingRect(tileX, tileY, tilesWide, tilesHigh,
                                      roomX[i] - 3, roomY[i] - 3,
                                      roomW[i] + 3, roomH[i] + 3))
      {
         return true;
      }
   }
   return false;
}
The Main Loop
All right, with background and all the utility methods out of the way, you're ready for the main loop. Since this is a pretty lengthy process, here's the basic pseudo-code for the entire process.
Pick a level width and height and create a corresponding tile map array.
Choose the number of rooms you'd like in the level.
Create a starting room with a random size within one of the four corners of the map.
Start looping until you've either reached the target room count, or you've tried so many times that you have to give up. (Do the following inside the loop.)
Pick a random size for a new room.
Pick a random size for a corridor to connect that room to the existing one.
Starting from the current room, pick a random direction (left, right, up, or down) from directions not previously tried for this room.
Mark the chosen direction as tried.
Test if the new room and connecting corridor will fit on the map and that it does not collide with another room already on the map.
If the room fits, set the added room to be the last one (not the corridor) and add it to the map. If the room did not fit then just go back to the top to try another direction.
Pretty dense I know, but there's no rocket science going on here; the process is basically to create rooms and connecting corridors in random directions, keeping track of what you're doing along the way. Here's the complete code for the generateLevel method. I'll explain things along the way.
public byte[][] generateLevel(int level)
{
The level integer is an arbitrary number used to alter the size and density of the level being generated. Level 1 for example is only a few rooms, with each room containing a small number of enemy; level 10 has significantly more rooms and a larger number of enemy in each of those rooms. There's no solid formula to how the level corresponds to difficulty; it's a game balancing thing that you just tweak as you flesh the game's playability out.
// Set the size of the level relative to the level number provided.
width = 30 + (level * 2);
height = 30 + (level * 2);
The size of a level needs to be capped to a reasonable map since it directly corresponds to the size of the tileMap byte array, and therefore the amount of memory being consumed.
// Cap the level to a reasonable maximum.
if (width > 100) width = 100;
if (height > 100) height = 100;

// Construct a new tile map based on this size and clear it.
tileMap = new byte[height][width];

// The minRooms is used later to determine when to stop generating new
// rooms. It's more of a target than an exact number though.
int totalRooms = 10 + (level * 2);

System.out.println("Generating level: " + level + " minRooms: " +
                     totalRooms + " width: " + width + " height: " + height);
To track all the rooms created in a level we use an array for each room's x, y tile position, the width and height as well as whether the room was a corridor joining two others. This is mostly used by the code to determine if there is enough space to place a new room.
roomX = new int[totalRooms];
roomY = new int[totalRooms];
roomW = new int[totalRooms];
roomH = new int[totalRooms];
When creating a room there is a reasonable minimum and maximum size set.
// The minimum size of each room.
int minRoomHeight = 6;
int minRoomWidth = 6;
int maxRoomHeight = 10;
int maxRoomWidth = 10;
The first step in the generation process is to create a room. In order to give the generation system the best chance of creating lots of rooms we always start in one of the corners, rather than near the center of the map.
int corner = Tools.getRand(0, 3);
int roomStartX = 3;
int roomStartY = 3;

switch (corner)
{
   // case 0 is top left (3,3) (which is already initialized)
   case 1: // top right
      roomStartX = width - maxRoomWidth;
      roomStartY = 3;
      break;
   case 2: // bottom right
      roomStartX = width - maxRoomWidth;
      roomStartY = height - maxRoomHeight;
      break;
   case 3: // bottom left
      roomStartX = 3;
      roomStartY = height - maxRoomHeight;
      break;
}
Once the position of the first room has been set, the following code adds it to the map with a random width and height within the previously specified range.
addRoom(level, roomStartX, roomStartY,
         Tools.getRand(minRoomWidth, maxRoomWidth),
         Tools.getRand(minRoomHeight, maxRoomHeight));
Next the player's start position for the level is set to be the center of the first room.
playerStartX = roomX[0] + (roomW[0] / 2);
playerStartY = roomY[0] + (roomH[0] / 2);
Since the addRoom method call above also fills the room with enemy fighters, you need to clear the tiles directly around the player in order to not give them a nasty surprise when entering a level. To do this, the code just sets all the tiles close to the player start point to World.NO_TILE.
      for (int ty = 0; ty < 3; ty++)
         for (int tx = 0; tx < 3; tx++)
            tileMap[playerStartY - 1 + ty][playerStartX - 1 + tx] =
                     World.NO_TILE;
Since the generator needs to connect rooms together it keeps track of the last room created using this value. You'll see it in action a little later. For now this value is set to be the array index of first room created.
int lastRoomIndex = 0;
If a new room is not valid (too big, for example) the generator will loop around for another go trying all the different directions. If all the directions are exhausted, they are reset and the generating will have another go, ad infinitum. To stop it from going forever, the tries counter is used to stop the loop after a reasonable number of attempts have been executed.
int tries = 0;
The following two variables are used inside the loop when creating new rooms.
int newRoomX = 0;
int newRoomY = 0;
The roomCount integer is incremented every time a new room is successfully added to the map.
roomCount = 1;
The code will randomly try to attach a corridor and room using one of the four directions (left, right, up, and down). If this step fails, such as when there's no space left on the map, or another room is in the road, the generator attempts another direction. To make this efficient, it tracks which directions it has already tried using an array of four booleans (one for each direction).
boolean[] dirsTried = new boolean[4];
Next is the main while loop for creating the rooms. On each pass it will attempt to create a room along with a connecting corridor. The process ends when the generator has either created the required number of rooms, or the number of passes has reached a high level (100).
while (roomCount < totalRooms - 1 && tries < 100)
{
   tries++;
To add a room to the map, you need to place it relative to the previous room, and then connect back using a corridor. The first step is to grab the details of the previously created room. In the first pass, this is set to be the first room created outside the loop.
// Grab the info on the last room created.
int lastRoomX = roomX[lastRoomIndex];
int lastRoomY = roomY[lastRoomIndex];
int lastRoomW = roomW[lastRoomIndex];
int lastRoomH = roomH[lastRoomIndex];
Based on the minimum and maximum room sizes the generator randomly chooses a width and height for the new room.
// Pick a random size for the new room.
int newRoomW = Tools.getRand(minRoomWidth, maxRoomWidth);
int newRoomH = Tools.getRand(minRoomHeight, maxRoomHeight);
Here the code checks that all the directions away from the last room have already been tried. If they have then it's likely one or more failed because the random room and connecting corridor size were too large or misplaced. In this case the code resets the previously tried boolean array back to all false so the system can have another go around. If the room really is surrounded by blocks, then the tries counter will cut the process off after a certain number of attempts. (This could be optimized to detect a case where the generator just keeps failing on the same room.)
   // If all the previous directions have been tried we reset them
   // and start again.
   if (areAllTrue(dirsTried))
   {
   // reset the tried dirs to have another go
   for (int i = 0; i < 4; i++)
      dirsTried[i] = false;
}
Now the generator picks a random direction for the next room to be placed and then records the attempt by setting the corresponding boolean in the array to true.
// Pick a random dir from the ones that have not previously been tried.
int dir = getRandDir(dirsTried);

// Mark this direction as tried.
dirsTried[dir] = true;
Next, a corridor is randomly sized and placed to link the last and new rooms together. By default, it assumes the chosen direction was either left or right and initializes the values according to that direction. If it turns out to be up or down it redoes the number for that. In each case the corridor size (either width or height) is fixed so that it does not exceed the size of the room it's connecting to.
// Figure the corridor dimensions to connect up this new room.
int corridorWidth = Tools.getRand(4, 10);
int corridorHeight = Tools.getRand(4, minRoomHeight - 2);
if (dir == UP_DIR || dir == DOWN_DIR)
{
   corridorWidth = Tools.getRand(4, minRoomWidth - 2);
   corridorHeight = Tools.getRand(4, 10);
}
With the corridor and room size chosen, the following code will attempt to randomly position the new room and corridor on the map. The tricky bit is figuring out how much space to leave for all the different directions.
// If the room is to the left or right.
if (dir == LEFT_DIR || dir == RIGHT_DIR)
{
   // First choose a new x position (it's relatively fixed based on the
   // position of the previous room and the width of the corridor
   // (already chosen above).
   if (dir == LEFT_DIR)  // to the left
      newRoomX = lastRoomX - newRoomW - corridorWidth + 2;
   if (dir == RIGHT_DIR) // to the right
      newRoomX = lastRoomX + lastRoomW + corridorWidth - 2;

   // Next determine the vertical position of the new room. This code
   // ensures enough space is left available to fit in the corridor
   // (positioned on the left or right).
   int lowPoint = Math.max(1, lastRoomY + corridorHeight - newRoomH);
   int highPoint = lastRoomY + lastRoomH - corridorHeight;
   newRoomY = Tools.getRand(lowPoint, highPoint);
}

// If the room is above or below.
if (dir == UP_DIR || dir == DOWN_DIR)
{
   // First choose a new y position (it's relatively fixed based on the
   // position of the previous room and the height of the corridor
   // (already chosen above).
   if (dir == UP_DIR)
      newRoomY = lastRoomY - corridorHeight - newRoomH + 2;
   if (dir == DOWN_DIR)
      newRoomY = lastRoomY + lastRoomH + corridorHeight - 2;

   // Next determine the horizontal position of the new room. This code
   // ensures enough space is left availble to fit in the corridor
   // (positioned on the above or below).
   int lowPoint = Math.max(1, lastRoomX + corridorWidth - newRoomW);
   int highPoint = lastRoomX + lastRoomW - corridorWidth;
   newRoomX = Tools.getRand(lowPoint, highPoint);
}
With the new room position and size figured out, you can now test to see if it actually fits on the map, and it isn't too close (or overlapping) another room.
// Check to see if this new room is within the dimensions of the map.
if (Tools.isRectWithinRect(0, 0, width - 1, height - 1,
                              newRoomX, newRoomY, newRoomW, newRoomH))
{
   // Check the room is not too close (or overlapping) another room.
   if (!isRectNearRoom(newRoomX, newRoomY, newRoomW, newRoomH))
   {
Now clear to add this room (and the corridor) to the map. The final step is to figure out the x and y position of the corridor and also place it on the map.
addRoom(level, newRoomX, newRoomY, newRoomW, newRoomH);

// Add the corridor connecting the new room to the last one.
int corridorX = 0;
int corridorY = 0;
// Connect a new room either to the left or right.
if (dir == LEFT_DIR || dir == RIGHT_DIR)
{
   if (dir == LEFT_DIR)
      corridorX = lastRoomX - corridorWidth + 1;
   if (dir == RIGHT_DIR)
      corridorX = lastRoomX + lastRoomW - 1;

   corridorY = Tools.getRand(Math.max(lastRoomY, newRoomY),
                               Math.min(lastRoomY + lastRoomH -
                                         corridorHeight,
                                         newRoomY + newRoomH -
                                         corridorHeight));
}

// Connect a new room either above or below.
if (dir == UP_DIR || dir == DOWN_DIR)
{
   if (dir == UP_DIR)
      corridorY = lastRoomY - corridorHeight + 1;
   if (dir == DOWN_DIR)
      corridorY = lastRoomY + lastRoomH - 1;

   corridorX = Tools.getRand(Math.max(lastRoomX, newRoomX),
                              Math.min(lastRoomX + lastRoomW -
                                       corridorWidth,
                                       newRoomX + newRoomW -
                                       corridorWidth));
}

// Draw the corridor on the tilemap.
addRoom(level, corridorX, corridorY, corridorWidth,
         corridorHeight);
Since a room was successfully added to the map, the generator now makes it the last room so that the next room will extend out from this one.
         // Set the last room index to be the room we added (step back by
         // an extra one to skip the corridor just added to connect the
         // new room to the last one).
         lastRoomIndex = roomCount-2;
      }
   }
}
After completing the while loop the new map is returned.
   return tileMap;
}
To now use our level generator, you need to call it from the World class in order to fill in the tileMap before starting the game. For example, here's a method for the World class to generate a new level:
public void generateLevel(int levelNum)
{
   LevelGenerator lg = new LevelGenerator();
   tileMap = lg.generateLevel(levelNum);

   tilesWide = tileMap[0].length;
   tilesHigh = tileMap.length;
   int levelStartX = lg.getPlayerStartX();
   int levelStartY = lg.getPlayerStartY();

   playerShip.setX(levelStartX * TILE_WIDTH);
   playerShip.setY(levelStartY * TILE_HEIGHT);
}
And finally, call this method from an appropriate location to create a new level, such as the GameScreen constructor.
public GameScreen()
{
   // Set a reference to ourselves (singleton).
   theGameScreen = this;

   // Construct a new world 10 by 10 tiles in size using a view port the
   // size of the screen.
   world = new World(10, 10, getWidth(), getHeight());

   // Create the player ship and add it to the world.
   playerShip = new Ship(world, false, 20, 20);
   world.addActor(playerShip);
   world.setPlayerShip(playerShip);

   world.generateLevel(1);
}
Hopefully you didn't find any of that particularly difficult. It's a complicated process (and a bit of a brain bender sometimes) but in the end it's quite a basic system for creating a level. For a simple example, look at the CD Chapter 11 source code directory "Generated-WorldTest" as well as the finished Star Assault source code for a look at how it would integrate into a completed game.
Using Generators Effectively
I've used random level generators successfully in plenty of game development situations. You'll be surprised how often you can use them to enhance your game.
Once you have this system up and going, you can easily add special rooms and other level components to spice up what's happening. For Star Assault, you could add lines of turrets that stretch across the room, fighter bays (rooms with bunches of fighters in formation), or even special grids to make navigating more difficult. The possibilities are pretty much endless.
The best use of generators, however, is typically in combination with other map generation systems. For example, you can use a random generator for parts of your level, and then use hand-edited rooms at certain locations. In turn, you can assist the generator greatly by placing anchor points on your map that it can use as references to generating different content (such as a boss indicator).
In the next section, you'll look at another great way of creating level contentmap editors.
Using a Map Editor
Probably the most flexible and powerful world creation method is to use a dedicated application known as a map editor. A map editor lets you visually edit the contents of your map using drawing tools. In other words, what you typically see on the screen is what you'll see in your level.
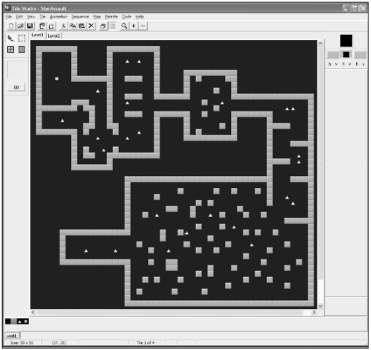
Map editors come in a variety of shapes and sizes, some obviously better than others. The two most suitable (and popular) for J2ME development are Mappy (http://www.tilemap.co.uk), shown in Figure 11.9, and Tile Studio (http://tilestudio.sourceforge.net), shown in Figure 11.10. Both of these tools are excellent for typical 2D game development requirements.
Figure 11.9. The Mappy map editor
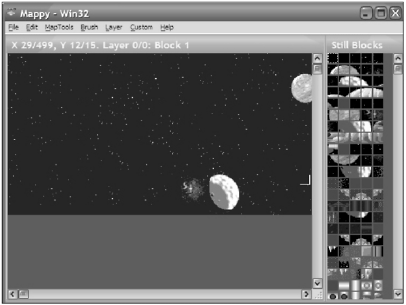
Figure 11.10. Tile Studio offers additional features such as tile graphic editing and customized export.
Of these two tools, I prefer Tile Studio due to the extra support for making edits to tile graphics (on the fly) and a programmable export system that lets you output data in almost any format you can imagine. This is, however, somewhat of a preference choice; I'm aware of other J2ME game developers successfully using Mappy as an editor.
You can download Tile Studio (for Windows) from the Web site listed a moment ago. Once you have it installed, you will need to create a new project.
NOTE
Tip
For a working example, you can load up the two levels from the StarAssault.TSP project file (under the MapEditedWorld Chapter 11 source directory on the CD).
Editing the Map
To edit using the actual tiles from your game, you first need to import the graphics into the project using the Import Tiles option from the Tile Studio File menu. This feature supports PNG files, so you should have no trouble loading up the tile packs for your game. (Make sure when you load the tile image you set the Tile Width and Tile Height options to 16.)
Once you have the tiles loaded, they will appear along the bottom of the screen. The next thing to do is set up special tiles for the elements in the game which are not represented as graphical tiles. The activator tiles are a good example of this. You want to be able to add them onto the map, but there's no graphical tile in the world.png file that represents it, so there's no tile to place. To get around this you add custom tiles to represent special functions.
NOTE
Tip
Tile Studio is based around having one set of tiles for all the maps within a project. If you have different sets of tiles in your game, you'll have to merge them into a single image file in order to edit maps using Tile Studio. If that's not suitable, you can create a different project for levels using other tile sets. Generally I just throw everything into one image file designed for use only with Tile Studio. The final image files for the project are still separate.
The first is a blank tile representing an empty tile space in our game. This is a blank tile with an index of 0, rather than Tile Studio's default "null" tile which has an index of -1. You can create this new tile by selecting the original world tile and then hitting the insert key. To edit the tile, press Ctrl+Tab to switch to the tile editor mode and draw on it using the basic tools. For the blank tile I just filled it with black. To switch back to the map editor mode press Ctrl+Tab again. You're then free to draw anywhere on the map using this new tile.
NOTE
Tip
When creating a new map, always start by filling it with the zero index tiles so as not to confuse the map loader introduced later in the chapter.
The two tiles to the right of the original world tile are exactly the same type of special case. The first is the fighter activator and the second is an indicator as to where the player's ship should start in the map. To support this, the World class file needs some new tile indices defined.
public class World
{
   public static final byte NO_TILE = 0;
   public static final byte WALL_TILE = 1;
   public static final byte START_ACTIVATOR_TILE = 2;
   public static final byte FIGHTER_ACTIVATOR_TILE = 2;
   public static final byte END_ACTIVATOR_TILE = 2;
   public static final byte PLAYERSTART_TILE = 3;
The important thing to take note of here is the byte values I've assigned to each of these tiles are the same as the tile index in Tile Studio. It's vital that these two things remain in sync, so if you add, delete, or move a tile, you'll need to adjust the World class indices to match.
NOTE
Tip
You can rearrange tiles (and their corresponding index value) anytime by selecting them and pressing Ctrl+Shift and the left or right arrow key.
The next thing to do is switch between the tile editor and map editor modes using Ctrl+TAB. You can then create a new map using the File menu's New Map command. Give it a name, such as "Level1" and a reasonable size (say 50 50 tiles).
NOTE
Tip
Use the View menu's Background Color option to change the color from the default black to something like dark gray. This will help highlight areas of your map that have not been filled in with content.
To edit your map, just select the tile you want and then draw on the map window. To remove a tile, right-click in the top-right tile panel to select no tile, and then draw over the area you want to erase. There are plenty of other features in Tile Studio, so feel free to play around with it.
NOTE
Tip
When editing a map, you'll find it annoying to have to select tiles from the bottom row all the time. An equivalent shortcut is to right-click on an existing tile on the map. This will select that tile as the current one. You'll find this a much faster method of editing.
Once you have a map created, the next step is to get the data into your game. To do that, you first need to export the map data out of Tile Studio.
Exporting Maps
One of the issues with using map editors is that they tend to use file formats designed for bigger systems. If you export all the data for a 50 x 50 map from Tile Studio, it can easily be 40 KB (or more). And that's for one map! If you make a game with 10 levels, you'll have serious JAR space issues. Thankfully, Tile Studio has an excellent customizable export system (Code Generator). You'll use this to export the data in a more suitable format. To create a custom export, you need to create a TSD (Tile Studio Definition) file. A TSD is a text file containing instructions on the format of the file that you want to make. For details on exactly what you can control, I recommend taking a look at the Tile Studio tutorial. For the purposes of Star Assault, you'll export the map data as a series of tile numbers (separated by spaces). Here's the TSD to do this:
#file levels.dat
#tileset
#map
!<MapIdentifier>~<MapWidth:"%2d"><MapHeight:"%2d">
#mapdata
<TSMidTile:"%2d">
#end mapdata
#end map
#end tileset
#end file
NOTE
Caution
Don't be tempted to indent your TSD files as you would with source code. This isn't valid, and it will cause the TSD compiler to report (rather obscure) errors.
To create a new TSD, just place a file containing this text into the directory where you installed Tile Studio. To select it as the current exporter, restart Tile Studio, hit Shift+F10, and select your TSD from the drop-down list. To export the current map, you can then just hit F10. The exporter will create a file named levels.dat (as specified in the TSD file) based on the contents of the map you're editing. Here's an excerpt from the generated file for the two Star Assault levels.:
!Level1~5050 0 0 0 0 0 0 0 0 0 0 0 0 0 0 0 0 0 0 0 0 0 0 0 0 0 0 0 0 0 0 0 0 ...
!Level2~3030 0 0 0 0 0 0 0 0 0 0 0 0 0 0 0 0 0 0 0 0 0 0 0 0 0 0 0 0 0 0 0 0 ...
As you can see, this file format is very simple. The exclamation mark is used to indicate the start of the level name string, and tilde (~) terminates it. Immediately following this is the number of tiles wide and high. All the rest of the numbers are the entries corresponding to all the tiles on the map.
The resulting file is around 8 KB, which is still too large for your purposes. Thankfully, though, the compression (ZIP) used by JAR files reduces this to a far more acceptable 400 bytes. Not bad for two levels.
NOTE
Note
It is possible to reduce this size even more. One method is to apply a simple run-length encoding algorithm. To do this, you could save a tile number and run-length value for the repeating values. For example, if the file contained a series of 20 tile 0s in a row (which is quite common), you could save that as the tile number, 0, and then a 20. When you re-create the map, you interpret the values and place 20 of that tile type in the map.
This is quite a simple thing to implement; after doing so, you get results of around 600 bytes (down from 8000) for the original map file. After JAR compression, the size is around 250 bytes. It all sounds good, but frankly, I found it not worth the added complexity, code, and mess of converting files to save only 150 bytes on each map in the end.
Loading Maps
Loading the map from this file format is pretty easy. In the following code, you read through the file until you get to the correct level and then load all the byte data for the tiles that make up that level. The result is a tileMap array containing all of the entries for the map. Here's the World class's level loader from Star Assault.You can see a complete example of this working in the MapEditedWorld directory under the Chapter 11 source code directory on the CD.
/**
 * Loads a level from the map data file using its name as the key.
 * @param levelName The name of the level to load.
 */
public void loadLevel(String levelName)
{
   try
   {
The levels.dat file contains the data for all the levels in the game. The first step is to load this file and create an input stream.
InputStream is = null;
is = this.getClass().getResourceAsStream("/levels.dat");
Since there are many levels in the one file, you need to read through the file checking the level name strings until you reach the named level (the parameter to the method call). The actual reading of a string is done by the readString method (shown next).
boolean foundLevel = false;

// Loop through until you get to the correct level.
int b = is.read();
while (b != -1 && !foundLevel)
{
   // Level name starts with a ! and terminates with a ~ character.
   // The readString method wraps up reading the string from the
   // stream.
   if (b == '!')
   {
      // Got a start of level name char, read the name string.
      String ln = readString(is, (byte) '~').toLowerCase();

      if (ln.equals(levelName.toLowerCase()))
         foundLevel = true;
      }

      // If the level hasn't been found yet you continue reading.
      if (!foundLevel)
         b = is.read();
}
// Test if the end of the file was reached, in which case the level
// load failed (possibly because of the wrong level name being used).
if (b == -1)
   throw new Exception("unknown level: " + levelName);
After reading through the level names, you're now positioned at the start of the level data for the map you want. The first step is to read the width and height variables and then construct a corresponding byte array (tileMap).
// Load the level. Start by reading the height and width from the file.

byte[] buffer = new byte[2];
is.read(buffer);
String tws = new String(buffer, 0, 2);
is.read(buffer);
String ths = new String(buffer, 0, 2);
tilesWide = Integer.parseInt(tws);
tilesHigh = Integer.parseInt(ths);

tileMap = new byte[tilesHigh][tilesWide];
Next you read all the tiles into the tile map. Each tile is represented by 2 bytes (tile numbers can go up to a maximum of 99). The data is read into a 2 byte buffer and then added to the tile map.
   int bytesRead=0;

   for (int ty=0; ty < tilesHigh; ty++)
   {
      for (int tx = 0; tx < tilesWide; tx++)
      {
         bytesRead = is.read(buffer);
         if (bytesRead > 0)
         {
            tws = new String(buffer, 0, 2).trim();
            if (tws.indexOf("-") != -1)
               // If this starts throwing exceptions when loading the map
               // check that the tile indecies in your map file doesn't
               // have -1's in it. This is the default index for the
               // empty tile in TileStudio. Always fill your levels with
               // blank (NO_TILE) entries before editing it.
               System.out.println("Oops, read a - at " + tx + ", " + ty);

            byte c = Byte.parseByte(tws);
            if (c == PLAYERSTART_TILE)
            {
               playerShip.setX(tx * TILE_WIDTH);
               playerShip.setY(ty * TILE_HEIGHT);
            } else
            {
               // All other tiles are handled either as walls or
               // activators.
               tileMap[ty][tx] = c;
            }
         }
      }
   }
}
   catch (Exception e)
   {
      System.out.println("Exception loading map file : " + e);
      e.printStackTrace();
   }
}
The readString method takes an input stream and keeps reading bytes until it hits the specified terminator character. It then returns the string of characters read up to that point as a String object. Again, this belongs in the World class.
private String readString(InputStream is, byte terminator)
{
   try
   {
      StringBuffer sb = new StringBuffer();
      int b = is.read();
      while (b != -1)
      {
         if (b == terminator)
         {
            return sb.toString();
         } else
            sb.append((char)b);
         b = is.read();
      }

      return null;
}

catch(IOException e)
{
      System.out.println("IOException: " + e);
      e.printStackTrace();
      return null;
   }
}
And that's it! You're now ready to load a level by calling the loadLevel method, such as from a GameScreen startNewLevel method.
Other Editors
Those are the basics of editing and then loading a map into your game. As you can imagine, though, building mapping and other editing tools can go quite a bit further.
Map files are not the only level files you can have. If you want to externally manage other aspects of the game, such as special event triggers, story lines, or object properties, consider adding another resource file type for the job. You don't have to have an editor to support it; just use a text editor for simple files. As well as improving your code base (by keeping it abstracted from the specifics of your game data) you'll find other members of your team can participate more fully in the development process because they have the power to edit that much more of the game content without pestering the all-important programmer.
Finally, after you develop a few games (don't try this on your first one), consider devoting some time to writing your own editing tools. Nothing will be more powerful or flexible than an editor dedicated to your engine's capabilities.
Advanced Object Management
Now that you have your level editing worked out, you can start to populate the game with lots of content, which inevitably means lots of actors. Through the use of activator tiles, you've dramatically reduced the total number of actors because now you don't need to bother creating actors until the player is near them. However, there can still be quite a few actors flying around when the action gets heavy. In addition, the weapons you added in the previous chapter are going to mean there are a lot more bullet-type actors floating around. Having this many actors introduces a few more challenges for you to solve.
The first problem you'll encounter is when you try to construct all these objects. It's a hopelessly slow process under J2ME (on pretty much all MIDs), so it will slow down the game overall. In the case of weapons fire, this will introduce a noticeable lag between when the player hits a key and when he sees a bullet appear.
The second issue relates to cleaning up all those objects when you've finished with them. The garbage collector process will be working overtime to clear out all those dead enemy and bullet objects. Because there can be literally hundreds created in a short time span, the garbage collector can drag the performance of the game down with it.
Finally, one of the most common errors encountered with J2ME games is the dreaded OutOfMemory exception. The number one reason this happens is excessive object construction, which in turn creates fragmentation in the available heap memory. Even if you're carefully managing your objects and memory, excessive object construction will cause memory issues. It won't happen overnight, but it will happen.
Unfortunately, if your game is constructing many objects, these issues simply do not go away.The only solution is the most obviousdon't construct objects. Take a look at how to avoid object construction using another method of managing your actors, known as object pooling.
Object Pooling
If you think about your problem with constructing objects, you'll see that the normal way of doing things is pretty silly. Object construction is an expensive exercise, yet every time the ships fire you're constructing a Bullet actor. The bullet then flies around for a while before being cleared (at some point) by the garbage collector. Your game repeats this process again and again.
Consider something else about the nature of weapons fire in your game. How many bullets would you say would be flying around at the height of the action? Something like 20 is probably about right; after that, things would be too confusing on the screen to notice moreand you'd likely be running in the opposite direction anyway.
The basic concept of using object pooling is to create a set (or pool) of objects which are then handed out upon request. Instead of constructing an object, you grab an existing one from the pool and then initialize it as though it were a new one. For example, to fire a bullet, you would get a Bullet object from the pool and then reset its position, speed, animation state, and other parameters to starting values. For all intents and purposes, the object would look and feel like a newly constructed one. When you're finished (the bullet has expired or hit something), you set it to be invisible and uncollidable and then tell the pool that the object is available again. The end result is that you only need to construct the objects for your pool once, rather than every time they're used, and there's never any need to remove them from memory, so the garbage collector is no problem.
Object pooling isn't all good news, though, and it's not suitable for all cases. For example, at this point you might be asking yourself what happens if the number of objects you need exceeds the number in the pool. The choices are to expand the pool to meet the requirement, constructing a new object along the way; to deny access to a new object, which has to be properly handled by your code; or to forcibly reuse an object that's already been handed out.
Take the example of the bullets in your world. If you were to create a pool of 20 bullets (quite a practical number, actually), what would you do in a case where a ship tries to fire a twenty-first bullet? You can use any of the options I've mentioned quite effectively for enemy weapons fire; however, if it's the player trying to fire, then having nothing come out the other end isn't really an option. This leaves you with either reusing another bullet object or constructing a new one. Before you decide which method to use, consider another problem.
Using the activator tile system in your game, the player will slowly encounter more and more enemies. The general idea is that the player will fly onto the screen, thus triggering the activators and causing ships and turrets to be grabbed from the pool and initialized. The player then destroys them (releasing them back to the pool) before continuing. However, there are situations in which the player might not bother (or need to) destroy the enemy. In a large level, you can quickly see how you'll end up with quite a few actors lying about, basically doing nothing until the level ends. Although there are other potential solutions to this problem, such as timing enemy actors out automatically, you'll still end up having to construct new actors because the pool empties. The easier method is to simply reuse the oldest object in the pool. This way, you'll avoid constructing new objects and force your game to stay within an acceptable limit.
All right, enough background. Take a look at how to code an object pooling system for Star Assault.
Linked Lists
The primary thing your object pooling system has to handle is storing references to all the objects in the pool, and then handing them out on request. One method to do this would be to store the references in a Vector object kept inside the object pool, and then just mark the object as it is used. To release the object, you just find it in the vector and mark it as available again.
Can you spot the problem with this? To find an available object, you need to traverse the entire vector! Consider your drawing, cycling, and collision detection code as well. You need to cycle any actors currently in use; however, this number typically is very small compared to the total number in the pool. Looking through the entire vector on every cycle is a horrible waste of time. More to the point, there's just no need to cycle every actor if most of them aren't currently in use.
Vectors are also a pretty slow method of accessing objects anyway. They're slow to traverse and even slower to update.
To get around this, think about what you really need to do to manage a basic object pool. Get a free object, release it back, and traverse the list. The key here is that you don't need to directly access any particular object in the list. The best storage method therefore is to use a linked list.
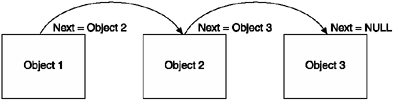
A linked list is like a chain of objects. The first object stores a reference to the second; the second stores a reference to the third; and so on. If you start at the first object (known as the head), you can traverse the list by looking at each object's reference to the next one. You can see this illustrated in Figure 11.11.
Figure 11.11. A linked list is a chain of linked-between objects.
To implement a simple linked list system for your Actor objects, you can simply add a next object reference to the class, along with methods to access and change it.
private Actor nextLinked;          // link to next actor if we're in a list

public final Actor getNextLinked()
{
   return nextLinked;
}
public final void setNextLinked(Actor nextLinked)
{
   this.nextLinked = nextLinked;
}
You can then add objects to the end of the list by setting the next-object values. For
example:
Actor actor1 = new Actor();
Actor actor2 = new Actor();
Actor actor3 = new Actor();

actor1.setNextLinked( actor2 );
actor2.setNextLinked( actor3 );
actor3.setNextLinked( null );
***end code***
To then traverse the list, you simply follow the next reference trail, starting from
the head of the list. For example:
***begin code***
Actor currentActor = actor1;
while(currentActor != null)
{
   System.out.print( currentActor.toString() + " " );
   currentActor = currentActor.getNextLinked();
}
Traversing a linked list is both very fast and simple.
You can also insert or remove an entry in a list by adjusting the references. For example, to insert an item between the second and third entries in your current example, you need to change item 2's next-object reference to point to the new object, and then point that object's next reference to item 3. For example:
Actor newActor = new Actor();
actor2.setNextLinked( newActor );
newActor.setNextLinked( actor3 );
To remove object newActor,you simply reverse the process by pointing actor2's next reference at actor3 (again) and setting newActor's next object reference to null. (See Figure 11.12.)
Figure 11.12. To remove an object from a linked list, you simply change the references to the object's prior and next links in the chain.
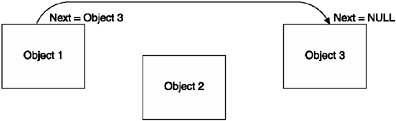
actor2.setNextLinked( actor3 );
newActor.setNextLinked( null );
There's a slight problem, though. Removing b from the list is much easier because you know the structure of the list. In a typical game environment, though, you're not going to know that actor2 references newActorall you'll have is newActor. To determine which item references newActor,you need to traverse the entire list!
The way around this is pretty easy: Have each object store not only a reference to the next object, but one to the previous object as well. You have two links to every object; hence, you call this a doubly linked list. To implement this, you just add a previous link to the Actor class.
private Actor prevLinked;                        // link to previous actor
public final Actor getPrevLinked()
{
   return prevLinked;
}
public final void setPrevLinked(Actor prevLinked)
{
   this.prevLinked = prevLinked;
}
Now when you adjust the list, you need to maintain both the next and previous references. For example:
Actor actor1 = new Actor();
Actor actor2 = new Actor();
Actor actor3 = new Actor();

actor1.setPrevLinked( null );
actor1.setNextLinked( actor2 );

actor2.setPrevLinked( actor1 );
actor2.setNextLinked( actor3 );

actor3.setPrevLinked( actor2 );
actor3.setNextLinked( null );
As a bonus, you can now traverse the list backward as well as forward.
Actor currentActor = actor3;
while(currentActor != null)
{
   System.out.print( currentActor.toString() + " " );
   currentActor = currentActor.getPrevLinked();
}
Mutually Exclusive Lists
All right, consider your object pooling system again. You now have a way of storing all the objects in the list. To create the object pool, you construct a bunch of objects you need and then hand them out upon request. This hand-out process also needs to keep track of which objects are currently in use. This is great, but in order to find a free object, you'll again have to traverse the entire list every time. If you have a reasonably large pool of objects, this is going to cost you in performance.
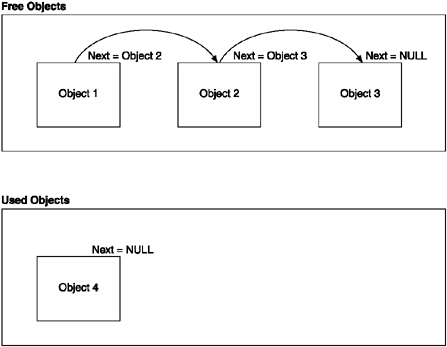
To get around this problem, you'll use two doubly linked lists as a mutually exclusive pair. Don't worry, it's simpler than it sounds. Basically, you'll have two linked listsone for free objects and one for used objects. When you grab an object off the free list, all you have to do is adjust the references so that it appears on the used list, and vice versa. (See Figure 11.13.)
Figure 11.13. In a mutually exclusive linked list pair no object can exist in more than one list at any point in time.
Using this system, it's now blindingly fast to gain access to a free or used object. Before you look at the code for this, I need to cover one more thing.
Tracking Object Use
There's one final thing your object pooling system needs. As I mentioned in the introduction, you might run out of objects. In other words, the pool might reach a point at which it has already handed out all it has available, but then another request comes in. At this point, you might have decided the best method is to forcibly reuse the object that has been in use the longestthe one least likely to still be on the screen. One minor issue, though: How do you keep track of which object has been out the most time?
To do this, you don't need to do any fancy timing or other tricks. When you first hand out an object, you consider that one the oldest. In the release code, you check to see whether the object returning to the pool is what you considered the oldest. If it is, you set the current first item on the list to be the oldest, and so on.
Take a look at the complete code to implement your actor pooling system.
The Actor Pool Class
To make all this work, let's wrap up the two doubly linked lists and the tracking of the oldest object in use into a complete class for actor pooling. Here's the final code:
public class ActorPool
{
The firstFree and lastFree members are used to track the head and tail of the free list. Similarly, the firstUsed and lastUsed is for the Actor currently "checked out" by the game. oldestUsed is a special variable used to track which is the oldest actor handed out, and the first object to be discarded if too many objects are in use at any one point in time.
private Actor firstFree;     // ref to the head of the free actor list
private Actor lastFree;
private Actor firstUsed;     // ref to the head of the used list (oldest)
private Actor oldestUsed;
private Actor lastUsed;
To construct an ActorPool you pass in an array of previously constructed objects (the pool won't construct them for you).
public ActorPool(Actor[] initObjects)
{
   if (initObjects == null || initObjects.length < 2)
      return;
   // initialize the linked list of free objects
If the caller passed in a list of objects, these are added to the list. The first object in the array is the firstFree item in the free list and the last item is the lastFree.
firstFree = initObjects[0];
lastFree = initObjects[initObjects.length - 1];
The constructor now loops through all the objects in the array and creates the doubly linked list chain.
for (int i = 0; i < initObjects.length; i++)
{
If this is not the last object in the list, you set this object's link to the next object to point to the next object in the array. Otherwise the next link is set to null making it the end of the list.
if (i < initObjects.length - 1)
   initObjects[i].setNextLinked(initObjects[i + 1]);
else
   initObjects[i].setNextLinked(null);
If this is not the first object, you set the link to the previous object to be the one prior to this one in the array. If it is first, the prior reference is set to null (start of the list).
       if (i > 0)
           initObjects[i].setPrevLinked(initObjects[i - 1]);
       else
           initObjects[i].setPrevLinked(null);
   }
}
This method returns the next free actor from the available object pool (the free list). It then marks that object as used by removing it (unlinking) from the free list and appending it onto the used list. If there are no available free actors, the oldest used actor is handed out instead.
public Actor getNextFree()
{
First you check if there are any actors in the free list. If firstFree is null that means there's none left.
if (firstFree != null)
{
Since you have a free actor available on the free list you need to now remove it from the free list and append it to the used list. To do this there are a series of cases you need to deal with to clean up the reference links.
If there is another actor after the first one on the free list (because the firstFree's reference to the next reference is not null) then you need to cancel the next actor's reference to the first one. In other words, the second actor on the free list has a reference back to the first actor. That reference needs to be set to null now since the first object is being removed from the list. (This might seem a little confusing at first, but try to keep up as this type of operation is repeated many times managing linked lists.)
// if there's an actor linked next after firstFree you set the second
// actor's reference back to the first to null.
if (firstFree.getNextLinked() != null)
   firstFree.getNextLinked().setPrevLinked(null);
Next you grab a reference to the next object on the free list (after the first one). Later you'll set this as the firstFree object. If the next reference is null (there is no next) that's okay, you'll just be setting firstFree to null, which indicates there are no more free objects.
Actor newFirstFree = firstFree.getNextLinked();
Now begins the process of adding the firstFree actor onto the used list. Since the firstFree actor is appending onto the end of the used list, the firstFree's next object reference is set to null.
// now link this actor onto the end of the used list
firstFree.setNextLinked(null);
if (lastUsed != null)
{
If there are any items on the used list already then lastUsed will not be null. In that case the firstFree actor is now the end of the list so you make adjustments by setting the lastUsed actor to have a next actor reference to the firstFree, and then set lastUsed to be the new end of the list (firstFree).
   firstFree.setPrevLinked(lastUsed);
   lastUsed.setNextLinked(firstFree);
}
lastUsed = firstFree;
Next the oldestUsed reference is updated to be firstFree if you didn't previously have a lastUsed reference (it was null). This only happens if there were no entries on the used list.
if (oldestUsed == null)
   oldestUsed = firstFree;
Likewise, if there is no first used actor (the head of the used list) then firstFree, the newly added used list object, is set to be the head of the used list.
if (firstUsed == null)
   firstUsed = firstFree;
Next you need to check for a case where you're handing out the last actor on the free list. If so the lastFree reference (the tail of the free list) is set to null.
// if we're giving out the last one then clear lastFree
if (lastFree == firstFree)
   lastFree = null;
Everything is now done for this case. The previously set newFirstFree,which is either the actor after firstFree (it's next) or null, in this case is the end of the free list. The firstFree actor, having now been properly placed into the used list is now returned to the caller.
   Actor r = firstFree;
   firstFree = newFirstFree;

   return r;
}
Next is the case where there are no free actors on the free list. In this case you need to return the actor that's been handed out the longest (oldestUsed).
Actor actorToReturn = oldestUsed;
if (oldestUsed == null)
{
If oldestUsed is null that means the entire used list has been traversed (by subsequent calls to this method). In that case you start again at the top of the used list.
   oldestUsed = firstUsed;
   actorToReturn = oldestUsed;
}
Now make the oldest reference the one after the current oldest (since you're about to hand the current oldest reference out as an object). Note that you don't need to worry about moving this from the free list to the used list (like you did above) because this object is already on the used list.
   oldestUsed = oldestUsed.getNextLinked();
   return actorToReturn;
}
When an actor is no longer required in the game, such as when a bullet's lifetime has expired, or the player destroys an enemy ship, you need to release it back from the used list into the available pool (the free list).
public void release(Actor actorToRelease)
{
If the actor you want to release has a link to a previous actor (not the first on the used list), then that reference is no longer valid. This reference is changed to point to the actorToRemove's next reference effectively removing the actorToRemove object from the link chain.
if (actorToRelease.getPrevLinked() != null)
   // join the break in the used list
   actorToRelease.getPrevLinked().setNextLinked(
            actorToRelease.getNextLinked());
The same thing is done to the actorToRemove's next linked actor. Its link back to actorToRemove is changed to reference the one before actorToRemove.
if (actorToRelease.getNextLinked() != null)
   actorToRelease.getNextLinked().setPrevLinked(
          actorToRelease.getPrevLinked());
Next you check to see if the actor being released back to the free pool was the current oldest one. If so, the oldest reference is changed to be the actorToRelease's next linked actor.
if (oldestUsed == actorToRelease)
    oldestUsed = actorToRelease.getNextLinked();
If the actorToRelease was the head or tail of the used list, then you need to change the reference to the next (or previous) actor appropriately.
if (firstUsed == actorToRelease)
    firstUsed = actorToRelease.getNextLinked();
if (lastUsed == actorToRelease)
    lastUsed = actorToRelease.getPrevLinked();
That takes care of removing the actor from the used list. Now you can add it onto the end of the free list. Since it's going to be placed on the end, the first step is to set the actorToRelease's next actor reference to be null.
actorToRelease.setNextLinked(null);
Next you have to handle the special case where the free list is currently empty in which case the actorToRelease becomes the one and only entry on the free list.
if (firstFree == null)
{
    firstFree = actorToRelease;
    actorToRelase.setPrevLinked(null);
}
Now you need to add the actorToRelease onto the end of the free list. If there is already an entry on the end of the list, you make actorToRelease equal to lastFree and set the existing lastFree's next reference to be the new end of the list (actorToRelease).
    if (lastFree != null)
    {
       actorToRelease.setPrevLinked(lastFree);
       lastFree.setNextLinked(actorToRelease);
    }
    else
        actorToRelease.setPrevLinked(null);

    lastFree = actorToRelease;
}
That's the basics of our actor pooling system out of the way. To see the complete class check the ActorPool.java file in the Chapter 11 source code directory on the CD. (For a working example of actor pooling, look at the complete Star Assault project also on the CD.)
Adapting the World to Pooling
Now that you have an object pooling system available, you need to modify the world to use it. The first major change is to how you construct the bullets and ships. Instead of creating them on the fly, you'll construct a bunch of them when the world class constructs. Because you want to treat ships and bullets a little differently, later on you'll create a pool for each type.
NOTE
Tip
Constructing the objects for your pool is a very slow process. To get around this delay, especially if you're dealing with more than 40 objects, you can have the pool construct objects on the fly as it needs them (up to a maximum). This also serves to keep the number of actors to exactly what's required, which in turn reduces overall memory use.
The only downside of this is the delay created when the pool constructs the objects, such as firing bullets. If you're dealing with a small number and you're reasonably sure of the maximum number of objects the player will encounter, then pre-create them.
If neither system is quite right for you, consider using a hybrid. Have the pool create a minimum starting number of objects, and then dynamically construct more as required (up to a maximum).
private ActorPool enemyShipPool;
private ActorPool bulletPool;
public World(int tilesWideArg, int tilesHighArg, int viewWidthArg,
                 int viewHeightArg){
   ...
   // construct the object's pools for ships and bullets
   Ship ships[] = new Ship[20];
   for (int i = 0; i < ships.length; i++)
      ships[i] = new Ship(this);
   enemyShipPool = new ActorPool(ships);
   Bullet bullets[] = new Bullet[20];
   for (int i = 0; i < bullets.length; i++)
      bullets[i] = new Bullet(this);
   bulletPool = new ActorPool(bullets);
}
To gain access to the pool, add some convenience methods. For example:
public final Bullet getBulletFromPool()
{
    return (Bullet)bulletPool.getNextFree();
}

public final void releaseBullet(Bullet b)
{
    bulletPool.release(b);
}

public final Ship getEnemyShipFromPool()
{
    return (Ship) enemyShipPool.getNextFree();
}

public final void releaseShip(Ship s)
{
    enemyShipPool.release(s);
}
The next change to the world is how you handle actor construction. Instead of creating a new object each time, you acquire an old one and clean it up by reinitializing (because you can't be sure where it's been). To handle this, the actors need to move much of their setup code out of the constructor and into an init method. To fire a bullet, for example, you grab it from the pool and then call the init method. (See the Star Assault project source code on the CD for the Ship and Bullet class for a complete example of the init method.)
int[] nosePos = Actor.getProjectedPos(getCenterX(), getCenterY(),
                                       getDirection(), 12);
// get a bullet from the pool and init it to what we want
Bullet newBullet = getWorld().getBulletFromPool();
newBullet.init(nosePos[0], nosePos[1], getDirection());
Next take a look at the updated drawing code based on pooling. The main change here is to traverse the linked list, rather than using a vector. Note also that you're only traversing the used actors list, not the free one, so only actors used in the game will be drawn. (The same also applies to the cycle and collision detection code.)
Actor ship = enemyShipPool.getFirstUsed();
while (ship != null)
{
    if (Tools.isPointInRect(ship.getX(), ship.getY(), viewX - TILE_WIDTH,
                              viewY - TILE_HEIGHT, tw * TILE_WIDTH,
                              th * TILE_HEIGHT))
       ship.render(g, viewX, viewY);
    ship = ship.getNextLinked();
}

Actor bullet = bulletPool.getFirstUsed();
while (bullet != null)
{
   if (Tools.isPointInRect(bullet.getX(), bullet.getY(), viewX - TILE_WIDTH,
                              viewY - TILE_HEIGHT, tw * TILE_WIDTH,
                              th * TILE_HEIGHT))
       bullet.render(g, viewX, viewY);
    bullet = bullet.getNextLinked();
}
Similarly, you need to modify collision detection and cycling to use the pools. Again, this all belongs in the World class.
protected final void cycle()
{
    if (lastCycleTime > 0)
    {
        long msSinceLastCycle = System.currentTimeMillis() - lastCycleTime;
The following code is the main change to the world's cycle method. Again, instead of looping through a vector, you traverse the linked list.
Actor a = enemyShipPool.getFirstUsed();
while (a != null)
{
    a.cycle(msSinceLastCycle);
    a = a.getNextLinked();
}
The same applies to the bullets list: traverse each link in the list until you get a null.
// now cycle all the bullets (we only cycle used ones)
Actor bullet = bulletPool.getFirstUsed();
while (bullet != null)
{
                bullet.cycle(msSinceLastCycle);
                bullet = bullet.getNextLinked();
            }
        }

    lastCycleTime = System.currentTimeMillis();
}
The collision detection code is again basically the same; you just add the linked list loop,
public final boolean checkCollision(Actor hitter, int x, int y, int w, int h)
{

    …

    // if this is the playerShip then we check if we hit another
    // enemy ship (we don't care if enemy ships hit each other)
    if (hitter == playerShip)
    {
        Actor a = enemyShipPool.getFirstUsed();
        while (a != null)
        {
            if (a.isCollidable && a.isCollidingWith(playerShip))
            {
                a.onCollision(playerShip);
                playerShip.onCollision(a);
                return true;
            }
            a = a.getNextLinked();
        }
    }

    return false;
}
The code I've presented so far is only an example of what's required for a complete game. Take a look at the complete Star Assault project on the CD to see how this can all come together in a game.